This post is being revised and updated. Please check back.
A Guide to Star Stitches in Patterns
All right. Here’s the thing: star stitches are beautiful, and also tricky sometimes. This is a solidly intermediate level stitch that requires from 5 to 12 steps to complete, depending on the stitch variation.
Most of us use patterns when crocheting this stitch, so most crocheters will encounter star stitch types that vary a little, or a lot. Toward the end of this post I use colored dots to give you a heads-up on some variations you might encounter.
This is still a “basic” start stitch how-to, though! The stitch variations complicate it, but you need to know about them because we’re all equally likely to encounter a variation any time we use a new star stitch crochet pattern.
Want to follow along with hook and yarn? With blue (or a dark color) yarn, chain 15, double crochet (dc) in the 4th chain (ch) from your hook and in each remaining ch: 11 dc; 12 dc if you count the 3 chs you skipped. Change to white (or a light color) yarn. Chain 3 and turn.

Basic Star Stitch How-to:
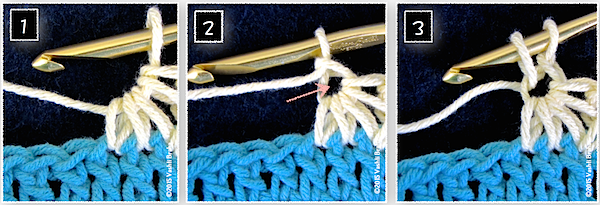
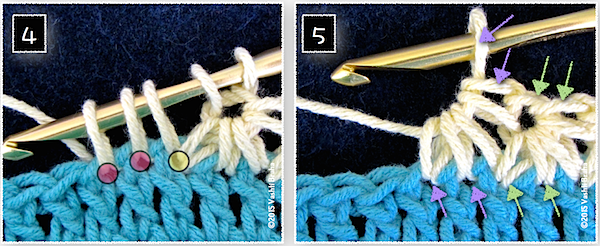
- Pull up a loop in the second white ch from your hook, in the top of the first blue dc, and in each of the next two blue dc. Yarn over (yo) and pull through all 5 loops on hook. Your stitches should look like image #1 above.
- Ch 1 to form the eye. This completes one star stitch. The arrow is pointing to the eye of the star.
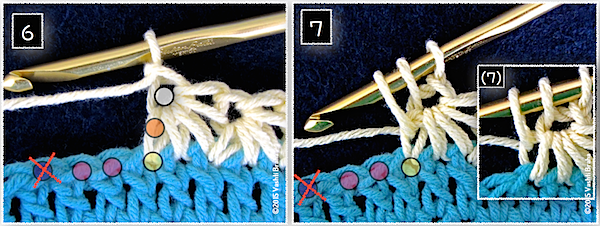
- To begin another star stitch, insert your crochet hook in that eye, yarn over, and pull up a loop.
Really Look At the Loops
In image #4, we see the two loops on the hook from image #3, plus three more loops. One of the loops was pulled up in the same blue dc as the completed star. I marked that with a yellow dot. Notice the two pink dots. Those are the two next blue dc of the row. I’ll come back to these dots later.

When you yarn over and pull the yarn through all 5 loops on your hook, you get image #5. Here’s what those arrows are all about: The two pairs of green arrows point out that the base of that completed star take up two blue dc; the top of that star counts as two stitches (the eye and what is called its top in most patterns). Each star counts as a two-stitch group.
The two lower purple arrows point out the same thing about this new star-in-progress: the base of it takes up only two new blue dc of the row.
The purple arrow pointing to the loop on the hook will become the star’s eye the minute we chain 1 to complete the star.
Common “Side of Star” Option

Image #6: More colored dots! The orange dot indicates the side of the star. The side of the star has a front loop and a back loop. In many star stitch patterns, you pull up a loop in the side of the star. Sometimes it doesn’t matter which loop, other times the front or the back loop is specified.
In image #7 you can see that a loop has been pulled up in the side of the star. In the smaller inset (7), the loop was pulled up in only the back loop of the side.
Loop Priorities
The two most important places to pull up loops while making star stitches are:
- the eye (the white dot in image #6), and
- one of the two new stitches of the row (the pink dot that’s furthest from the star).
All of the other loops you pull up between these two places are flexible and variable, meaning you can omit pulling up a loop in one, or opt to add a loop in one. You needn’t have five loops on your hook before completing a star stitch; for example, you can ignore the place indicated with the yellow dot, or the orange dot in image #6. Or include both.
You’ll likely develop a favorite way to make your star stitches. Most likely you can substitute the star you want in a pattern you’re using, but of course swatch to make sure. (Occasionally the stitch or row gauge will change slightly.)
It’s like picots: most experienced crocheters have their own favorite way to make a picot and freely use their own where they wish.
The blue dot with the red X signals an error (image #6 & 7). If you pull up a loop past the two pink dots, you’ll start decreasing. Your star will take up 3 stitches of the row, but still only give back only 2 stitches in its top loops. Does that make sense? And that is what my newsletter issue #73 is about.
(Note: There’s a star stitch out there that does take up 3 stitches of a row instead of 2. The stitch count is adjusted in the next row.)
Want more Star Stitches?
I’ve written four newsletters about star stitches over the years: Star Stitch Lace Pretties, Star Stitch the Tunisian Connection, Shaping Star Stitches, Foundation Star Stitch. Although I’ve created star stitch step outs for patterns and for classes, I thought I’d already blogged one for star stitches—like I have for Love Knots, basics of Foundation Stitches, and “camel crochet” (third loop of single crochet).
I hope this star stitch how-to comes in handy.
Star Stitch Patterns by Vashti Braha: Starlooper Mobius, Starpath Scarf, Q-Star Coverlet, and Starwirbel.

[…] “Crochet Star Stitch How-To, An All-purpose Guide“ […]
[…] and so I found some diagrams and a Youtube video to learn it from. Today I also found one other illustrative post explaining this stitch. So there should be enough different resources from where it is possible to […]