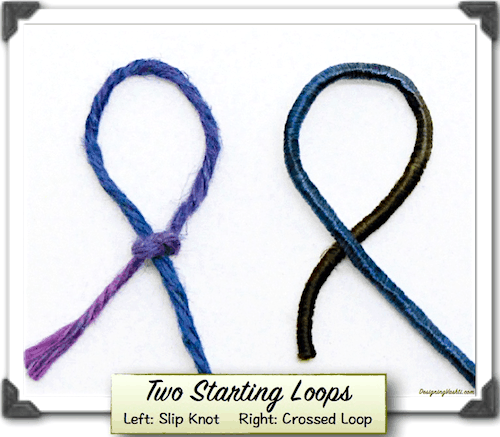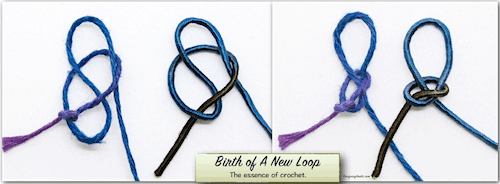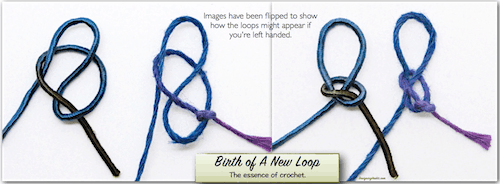
Classic Slip Knot (left), Simple Crossed Loop (right). Either one works. View larger.
How We Tend to Start
Let’s really look at how we start crocheting, and why we do it this way. Most of us learn to make a slip knot that gives you your first loop (called a slip loop) that you can tighten or loosen a bit to fit nicely over your crochet hook.
Later, some of us may alter the beginner’s slip knot, depending on the project. We may start crocheting in the round with a magic ring instead; or we might undo it later because that starting knot is too noticeable in the yarn we’re using. Some crocheters loosen it and crochet the last stitch of the row into it.
Over the next few posts I contrast the advantages of the standard slip knot with some alternatives.
Are you a beginner? Head over to this post first so that you’re clear on the best way to make the standard starting slip knot.
Many Crocheters Don’t Know:
- The simple slip knot we all learned as beginners is one of two types based on which yarn end tightens the slip loop. Which one we learned matters.
- The slip knot has a special relationship to the chain stitch. (That’s the first stitch you make after putting the slip loop on your crochet hook.)
- A slip knot is not required at all, but it’s helpful if you’re a beginner.
- There are slip knot variations that could be more useful for a particular project. (Explained in future posts.)
Start Crocheting With Just a Loop
The knot part is optional. Compare the two starting loops in the image above. Frankly, you don’t even need a crochet hook or a specific kind of yarn. Isn’t this a remarkable thing about crochet? Musicians need to tune their instrument first, and weavers need to string a loom first. Even knitters need to cast on more than one loop.
The minimum a crocheter needs to start crocheting is a yarn end looped around a hook (or your finger if finger crocheting).
About the “Yarn”
To start crocheting with a loop implies that you need a length of something that bends into a loop, right? If you’ve never, ever crocheted before, you don’t need a ball of yarn. Start crocheting right now with a piece of yarn-like cord that’s at least 36″ long (almost 1 meter). Ideally your cord or string is smooth, limp, and a light enough color to see well. Kind of thick—like craft yarn or cotton clothesline. Not stiff or wiry, neither bristly nor bumpy, and not as skinny as kite string. From here on I’ll refer to this as “yarn.”
The Crossed Loop
When a simple loop has crossed ends, you’ve already got a starting loop for crochet. See it in the photo above? When you think about it, all of crochet is based on loops with crossed ends.
The two crossed ends of a loop matter later. They have different roles in crochet. (For a future post.)
A quick and easy way to think of this Crossed Loop is to imagine that you’re writing a cursive letter “e”. You can do it in the air or “write” with the yarn on a table. See how the Crossed Loop in the photo above could be a cursive “e”?
From Crossed Loop to Slip Knot
If You’re Right-Handed
Pinch and hold a Crossed Loop with the fingers of your left hand where the yarn crosses itself. It now appears that two strands are hanging down from your hand. With your right hand, pick up the strand on the right that crosses in front of the other strand. Bring it around behind your loop. Bend it so that you can pull a new loop through the first loop, from behind. Leave it sort of loose, and set it down.

If You’re Left-Handed
Turn it around, pinch and hold it with the fingers of your right hand where the yarn crosses itself. Or, you could write a cursive “e” backwards. It now appears that two strands are hanging down from your hand. With your left hand, pick up the strand on the left that crosses in front of the other strand. (See below.) Bring it around behind your loop. Bend it so that you can pull a new loop through the first loop, from behind. Leave it sort of loose, and set it down.

Slip Knot: It’s a Chain Stitch!
You’re already crocheting. When you pulled the bent or “looped” strand through the initial loop, you finger-crocheted. You can see why some crocheters just leave the knot loose and crochet into it like it’s one of the foundation chains.
Key Takeaways
1. The Crossed Loop is one loop away from being a Slip Knot. Once you pull a new loop through a simple Crossed Loop, just tighten it to reveal that it’s actually a Slip Knot. (To tighten, pinch the loop and tug on the other strand to watch the knot tighten around the loop.) Notice that you can also adjust the loop size of the Slip Knot, and the knot part preserves the size of the loop.
2. The Slip Knot is the standard, official way to start crocheting, especially for beginners. This is probably because beginners also usually start crocheting with a crochet hook in their hand (as opposed to finger crocheting). The Slip Knot is great for this. You can tighten its loop around a crochet hook and wave it around like a magician. It stays put. Very handy!
3. Once you pull a loop through an initial Crossed Loop you’ve crocheted. A Crossed Loop is a fine start for any crocheting, when you’re ready for it. For finger crocheting, you wouldn’t need a Slip Knot to keep a loop on your finger because you can easily hold it. Just keep pulling a new loop through the next loop and you’re crocheting.
4. Chain stitches are self-knotting at the starting end. It’s another reason that a Slip Knot is not essential, it’s optional. Try it: undo the initial Slip Knot after you’ve crocheted some chains. Tug on that starting yarn end and the very next chain stitch automatically becomes the new starting knot. This is why some crocheters can leave the initial knot loose and undo it later.

thank you !!!!!!!!!!!
I am already looking forward to next week
As basic as this is it is a huge help to me while I try to figure out what I can do with all my left-over embroidery threads i.e. it encourages/inspires me to try again to figure out how to start chains with a minimum tail end. (No idea yet what to assemble them into once I have chains. My hope is that some time I’ll have a heureka for turning all my left overs into string curtains.
Hi Silke, great!
I wonder if you’ve seen a newsletter issue I did on the topic of getting the most out of limited lengths of yarn or thread: http://eepurl.com/LY_mP
[…] Note: The previous post was about the standard crochet starting knot. In crochet it’s known as the slip knot or slip loop. It’s a common, fast, useful, and easy knot. It’s often thought of as one knot, but in reality there are two versions of it. Among non-crocheters these two versions may go by other names, such as Simple Noose Knot, Overhand Knot with Draw Loop, and Slipped Overhand (or Thumb) Knot. I blogged about the two kinds of slip knots here. […]
[…] keep the “yarn” simple for now. Let’s keep using just a three feet long {91 cm} piece of yarn that I mentioned previously. A shorter piece like this avoids all kinds of non-beginner issues, like how to find a yarn end in […]
[…] role of the traditional beginner’s slip knot is to be: 1. Invisible (mostly, or completely). 2. Strong. 3. Permanent. 4. Simple and quick to […]