Posted on 2 Comments

Crochet Star Stitch How-To

This post is being revised and updated. Please check back.

A Guide to Star Stitches in Patterns

All right. Here’s the thing: star stitches are beautiful, and also tricky sometimes. This is a solidly intermediate level stitch that requires from 5 to 12 steps to complete, depending on the stitch variation.

Most of us use patterns when crocheting this stitch, so most crocheters will encounter star stitch types that vary a little, or a lot. Toward the end of this post I use colored dots to give you a heads-up on some variations you might encounter.

This is still a “basic” start stitch how-to, though! The stitch variations complicate it, but you need to know about them because we’re all equally likely to encounter a variation any time we use a new star stitch crochet pattern.

Want to follow along with hook and yarn? With blue (or a dark color) yarn, chain 15, double crochet (dc) in the 4th chain (ch) from your hook and in each remaining ch: 11 dc; 12 dc if you count the 3 chs you skipped. Change to white (or a light color) yarn. Chain 3 and turn.
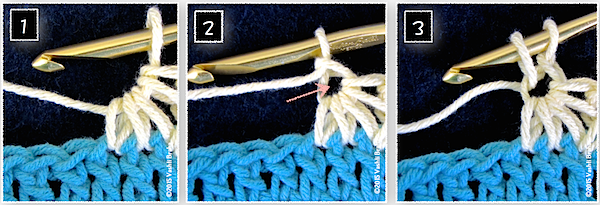
A star stitch is intricately linked with the stitch before it.
It may look like image #1 skipped some steps, but read the directions above and below.

Basic Star Stitch How-to:

  1. Pull up a loop in the second white ch from your hook, in the top of the first blue dc, and in each of the next two blue dc. Yarn over (yo) and pull through all 5 loops on hook. Your stitches should look like image #1 above.
  2. Ch 1 to form the eyeThis completes one star stitch. The arrow is pointing to the eye of the star.
  3. To begin another star stitch, insert your crochet hook in that eye, yarn over, and pull up a loop.

Really Look At the Loops

In image #4, we see the two loops on the hook from image #3, plus three more loops. One of the loops was pulled up in the same blue dc as the completed star. I marked that with a yellow dot. Notice the two pink dots. Those are the two next blue dc of the row. I’ll come back to these dots later.
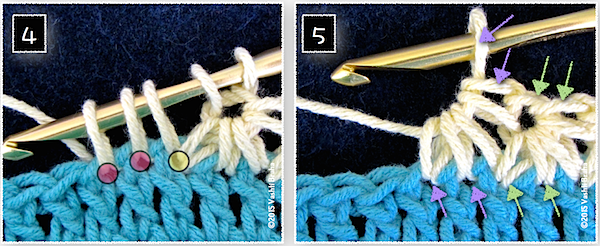
Two red dots (image #4) indicate the two next stitches of the row to crochet the new star stitch into. Image #5 identify what the stitch loops become in a completed star vs while a star in progress.
These two images illustrate how to avoid accidentally increasing or decreasing along the row.

When you yarn over and pull the yarn through all 5 loops on your hook, you get image #5. Here’s what those arrows are all about: The two pairs of green arrows point out that the base of that completed star take up two blue dc; the top of that star counts as two stitches (the eye and what is called its top in most patterns). Each star counts as a two-stitch group.

The two lower purple arrows point out the same thing about this new star-in-progress: the base of it takes up only two new blue dc of the row.

The purple arrow pointing to the loop on the hook will become the star’s eye the minute we chain 1 to complete the star.

Common “Side of Star” Option
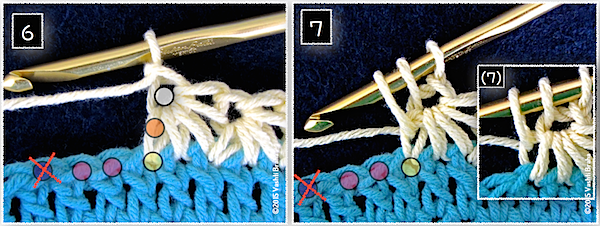
The side loops of the star are shown with an orange dot in image #6. Image #7 shows what it looks like when you pull up a loop in the side. Colored dots also indicated other places to pull up loops.
Pay attention to just the ORANGE dot for now.

Image #6: More colored dots! The orange dot indicates the side of the star. The side of the star has a front loop and a back loop. In many star stitch patterns, you pull up a loop in the side of the star. Sometimes it doesn’t matter which loop, other times the front or the back loop is specified.

In image #7 you can see that a loop has been pulled up in the side of the star. In the smaller inset (7), the loop was pulled up in only the back loop of the side.

Loop Priorities

The two most important places to pull up loops while making star stitches are:

  • the eye (the white dot in image #6), and
  • one of the two new stitches of the row (the pink dot that’s furthest from the star).

All of the other loops you pull up between these two places are flexible and variable, meaning you can omit pulling up a loop in one, or opt to add a loop in one. You needn’t have five loops on your hook before completing a star stitch; for example, you can ignore the place indicated with the yellow dot, or the orange dot in image #6. Or include both.

You’ll likely develop a favorite way to make your star stitches. Most likely you can substitute the star you want in a pattern you’re using, but of course swatch to make sure. (Occasionally the stitch or row gauge will change slightly.)

It’s like picots: most experienced crocheters have their own favorite way to make a picot and freely use their own where they wish.

The blue dot with the red X signals an error (image #6 & 7). If you pull up a loop past the two pink dots, you’ll start decreasing. Your star will take up 3 stitches of the row, but still only give back only 2 stitches in its top loops. Does that make sense? And that is what my newsletter issue #73 is about.

(Note: There’s a star stitch out there that does take up 3 stitches of a row instead of 2. The stitch count is adjusted in the next row.)

Want more Star Stitches?

I’ve written four newsletters about star stitches over the years: Star Stitch Lace Pretties, Star Stitch the Tunisian ConnectionShaping Star Stitches, Foundation Star Stitch. Although I’ve created star stitch step outs for patterns and for classes, I thought I’d already blogged one for star stitches—like I have for Love Knots, basics of Foundation Stitches, and “camel crochet” (third loop of single crochet).

I hope this star stitch how-to comes in handy.

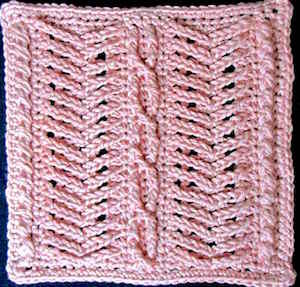
Star Stitch Patterns by Vashti Braha: Starlooper Mobius, Starpath Scarf, Q-Star Coverlet, and Starwirbel.

Posted on Leave a comment

Fascinating Crochet Texture: Chainmaille Cowl

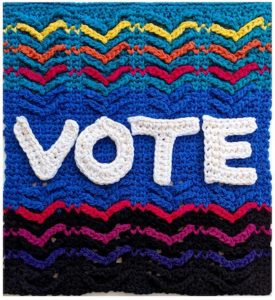
Bottom band of my Oct. 2018 VOTE crochet poster in our Lotus yarn.
This is the bottom band of a crochet poster. See the rest of it below. View full size.


Chainmaille is a downloadable DesigningVashti crochet pattern that was recently the focus of a CAL (Crochet Along) in northern Illinois. I thought you and the CAL participants would enjoy seeing a few variations I’ve swatched of this fascinating crochet texture.

The Structure of a Fascinating Crochet Fabric

Brighid's Willow afghan block contributed to a pattern booklet.
For the Brighid’s Willow afghan block I added a simple cable and contrasting edge columns.

Long chains cross over a filet surface in a herringbone-like pattern. It’s easier to see in striping colors, above and below.

It might also be easier to see in different types of yarn. The alpaca-tencel yarn adds to the scarf’s unique look. I used a cotton-acrylic blend for the afghan block at right. For the V-o-t-e poster I used two strands held together of a cotton-rayon blend.

It helps me to think of it as two layers of lace: each gives the other added dimension and visual depth. This makes it lighter to wear. It also drapes better than the solid layered and aran-style crochet fabrics.

How did Chainmaille come about?

I first saw a confusing photo of the stitch pattern in a book. I couldn’t make out what its texture was like, and the book offered no stitch diagram for it. (It turns out that a stitch diagram wouldn’t have helped me, I just had to crochet it first.) I now understand why the photo confused me: a layered crochet texture is hard to capture in a two-dimensional image. If light shows through the layers, that also adds mystery.

Tunisian crochet letters spell V-O-T-E against a rainbow aran crochet background.
This poster is approx. 12″ x 14″. Ten colors of our Lotus yarn, a cotton & rayon blend.

For me, the Chainmaille design is all about immersing oneself in a fascinating crochet fabric. There is no shaping or complicated assembly. Turning it into a cowl is simple enough: just seam it into a tube. Leave it unseamed for a neck warmer, or make it longer like I did to wear as a scarf. (Or gift to a man.)

A Chainmaille Crochet Along took place last month (July 2015) at Mosaic Yarn Studio in Mt. Prospect, Illinois. Have a look at this wrap-sized Chainmaille on display in the shop!

I met with a CAL participant, Susan Kenyon, at the Chain Link crochet conference in San Diego a few weeks ago. Susan and I seem to share the same kind of enjoyment of this fascinating crochet stitch pattern. It sounds like the CAL was fun.

Posted on 5 Comments

Crochet Cable Boot Cuff Pattern in Progress

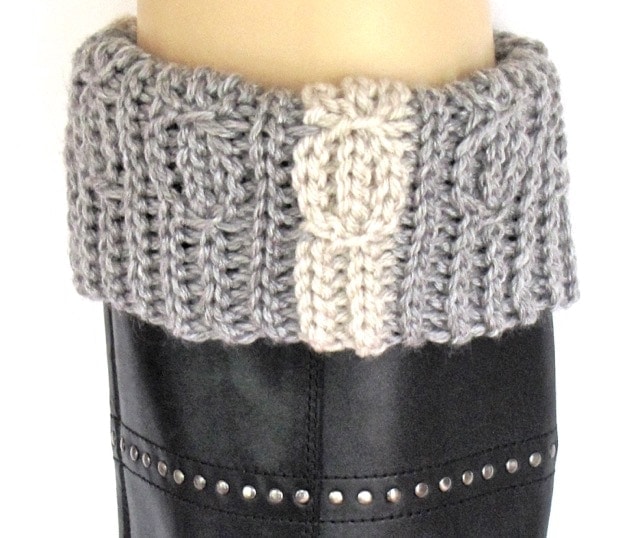
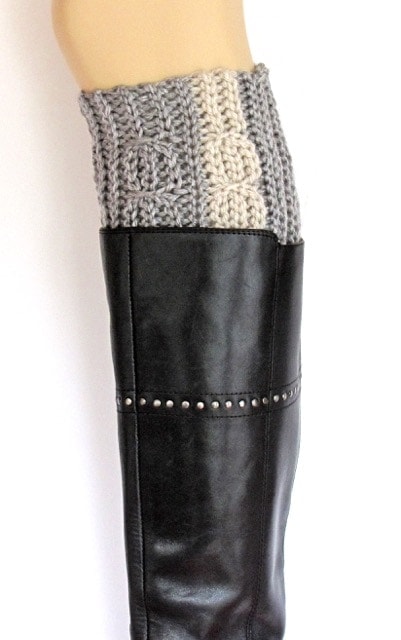
Lucky Twist Bootslip folded over boot top

New Crochet Cable Boot Cuff Pattern!

The Lucky Twist Boot Cuff in action!

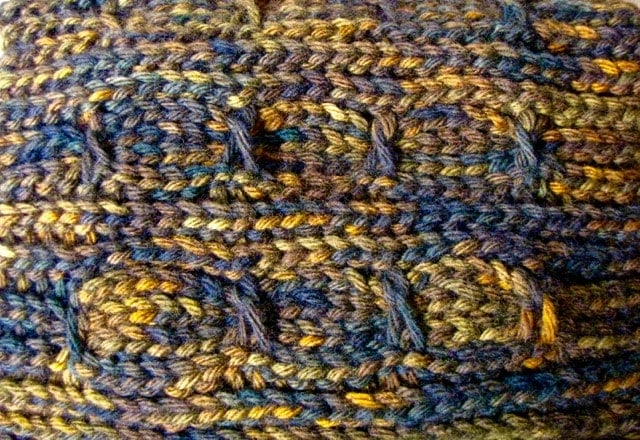
A few days ago I sent out issue #65 of my Crochet Inspirations newsletter: “Mock Cables in Slip Stitch Crochet.” I’m getting questions from readers about the dark brown crochet cable boot cuff photo (shown below). I crocheted that one in November 2012. The gray striped one is fresh off the hook.

The 2012 brown one is actually a prototype of the new crochet slip stitch Lucky Twist Mitts. It’s my newest downloadable pattern. A matching Lucky Twist crochet cable boot cuff pattern is almost finished.

Update: The boot cuff pattern is done!

The early brown Lucky Twist swatch helped me test lots of things. For example, how stretchy the limp five-ply merino yarn would be as a mitt (not enough). How much to taper the ribbed edge with short rows. I wondered about the speckled dyeing and overall dark brown tones.

As I mentioned in the newsletter, I had to dramatically brighten these photos just so that the cabled stitch textures would show up! So in real life I’d need to be standing in full sunshine to see the cabled surface texture in a dark brown yarn. The short amber color flecks are pretty, but they distract a bit from the cables.

First swatch of Lucky Twists Boot Cuffs pattern

This was also the first boot cuff prototype I’d ever crocheted. So I learned about:

  • Finished dimensions for a good crochet cable boot cuff pattern.
  • Stitch surface textures and yarn colors that show up well on that area of the body. (Lighter colors help.)
  • Should one or both edges of a boot cuff taper? (I prefer it tapered at one end only.)
  • How much yarn and time does it take to crochet boot cuffs? (About as long as crocheting just 14 inches of a scarf!)
  • Thickness of yarn and of stitches that fit inside the boot top. (Medium weight yarn seems fine for the boots I own.)
  • Folded, unfolded, scrunched. All ways are fun!

Crochet Boot Cuffs, 2012 and beyond

Back in 2012, crochet boot cuffs were such a new trend that they might have just been a one-season fad. That November I traveled to northern Illinois to teach a crochet retreat. It was a boot-wearing opportunity that I don’t often get here in Florida.

It was in Illinois that I started the brown crochet cable boot cuff pattern prototype. I’d be able to test how much warmth they add, and if I enjoy wearing them.

I discovered that crochet boot cuffs feel great! I wore them over dark tights with skirts. They stayed put. I enjoyed wearing them all ways – scrunched, folded over the boot, and unfolded. Down low into the boot or up near the knee. I did find that I wanted longer ones that covered more of my legs for warmth.

Posted on 3 Comments

Yarn Tests for a New Tunisian Crochet Filet Design

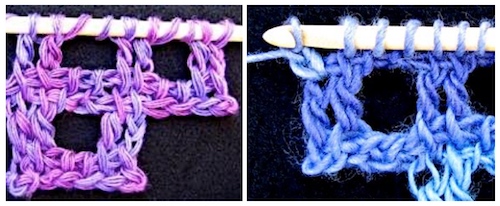
Yarn tests for stitch close up photos: color, plying, thickness, etc.
This blog post is third in a short series about the development of a new Tunisian crochet pattern pdf.

Two kinds of yarn tests.

I did two kinds of yarn tests for my new Tunisian crochet filet scarf (first blogged here).

#1. For Tutorial Close Ups

I’ve learned to take three things into account: the yarn’s plying, color, and thickness.

Yarn plies: I have the best luck with a single ply yarn. More than one ply can add a distracting texture, especially in close ups. I love the look and colors of the purple yarn in the first photo, but its plies worried me. (Each individual ply of this unusual 100% cashmere yarn is twisted, but there’s no twist holding them all together.)

The color(s): Yarn colors also matter for Tunisian crochet filet close ups. A single light color shows texture depth the best. I tend to avoid variegated yarns, with exceptions here and there.

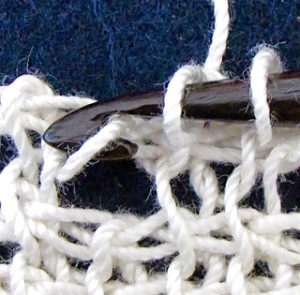
Extreme close up of a good quality crochet thread makes it look old and hairy.
Opera crochet thread is known for its polished, silky beauty. This extreme close up is not its best look.

Subtle color shifts can be a real plus with Tunisian crochet, though! I think this might be because it helps the eye distinguish forward pass loops from return pass loops. (Four Peaks images are good examples of this. Strong contrasting color shifts would normally be distracting. This isn’t the case for Four Peaks because of the small, fine-grained Tunisian simple stitches.)

Yarn weight: If I’m taking close up photos, and the camera has a good zoom lens, why does it matter how thin or thick the yarn is? How about using a crisp crochet thread? I discovered the hard way that I have better luck with a thick yarn. With thread and skinny yarns, the individual fibers show up too much in each loop. Even slight fuzziness is magnified. It makes the yarn or thread look old, shaggy, and worn out.

#2. A Winter Yarn

I fell in love with my first Tunisian crochet filet design in wool. That would be…Warm Aeroette! (Hence the “warm” part.) Traditional filet lace has mostly been a cotton thread kind of crochet project. Maybe that’s why I didn’t think of wool at first.

Until Aeroette I’d only had Tunisian crochet filet thoughts in bamboo (Ennis), silk (Aero), and cotton (dishcloth test in my Lotus yarn). It’s thanks to Warm Aeroette that I discovered how nice Four Peaks is is in a toasty aran-weight wool.

I needed to test with classic wool yarn to know Aeroette better. Could it work in something other than Aero’s fancy silk? Unlike Four Peaks, the wool yarn I used isn’t thick; it’s a fingering/sock weight fine-micron merino wool. (Fine-micron merino has a lot in common with cashmere.)

Thin fingering weight gives the tall Tunisian filet stitches a fine-grained texture. In a thick wool like the Mochi Plus (blue photo above), the filet-style lacy eyelets could look clunky or lumpy as a scarf. Would be a lovely afghan border though!

Posted on 1 Comment

New Tunisian Crochet Pattern PDF: What Takes So Long?

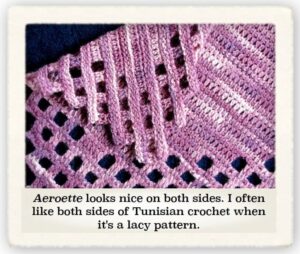
Both sides of Tunisian crochet often look nice if it's a lacier pattern.
           —-:—-
This blog post is the second part of a short series about the birth of a new crochet pattern pdf. The third is here.
Update: Downloadable PDF for the new Tunisian crochet Warm Aeroette Scarf is officially in the shop.


Behind the scenes of a new Tunisian crochet pattern

Pictured is draft #4 of Warm Aeroette Tunisian Crochet Scarf.

I’m a slow, deliberate pattern publisher.

Draft 4 of Warm Aeroette Tunisian Crochet Scarf. Almost done!

I love crocheting and so I think I chronically underestimate how much work it really is! Not only does a step almost always take longer than expected, I don’t always know when I need to recharge. (Each of these is a “step”: a stitch diagram, a photo tutorial, pattern testing, sizing, tech editing, etc.)

The Aeroette pattern has a longer title because this is a downloadable single pattern. The title needs to tell crocheters (and search engines) as much as possible in one line.

Three things can slow down new Tunisian crochet patterns for me:

Each design seems to bring unique issues!

For Aeroette, starting the scarf in one corner is a biggie. It merits a nice step by step photo tutorial. It’s a rare construction method for Tunisian crochet. Also, the best pattern wording evolves slowly sometimes. For Aeroette I’ve revised the wording of how and where the beginning and ending picots go a few times for clarity. Tunisian crochet pattern language has its own conventions.

Temptation of creative design details.

Doris is the same way and we laugh about this. Maybe optimize X, or add Y feature? What about this or that variation? I’d better swatch it in a very different yarn to make sure the design is not dependent on the yarn I’m using.

How educational it is. 

Aeroette started out originally as a practice project for a class on the Aero Tunisian Filet Lace Wrap. My goal with Aeroette is that it serve as a new Tunisian crochet skill building experience.

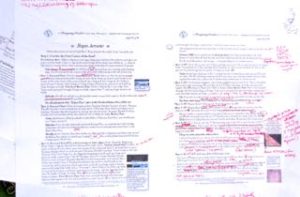
Sometimes I print a 2-to-a-page draft like you see here, to save paper. To save printer ink, the photos and captions are temporarily tiny. Most images are step-by-step tutorial photos that will all go on a back page. That will make printing them optional to save everyone’s printer ink.