Posted on 6 Comments

Crochet Mask Lanyard, A Hook-Only Free Pattern

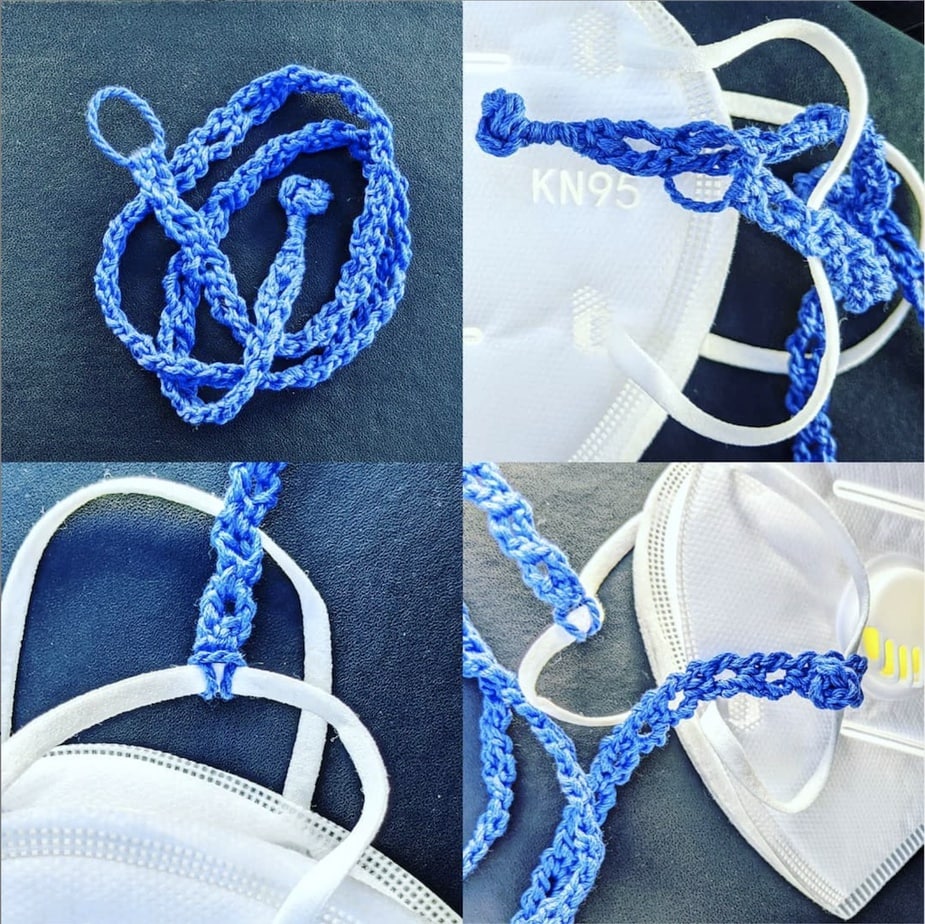
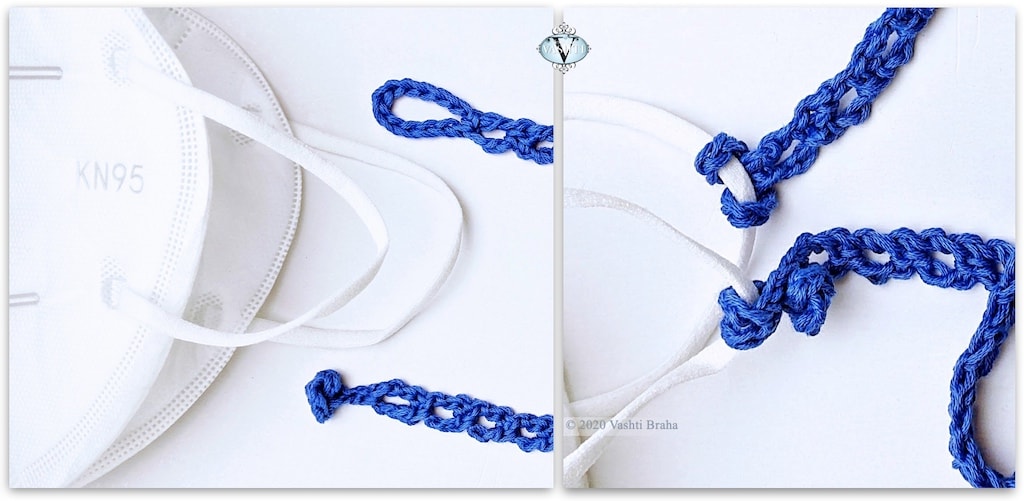
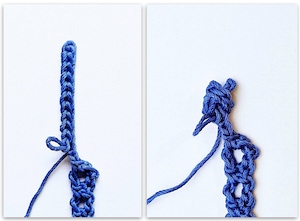
Crocheted fasteners before and after attaching to mask

This reversible crochet mask lanyard attaches to each ear loop of a face mask with 100% crocheted fasteners. No sewing on buttons or metal hardware!

Wear the lanyard around your neck. If you remove your mask, there it hangs, already found, like wearing reading glasses on a chain.

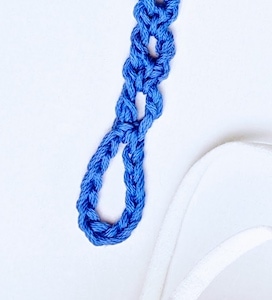
The chain loop end attaches with a lark’s head knot, explained below. The other end has a crocheted peg-like “shank” button. It loops around the other ear loop and buttons into a stitch space of the lanyard. This makes the length easy to adjust. The mask loops can be any thickness.

Three Favorite Things

My favorite thing about this pattern is that it’s “hook-only”: 100% crochet, even the fasteners.

My second-favorite thing is it’s a chance to use my new rosebud button idea for a project. It’s reminiscent of a Chinese frog closure, but like I say, no sewing! Also, unlike some button knots, zero chance of it coming unknotted.
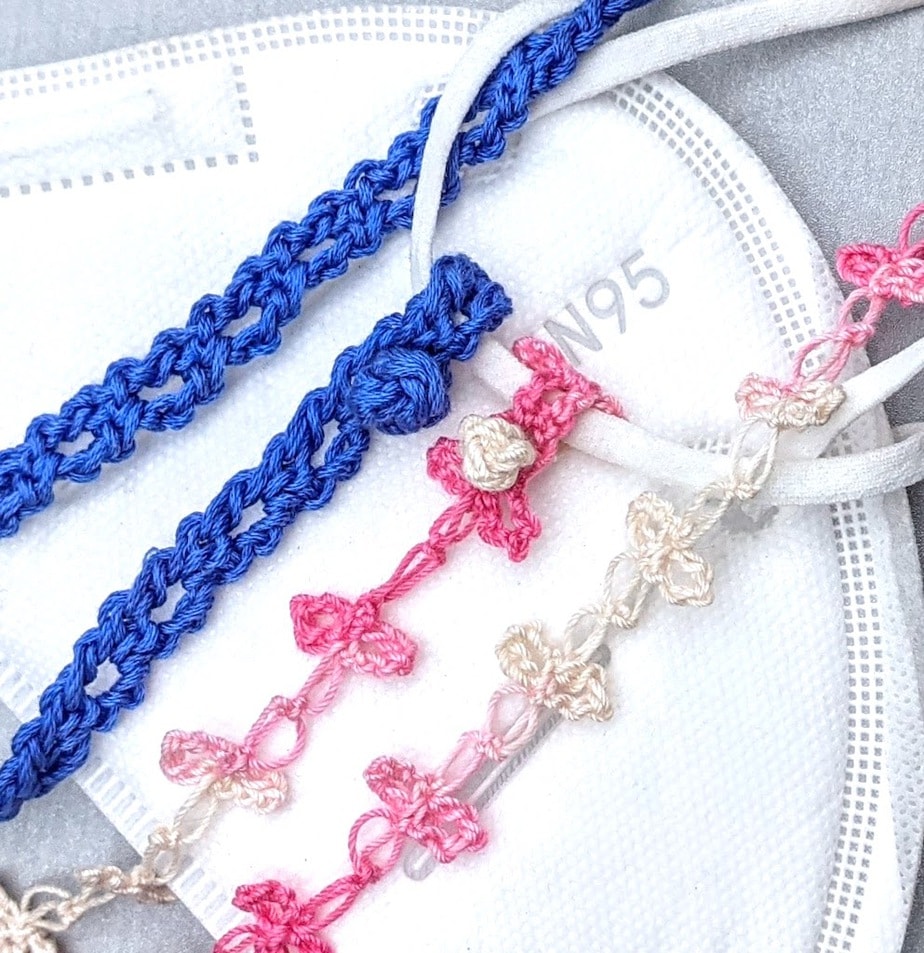
Crochet mask lanyard button in two thread sizes
Free crochet mask lanyard pattern below is for the blue one in sport weight cotton yarn.
The pink one in size 10 thread uses parts of the same pattern.

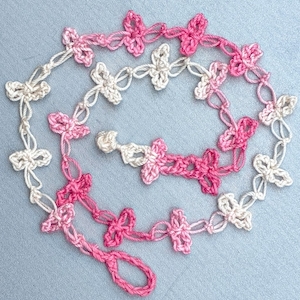
And, third, this pattern doubles as a versatile template. I’m already borrowing individual elements from it. The lacy pink love knot lanyard has the same chain-loop end, rosebud button end, and even a few repeats of the blue cord to serve as buttonholes (near the button end). If you have a cord pattern you like, add a few elements from this pattern to keep it hook-only.


Crochet Mask Lanyard Pattern

A PDF version of this pattern was emailed to members of the Crochet Guild of America (CGOA) as a part of a Holiday Shopping Guide, December 1, 2020.

Materials 

  • About ten yards of a sport weight (CYC Size #2 Fine Weight) yarn. Shown (in blue): Lang Fiorina (100% cotton, 135 yds / 125 m per 1.75 oz/50 g)
  • Size E / 3.5 mm hook
  • A stitch marker is recommended for the first few rows
  • Yarn needle

Abbreviations used

Pattern uses US terms. UK/AUS terms are in { }

  • ch = chain
  • dc = double crochet {UK: treble}
  • hdc = half double crochet {UK: half treble}
  • sc = single crochet {UK: double crochet}
  • sl st = slip stitch
  • st = stitch
  • yo = yarn over {UK: yarn over hook}

Gauge 

8 pattern repeats (row pairs) = 4″ {10 cm}. Exact gauge is not necessary for this pattern to work.

Size

21 inches {53.34 cm} long. Length is determined by the number of pattern repeats so it’s easy to choose a different finished length.

Pattern Notes

  • Pattern begins at the fastening loop and ends at the other end with the button. The strap between these two ends has a two-row repeat: it’s a long narrow column of just one stitch per row.
  • To begin each new row, turn your work clockwise. (If you’re crocheting left handed, turn the other way.) The yarn will end up in back of the hook and turning chains instead of in front of them.

Instructions

Time needed: approximately 30 minutes


Chain 12. Hdc in 12th ch from crochet hook to form a ring.
This is the fastening loop.

  1. Ch 3, dc in the same ch as the hdc.

    Simple chain loop lanyard fastener close up

  2. Ch 1, turn, place marker in bump of ch and in a top loop of dc, sc in space between dc and ch-3.

  3. Ch 3, turn. Dc in bump of turning ch-1 and back loop of dc (the marked loops). 

  4. Ch 1, turn, move marker (until you can identify the loops to crochet into), sc in space between dc and ch-3.

  5. Repeat steps 3 & 4: 38 times or until it’s the length you prefer.

    Do not fasten off.

  6. Rosebud Button

    Crochet all stitches tightly. Ch 13, sl st in the front loop of the 2nd ch from crochet hook, sl st in the front loop of each of next 10 chs. Leave last ch unworked to form the “shank” at the button’s base. Remove crochet hook from loop for the next step. Place marker in loop to secure.
    Tie the strip of 11 sl sts into a simple overhand knot so that the tip of the sl st strip peeks out. Ignore how it looks for the moment. Replace hook in loop and in two or three strands of the sl st tip, and tightly sl st around the unworked ch-1 of shank. (Knot will bend over.) Sl st in same ch, sl st in nearest next stitch, fasten off, and weave in ends.
    Tug on sections of the button knot to even it out; plump it up to make it cute. The goal is to center the shank under a mushroom cap shape. Spritz with water to set it.Crochet Rosebud Button steps 1 & 2 of 4 © Vashti Braha 2020
  7. Attach to face mask

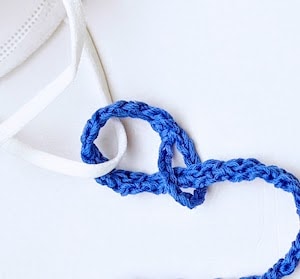
    Slide loop end under an ear loop of the mask. Feed the button end through the loop end and pull the full length of the lanyard through so that the loop wraps around the ear loop tightly with a lark’s head knot.
    Slide the button under the other ear loop of mask. Fold button over and press it through one of the nearby spaces of a dc row. (Reverse these steps to release lanyard from mask.)
    If the length you made doesn’t fit over your head, attach the button end after you’ve placed it around your neck.How to attach crochet loop to mask ear loop
  8. Variation I

    Wrap the fastening loop with the starting yarn end, and wrap the shank of the button with the other yarn end when you’re about to weave in the ends. It’s a nice look. I did this for the button shank of this prototype.Crochet mask lanyard prototype shows a wrapped fastening loop and button shank.

  9. Variation II

    Use your own favorite crochet cord pattern and incorporate sections from this pattern. Here’s how the complete pink love knot example looks:Crochet mask chain of lacy pink love knots and crocheted fasteners.


FAQ About Crochet Mask Lanyards

Why crochet a face mask lanyard? Is it better to crochet one?

Crocheting a lanyard is easy and fast, especially when you can also crochet the fasteners. Crochet makes a strong and durable lanyard with very little yarn (about ten yards).

Are crocheted lanyards washable and comfortable to wear?

Yes: use a soft, washable yarn. It’s comfortable and almost weightless. I forget that I’m wearing it sometimes.

How much yarn do I need to crochet a mask lanyard?

The pretty blue one shown here required only ten yards of a sport weight cotton yarn, and a size E (3.5 mm) crochet hook. Even the lanyard clips are crocheted!

What’s the difference between a mask holder, mask extender, mask chain, and mask lanyard?

“Mask holder” and “mask extender” usually refer to a small strip that has a button at each end. Wear it to eliminate pressure or irritation behind the ears. It shows at the back of the head where the ear loops of the mask hook around the buttons instead of the ears. Another term is “ear saver”.
“Mask chains” and “mask lanyards” drape around the neck like necklaces. It’s the same idea as wearing a badge holder, or a chain for reading glasses.

How long does it take to crochet mask lanyards?

The simplest one of all—just crochet chain stitches—would take 5-10 minutes. The fancier one shown here took 30 minutes.

Do I have to sew buttons or metal clips onto a crocheted mask lanyard?

No. It’s possible to crochet the whole lanyard, even the fasteners! That’s what it means when a crochet project is “hook-only”.
Posted on 1 Comment

Starry Crochet for Wire Mesh Panel Decor

Crochet DIY for Wire Mesh Panel Decor!

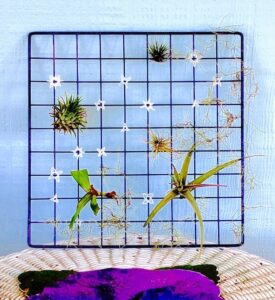
I have a fun summer crochet project to share. I’ve been bitten by the DIY wire mesh panel decor trend and have made several styles. Today’s focus is a cosmic one: wire mesh panel as Starry Firmament.

Unique crochet stars for wire mesh panel decor
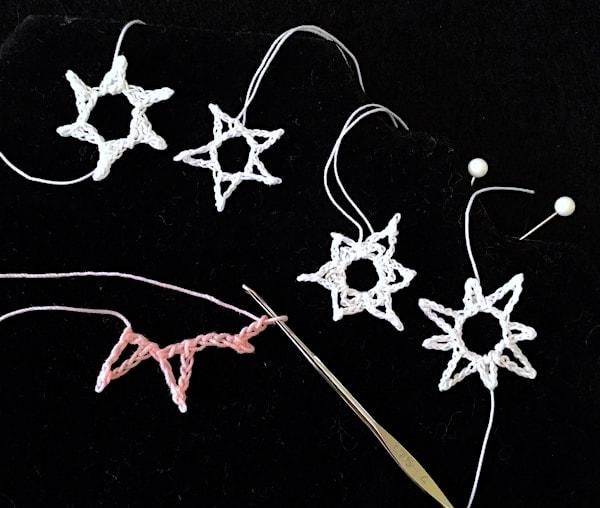
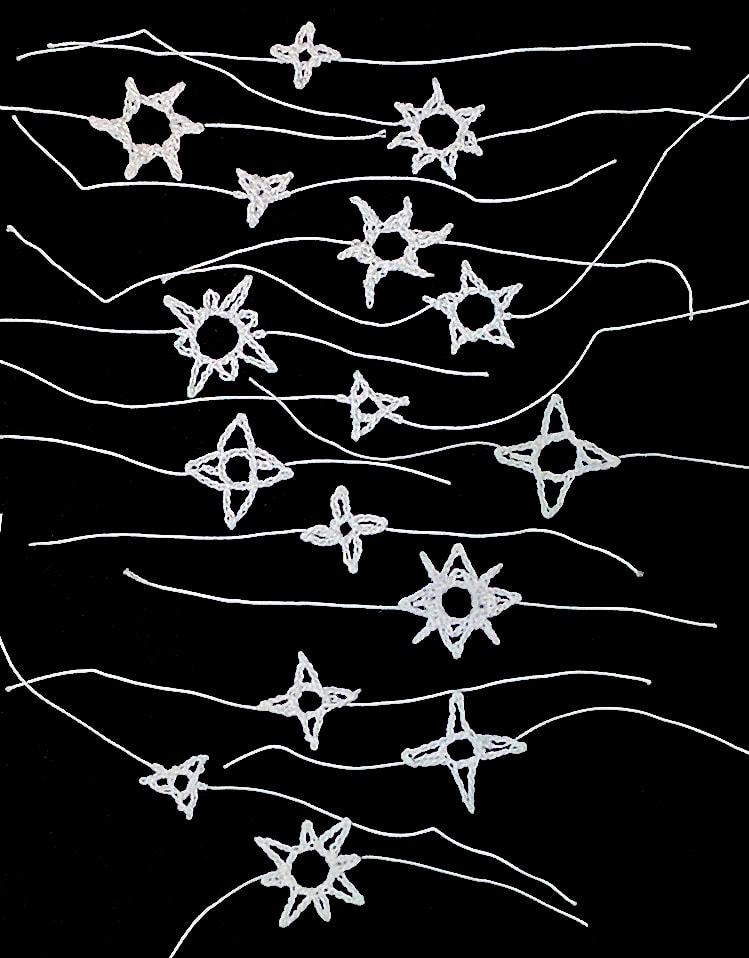
Half of these were made with the pattern below, or a simple variation of it (described in the pattern).

Shown above is a cosmic condominium for air plants, but it could just as easily be a photo memo board. Or see below for other decor ideas.

There’s a free crochet pattern for the stars below.

Wire mesh panels are not hard to come by at all. Not only are they easy to find, they’re a bargain: just a dollar or two for strong, durable, and very serviceable 14-inch {35.5 cm} square panels. In fact, they’re so low-priced and common that it costs more to ship them across the US than it does to buy new ones locally. Hence my problem.

I have stacks of them because they’re great for building show booths, like I’ve done at crochet conferences over the years. It only makes sense to keep them if I do show booths I can drive to. Some panels are getting a bit of surface rust here in the subtropics.

Most people would throw the panels away. I know because that’s the advice I’ve gotten. There’s a creative DIY decorating trend going on with wire mesh panels though! Why spend $15-$50 on one when you could spray paint it rose gold yourself? Or do like I did: add a constellation of stars?

Some wire mesh panel decor ideas I’ve found are: hang them over a desk to organize photos, memos, etc; string fairy lights into them and add a small shelf. Especially inspiring: sprinkle on some quirky air plants.

Crochet Pattern: Basic Firmament Star

I’ve used only the most elementary crochet stitches for this pattern. A new crocheter might struggle with it, though, if s/he isn’t accustomed to using very fine crochet thread yet.

Materials

I used a size #20 white crochet thread by DMC call Cordonnet Special. It’s on the stiff side because it has many plies that are highly twisted. This makes for crisp-looking stars that will hold their shape. If you can’t find it, Handy Hands Tatting make a cordonnet type called Lizbeth in many different sizes and colors. If you don’t have size #20, the next thinner/finer size, #30, seems to give me very similar results.

It doesn’t matter what steel crochet hook size you use. Choose the smallest size that still makes crocheting with the thread easy. For me it’s a size 1.25 mm in the brand I had at hand. For the thinner size #30 thread I needed a slightly smaller hook size. Psst, you might like what I wrote about steel crochet hook sizes!

Three thread sizes are represented here: the pink one in progress is size #10, and the two middle ones are the thinnest: size #30. The star on the far left and far right: size #20.

Pattern

Leave the thread ends 4 inches {10 cm} long.

Make a slip knot and place the loop on your crochet hook. Chain 5, slip stitch in the second chain from your hook to make a tiny picot, chain 2 or 3, double crochet in the first chain of this spoke (the chain that’s nearest the slip knot). In the photo above, two pink spokes have been completed. *Chain 5, slip stitch in the second chain from your hook, chain 2 or 3, double crochet in the first chain of this spoke.* Repeat from * to * one or more times, depending on how many spokes you wish the star to have. Then slip stitch in the first stitch nearest the slip knot. Fasten off.

To vary the appearance:

  • Use half double crochets in place of the double crochets.
  • Add another stitch (a slip stitch, or single crochet) in the next chain after the picot, then chain one less before finishing the spoke with a tall stitch.
  • Begin each spoke with 4 looser chains instead of 5 (then chain one less before finishing the spoke with a tall stitch). Or begin with more than 5 chains and add more chains after the picot.

To finish and use the star:

  1. With a fine needle, weave one of the ends to the opposite edge of the star. Notice in the photo above that the ends of the two outermost white stars are opposite each other while the middle two have ends coming from the same place of the star.
  2. Wet it, stretch, pinch the spokes, and allow to dry perfectly flat and as symmetrical as you can get it. Meanwhile prepare your wire mesh panel by sanding off rust if necessary, spraying with a primer and then a dark glossy blue. I then sprayed on a fine multicolored glitter too.)
  3. Tie each star onto a place where the grid wires intersect. Tie one direction and then the other tightly around the intersection. This keeps them stationary. Snip the ends close to the final knot on the back of the panel and apply a drop of glue to the knot.
  4. My one additional step was to spray a light coat of clear acrylic sealer onto the back of the panel. Mod Podge makes one that did not cause the stars to yellow, unlike a few other sealers I tested. Have a toothpick handy to smooth down the sealer where it shows on the stars (it will look hairy or like tiny dew drops in places). This helps keep them crisply starry.
  5. Now add air plants, or use those tiny wood clothespins to clip photos and things to it.

See more images of the Starry Firmament wire mesh panel decor at its Ravelry project page.

Posted on 2 Comments

A Crochet Class in a Vest

The first corner of a hanky-hem love knot mesh vest in spring sunshine.
View full size image.

Want to see what I’m working on? This will be Flowerfall, a hanky-hem waterfall vest that I can wear when I teach 21st Century Love Knot Adventures this July in Portland, Oregon. I’m now two-thirds done.

Several Class Skills in a Vest

I’m designing Flowerfall to be a visual aid for several skill levels. I’ll also be adding the pattern to my shop for those who can’t attend the class.

Love Knot Beginner Skills

Another view of this diamond mesh would be the love knot sections of Lovelace. (It’s so iconic that the stitch is synonymous with the mesh in some how-to sources from the 1800’s to now.) Then, compare it with the Electra Wrap’s triangular love knot mesh.

For Students With a Bit of Experience

  • How to increase and decrease this mesh, and add picots as one way to finish the edges as you go.
  • The when, why, and the how-to: making love knots with slip stitches instead of single crochets (UK: dc).
  • My new favorite way to keep love knots from loosening later if the yarn is slippery.
  • A new way to crochet into love knots that I recommend for a project like this one.

For Those With More Experience

  • How to do corner to corner (C-2-C) love knot mesh in which you start in one corner and end in the opposite one.
  • How to sprinkle in other stitches with the classic love knot mesh to create lacy new stitch patterns!

Multi-Purpose Visual Aids = Ideal

This is my seventh year shipping teaching aids across the USA for crochet classes. I teach four to six different topics per event. Visual aids are everything! I always end up with a lot of crochet items to ship.

In the past few years I’ve started designing class items that combine several points of information in one. Not only do I cut down on the shipping this way, it’s a fun design challenge. I also love coming up with how a design for one class topic can double or triple as a visual aid for other topics I’m also teaching.

Self-Healing Stitch Alert

An example of this is I’ll be adding armholes to Flowerfall by cutting them open. Know what this means? It’ll also be a great visual aid for the Self Healing Stitches and How to Cut Them class! I might even bring it to the Tunisian on the Diagonal class if I don’t make a Tunisian one in time. Even though Flowerfall isn’t Tunisian, it’s an example of an easy shape to crochet from corner to corner in any stitch. (Flowerfall is even relevant to my slip stitch classes. It’s the first design I’ve done with slip stitch love knots.)

I’ll post again about this design so that you can see its modified diamond shape, how its armholes happen, and different ways to wear it. I’m smitten ? . Flowerfall’s Flickr album has three photos so far.

Posted on Leave a comment

Hand Chaining, a Straddler of Worlds

Hand chaining is when you crochet chain stitches with your hands and fingers instead of with a crochet hook. It’s also called finger crocheting. Hand chaining is so easy! Kindergartners do it. It’s a popular way to crochet trendy necklace-scarves with fancy yarns in under 30 minutes.

Trendy Hand Chaining Trendy Necklace Scarves long
Love it! “Poseidon Scarf Kit” at loopymango.com

You might have learned hand chaining as a child in kindergarten, at camp, or from a babysitter. It’s often taught as a stand alone activity rather than as an introduction to the larger world of crochet, knot tying, or knitting. I don’t even remember how I learned it. I just already knew how by the time I officially learned how to crochet with a hook at the age of nine.

For the next blog post I viewed several videos that show how to do hand chaining as a crocheter, a knitter, or a knot tyer. It left me with a new way of thinking about the origins of crochet.

Not Just for Beginners

Hand chaining is so fun to do that even experienced crocheters are at risk of getting “hooked” (if they remember to try it). It’s often forgotten as a crochet method even though it offers nuanced control over unusual yarn combinations for edgy, artsy effects. I get new, deeper insights into simple stitches when I hand crochet them, thanks to the intimate, tactile experience of crocheting.

Hand chaining a special subset of crochet that merits a closer look than it usually gets.

Hand Chaining vs. Hook Chaining

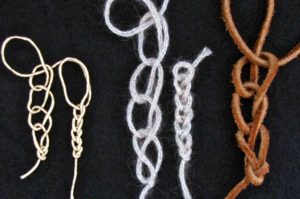
Hand chaining (finger crocheting) loosely and tightly in 3 different fibers: sain cord, wool tube yarn, suede lacing.
Hand Chaining loosely vs. tightly. L to R: Satin cord, wool knit tube yarn, suede lacing.

Hand chaining cuts out the middleman (er, the crochet hook). This is perfect for crochet beginners! Learning to use a new tool with yarn loops for the first time takes the focus off of the stitch. Shouldn’t getting to know a stitch be the most important part of learning to crochet? Especially when that stitch—the chain stitch— is the foundational core of all crochet? I think so.

The crochet hook is the one central tool of crochet. When researchers encounter an unfamiliar fabric, they consider the tool used to create it. An item made with a crochet hook is usually classified as crocheted. I wonder how hand-chained items are classified.

Earliest Crochet Roots?

Hand chaining straddles two worlds: Crochet, and Knot Tying. The same basic crochet stitches can be made with hand chaining as with a crochet hook: Chain Stitch, Slip Stitch, and Single Crochet. (Other stitches are more of a struggle without a hook.) The fingers or the whole hand simply take the place of the crochet hook. Perhaps hand chaining came first, at least in some early cultures, and the crochet hook evolved to substitute for hands and fingers.

Among knot tying aficionados, hand chaining is called many other things: Drummer Boy’s Sinnet, Zipper Sinnet, Monkey Braid, Sea Chains, Chain Knots, Caterpillar Sinnet, and Daisy Chains. Boys and men may have encountered hand chaining via knot tying. Some practical uses among knot tyers include:

  1. To quickly neaten long lengths of rope or electrical wire for storage. (To this linked video, a commenter added, “This is used by riggers [who set up e.g. the ceiling on stages for rock concerts] as a cool way of shortening and storing several long ropes in a hurry.”)
  2. Launder climbing rope so that it can be easily machine washed, allowed to dry, and then “unzipped” for use afterwards.
  3. Watch James Dean absent-mindedly finger crochet with a rope while doing an interview in 1955! (Video starts as the camera is about to pan down to the rope he’s holding.)

-:———:-

Even if you already know how to crochet, I think Chain Stitch In Depth and other posts about crochet basics offer some new ways to think about our most basic and important crochet stitch of all, the Chain Stitch.

Updated November 2018. It’s part of an experimental blog post series: Vashti’s How to Crochet Book. Next post: Hand Chaining How-To’s.
Posted on 2 Comments

DesigningVashti Lotus Yarn: Magazine Gallery

Two new crochet top patterns by Doris Chan and two by Jennifer Ryan (an Irish knot wrap and a multicolored tote)

Our Yarn in the Magazines!

Crochet pattern magazines have been awesome for DesigningVashti Lotus Yarn. It’s like getting a surprise Valentine each time I hear that a designer or magazine editor has chosen to use it for a design.

Patterns for the designs you see above are published in the following crochet magazines, listed as shown from left to right:

  1. Interweave Crochet, Spring 2015: Sapphire Sweater. Designer: Doris Chan.
  2. Crochet! Magazine, Spring 2015: Harmony Bamboo Tank. Designer Doris Chan.
  3. Crochet! Magazine, Summer 2015: Féileacán Shawl. Designer Jennifer E. Ryan.
  4. Crochet! Magazine, Spring 2015: Fabric Fusion Tote. Designer Jennifer E. Ryan.

It’s a slow and steady roll out, and that’s good. Here’s why. Crochet designers started requesting DesigningVashti Lotus yarn to swatch with in 2014. A designer has two professional directions to go with a swatch:

1) Create a design proposal with it.

Designers submit their proposals when a magazine editor sends out a call for designs. These calls go out several months in advance of a magazine issue’s publication, especially the print magazines. For example, a call for winter designs might go out in the spring. A digital-only magazine can sometimes have faster production times than print magazines, but speed isn’t everything. There’s nothing like holding a print magazine in your hands or rolling it up in your tote and dashing out the door. I leisurely page through mine several times and save them all.

2) Self publish the design online as a downloadable pattern.

This can be in Ravelry or on one’s own site, for example. Doris Chan and I both tried to get indie (self published) patterns out quickly for our Lotus yarn this way. It’s often the fastest route, depending on the design and the designer.

DesigningVashti Lotus Patterns & Project Galleries

As a designer and also as a yarn company owner, I think a combination of digital and print magazine designs, and quick pattern downloads, is perfect support for a young yarn.

A Young Yarn Design-Wise

As I’ve journaled over at another blog, our yarn celebrated its first birthday a few months ago. I have to remind myself that it’s still a new one, considering that many of the those first months of its life happen behind the scenes. Designs for it are being swatched, submitted, written and edited, photo styled, etc.

Shortening the Lead Time

Yarn companies can sometimes shorten this lead time. The yarn company might be able to get a small advance shipment of a new yarn. Then they get it into the hands of a few designers as soon as possible. This way, the designers can be:

  • Answering calls for designs with swatches of it
  • Crocheting up complete projects for photo styling, or for industry trade show displays.

I experienced this as a designer a few times back when I worked primarily with magazines and yarn companies. It was exciting. One brand-new yarn didn’t even have a label yet!  The color was whatever the company could get a hold of quickly. Sometimes it was also a little confusing. For example, the design was accepted—great!—but the yarn took longer to ship from the mill than expected. The production deadlines had to be readjusted and squeezed in. Occasionally a design contract had to be deferred, or canceled, or a different yarn substituted at the last minute.

After these experiences, when I hear from magazine staff that they’ve chosen to include our yarn in a future issue, I immediately ship it to the lucky designer!