Posted on Leave a comment

Rosebud Argyle Color Pooling Stitch

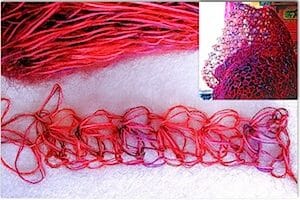
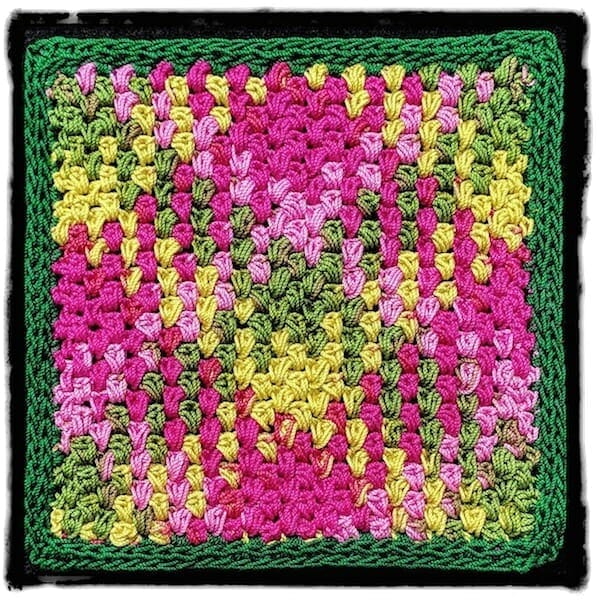
Moss Stitch (linen, granite, seed stitch) modified for longer crochet thread color sequences.
Size 10 variegated Lizbeth cotton thread, color #10-104 Spring Garden. I created a “Color Eater” variation of the moss stitch for it. Row by row pattern below.
View hi-res size.


Have you seen the planned color pooling crocheters are doing to get a cool argyle or plaid look with variegated afghan yarns? You can use lots of different stitches for this, but the height of single crochets (sc, or in UK/AUS: dc) is great, especially with moss stitch (a.k.a. linen, granite, seed stitch).

Planned Pooling with Cotton Thread

I pooled the colors of a size 10 crochet thread into an argyle and “Rosebud Argyle” is the result. It’s 3.5″ x 3.5″ and dense because I used a color-gobbling stitch pattern, so I added a border and turned it into a “mug mat” (coaster). I’ll be bringing it to the Creative Planned Color Pooling class.

If I had used the classic moss stitch pattern of [sc in next ch-space, skip next sc, ch 1], my swatch would have come out more than double that size: over 7″ x 7″ (I ripped it out before measuring exactly how much smaller it is with my stitch variation).

Even the 3.5″ size is bigger than I expected! My original goal was only 1″ or 2″. New lesson learned: the color changes in variegated thread look short until you start crocheting with it. The stitches just don’t take up much thread.

Stitches Change the Color Width

I really wanted the experience (and general look) of a moss stitch pooled argyle, so I needed to substitute with stitches that eat up a lot more thread. Why? The length of each color in a variegated thread or yarn is fixed. When the colors repeat, their sequence is also fixed. The total length of one whole sequence is your fixed width. The way you alter this fixed width is with the stitches you use. (There are other options but not for this post.)

Each row of moss stitch is [sc in next chain-space, skip next sc, ch 1]. With each new row, the sc’s are over the ch’s and the ch’s are over the sc’s. It is common to use half double crochets (hdc, or UK/AUS: htr) instead of sc. I haven’t seen much of it lately, though. I hope crocheters are feeling free to alter the moss stitch, especially if you’re doing planned pooling.

Below I’ve written up the stitch pattern instructions for my color-gobbling moss stitch variation. It’s the one I used for the swatch pictured above. I wrote it as if you’re using a solid colored yarn or thread.

Vashti’s “Color Eater Stitch”

Pattern Notes

  1. The “color eater stitch” is [slip stitch, 2-hdc puff] in the next ch-space. The slip stitch is to keep the hdc puff closer to the height of a sc and puffy (rosebud-like). It also helps keep the color changes distinct when you’re pooling.
  2. Like moss stitch, each row is [color-eating sc substitute in next ch-space, skip next color-eating sc substitute, ch 1]. With each new row, the color eaters are over the ch’s and the ch’s are over the color eaters.
  3. It’s easy to fine tune how much you use of a color when you’re pooling with it. For example, sometimes I did a 3-hdc puff instead of 2 to eat up more color. Or, a tighter ch-1 and shorter puff to eat less color. I got better at this with the later rows. Maybe you can tell in the swatch.
  4. When color pooling with it, do whatever you need to at the row ends: just a ss and hdc to use less color, or even a 4-hdc puff to use much more.

Abbreviations

  • ch – chain stitch
  • hdc – half double crochet (hdc, or UK/AUS: htr)
  • 2-hdc puff – [yarn over, pull up a loop] twice in the same designated stitch, yarn over and pull loop through all 5 loops on hook.
  • ss – slip stitch

How to Crochet It

Foundation chain: With a solid colored thread or yarn for your first swatch, chain an even number.

Row 1: Skip 3 chs, *[ss, 2-hdc puff] in next ch, ch 1, skip next ch, repeat from * until one ch remains, [ss, 2-hdc puff] in last ch, ch 2, turn.

Row 2: Skip first puff and ss, *[ss, 2-hdc puff] in next ch-space, ch 1, skip next puff and ss, repeat from * for rest of row, [ss, 2-hdc puff] in space of turning-ch 2, turn.

Repeat Row 2 for pattern.
For more on planned pooling, you might like this recent blog post: Color Pooling Developments.
Posted on 2 Comments

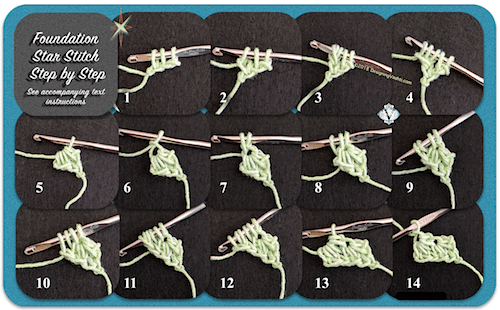
Foundation Star Stitches Step by Step

How to Crochet the Foundation Star Stitch in 14 Steps
View the full size hi-res image.

Star Stitch Foundation

It’s the perfect way to start a Starwirbel! We’re going to use it in the upcoming Starwirbel Way class this July. (CGOA Chain Link conference this July in Portland, Oregon).

For this unusual stitch, two foundation chains must be created as you complete each star. In the text instructions below, a [bracketed number] refers to a numbered photo step above.

First foundation star stitch (fstar):

Chain 3 loosely.

  • [image #1] Pull up a loop in each of the second and third chains; you have 3 loops on your hook.
  • [image 2] Chain 1 (counts as first foundation chain of first star),
  • [3] Yarn over and pull up a loop in the two outermost strands of the chain just made,
  • [4] Chain 1 (counts as second foundation chain of first star),
  • [5] Pinch it while you yarn over and pull through all 5 loops on your hook so that the last loop doesn’t tighten,
  • [6] Chain 1 (eye of this first fstar).

Tips: Pinching also helps you recognize which loops are the new foundation chain loops. Pull up loops loosely enough that a second crochet hook could fit in them.

Add more foundation star stitches:

Vashti's lacy Star Stitch Foundation in a hand dyed mohair for the "Firewirbel" Starwirbel Cowl.*Pull up a loop in each of these places:

  • [7] The Eye,
  • [8] Side of star,
  • [9] Two loops of second foundation chain of star;
  • [10] Chain 1 (counts as first foundation chain of next star),
  • [11] Yarn over and pull up loop in chain just made,
  • [12] Chain 1 (counts as second foundation chain of next star) and pinch it,
  • [13] Yarn over and pull through all 6 loops on hook,
  • [14] Chain 1 for eye.

Repeat from * for each new fstar.

You might be interested in the resources page for the Starwirbel Way class.
Posted on Leave a comment

Last Minute Crochet Jewelry Gift–How to

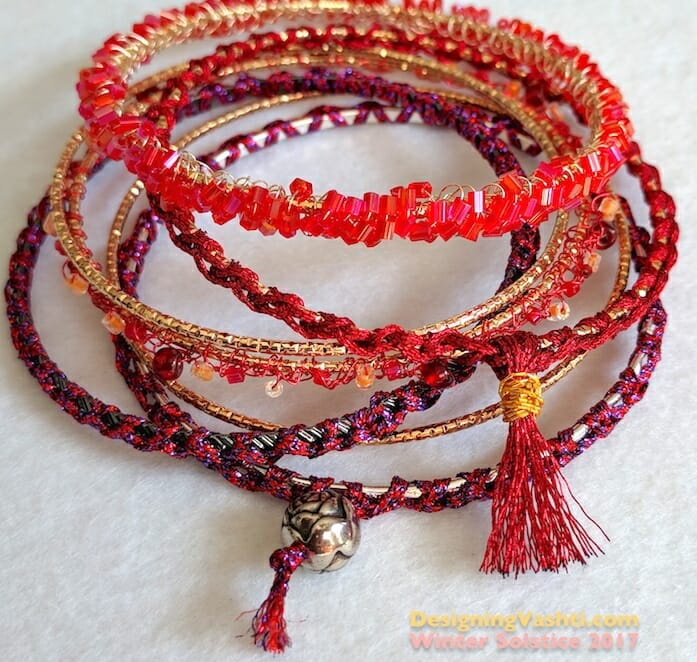
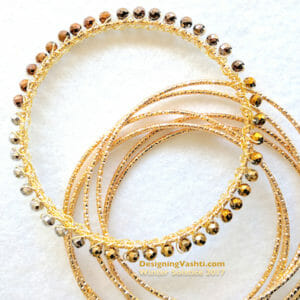
I’m crocheting these festive bangles for quick holiday gifts (Hanukkah, solstice/yule, Christmas), hostess gifts (I have five holiday parties to attend), and for myself. It’s relaxing now to make them. I’ll wear some to the parties.

Each completed bangle is costing me about 50¢ (not including labor, a.k.a. the love in every stitch ❤️).

“Solstice Bangles” Free Pattern

Below is the complete pattern for what I’ll call “Solstice Bangles” because tomorrow morning is the Winter Solstice (first day of winter). I contemplate this sometimes as I crochet around the bangles; it’s a satisfying “full circle” feeling. I’m completing another sparkly “wheel of the year”.

Skill level

The starter pattern is Beginner-friendly. So many ways to get fancy with it. Add some challenge with wire or beads.

Materials

This section looks long because it includes tips for substituting with items you have on hand.

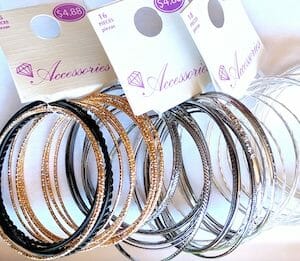
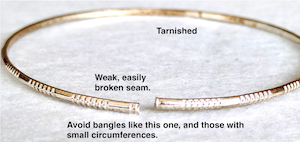
  1. Bangle “blanks”: Look for thin, narrow, permanently closed (not hinged or locking) metal bangles. They’re often sold as a group to be worn stacked, meaning all at the same time. If they are labeled with a size, choose only “large” because any crocheting you add will reduce the final inner circumference. I don’t want any tarnishing or chipping, so I prefer to buy them exposed to air without a package wrapper. If they have soldered seams, check them for strength. This is especially important for gifts because you don’t know how much force someone will use to slide it on over their hand. I only buy them locally so that I can test the seam and finish of each one. Over the years I’ve kept an eye out for them in places like Claire’s, Wal-Mart, Target, etc. The quality varies wildly. I can recommend the ones in Wal-Mart now (pictured). They come in bunches of 15-18 bangles for $4.88.
  2. Yarn, if you’re not adding beads: Here’s where you can use the interesting embroidery braids, flosses, and fine novelty yarns languishing in your stash. My first choice is a fancy metallic Kreinik braid type if I’m not adding beads. My little 5-meter spool can cover two, possibly three skinny bangle blanks. Some fingering and lace weight yarns would work, and any crochet thread size. Beginners: start with a sock yarn or size #3 or #5 crochet thread, and no beads. Then graduate to a fancy metallic floss/braid type, then try very fine wire without beads first (30ga to 32ga thickness).
  3. Yarn if you’re using beadsI’ve had the best luck crocheting with wire. The wire holds the beads in place the best for me. Wire is a unique crochet experience. If you’ve never tried it, please see my newsletter issue on it, or the Embracelet pattern.
  4. Crochet hook: This is easy. Use whatever hook size that makes it easiest for you to crochet tightly and evenly.
  5. Beads (optional): I like very small beads for this. I don’t go much larger than “e-beads” (size 6 seed beads). Beads with small holes also work better for this so that they don’t jiggle and shift around. This means gem, chip, and pearl beads are great! You can use a larger accent bead for a tassel finish.
  6. Sealer, stiffener, adhesive, fine yarn needle, etc. (optional): You might wish to use a fabric protectant such as Scotchgard if your yarn is an absorbent fiber. I used three coats of clear nail polish to secure a tassel of metallic embroidery floss because it doesn’t hold knots well. I may use this, or some clear fabric paint, on the inner surface of a bangle to keep the stitches from twisting around the bangle.

Pattern Abbreviations

  • ch = chain stitch
  • sc = single crochet (UK/AUS: dc)
  • ss = slip stitch

Crochet a Basic Solstice Bangle

Step 1: Leave a 4″ yarn end that you can crochet over it, weave in later with a needle, or leave hanging with a bead or tassel. Crochet all stitches tightly. Slip stitch around the metal bangle tightly, *ch 1, ss, repeat from * until bangle is covered.

This is up to you: use fewer stitches to cover the bangle by stretching them taut around the bangle. They’ll be less likely to twist and shift around the bangle, and you’ll see more of the metal. Or, use an excess of stitches for a different look: I love the wavy zig-zag texture of the (ch 1, ss) combo. You’ll see much less of the metal this way.

Step 2: When you’ve crocheted the number of stitches around the bangle that you like, join the last stitch to the first one. I remove my hook from the stitch loop, insert the hook in the first ss, and pull the last stitch loop through it with the hook, then fasten off.

Step 3: Decide what you want to do with those yarn ends. Weave them in. Or, string an accent bead onto both ends, knot them, and trim ends close to the bead. A third option is to tie the ends together, cut more yarn lengths, then add to the yarn ends and tie into a bundle to make a tassel.

Step 4, optional: If you add a fabric protectant, test a swatch first. You could coat the inner rim with a glue or sealer to prevent stitches from twisting around the bangle. Add a drop to knots if they might loosen with wear.

Add Challenge

The basic Solstice Bangle pattern is crazy simple, right? Add just one variable and it’s a different experience. For example:

Add other stitches or change them completely. You could try all sc. I used such a fine red wire for a beaded bangle that I had to use sc instead of ss to make them more visible. Embracelet is an example of using love knots.

Hold two different glittery strands together as you crochet, or use 6-strand embroidery floss. (Managing multiple plies as you crochet so tightly around a bangle does get tricky.)

Just add beads. That’ll keep you busy! I like to add one or more beads to the ch of the (ss, ch 1).

Use wire as the yarn. A thicker wire such as 26ga may be difficult for some people to crochet with, but it sure shows up well, and makes a statement even without beads. It also holds up nicely and is less likely to twist around the bangle. Finer wire is great for showing off beads.

Try to crochet the wire as tightly as you can. (It will still be looser than you intend.) When you’re done, tug on each bead a bit while also giving it a half-twist. This will tighten the stitch around the bead and bangle. I also compress everything by pressing and scrunching the stitch loops together into the bangle. I guess you could consider this a “blocking” method for wire jewelry?

Posted on Leave a comment

Crochet Tutorials – News

My crochet tutorials and tips (eventually all ten years' worth!) are now brought together under the "Learn" tab at the top of every page of the new DesigningVashti website.

All the Crochet Tutorials in One Place!

I set up a permanent home for my crochet tutorials and tips. Over the years I’ve posted some crochet how-to stuff on one blog and some on another. Still more are tucked away in newsletters, pattern PDFs, and class handouts. Eventually I’ll get all ten years of them under the “Learn” tab, which you can find at the top of every page of this new website. Huzzah! It feels so good to do this.

Crochet Tutorial Categories So Far

As you can see in the photo above, the Learn menu now has these two major categories:

  • Crochet Basics in Depth–For newer crocheters and anyone who likes a more thorough treatment of all things crochet. (My goal is always to write what I haven’t already read elsewhere.)

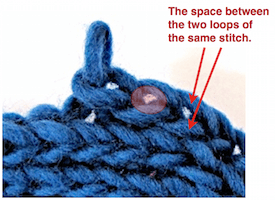
    Close up of two top loops of a row of crochet stitches slip stitches in this case), showing the distance and shape between the front and back loop of a stitch.
    From “Hook-Led Gauge“.
  • Beyond Crochet BasicsIf it’s something that might be considered an Intermediate skill or beyond, it goes here. Newer crocheters are welcome to use this section too. I try to connect each advanced or specialized topic directly to a basic crochet skill so that adventurous beginners can use some of it too.

Each category has a few how-to topics in them so far. Some will sound familiar to you if you’ve used my patterns or read my newsletters, such as “Hook-Led Gauge” in the Crochet Basics section and “When to Crochet BETWEEN Top Loops” in the Beyond Basics section.

Newly Updated

I’m rewriting each one—a little or a lot! Even if I’ve already posted a topic somewhere else. (I enjoy writing but it’s slow-going if I have to find the original images and optimize them.)

? “Crocheting the Love Knot Mesh” is so extensively revised that it’s now all new material.

Please let me know if you use one of my crochet tutorials here and the images are not clear enough. I’m still adjusting the image optimizing settings of this new site to get them truly…optimal.

Three More Tutorial Categories

I’ll be bringing back the Tunisian and Slip Stitch crochet sections that my old site had, but they had not been updatable for seven years. By the time I’m done revising them and adding lots of juicy tutorials, they might have nothing in common with the old ones! These will also be housed in the Learn menu:

  • The New Tunisian Crochet
  • Fun With Slip Stitch Crochet
  • Crocheting Jewelry

All three* are technique based unlike the first two that are purely skill based. The standard crochet skill level model tends to default to regular crochet, so these Tunisian and Slip Stitch categories should complement the skill categories neatly enough.

*Even though the jewelry crochet group is project based, I think of its tutorials as having a technique focus because it’s a specialized application of mostly regular crochet. (I don’t think my old site even had a page for crochet jewelry.)

Posted on 2 Comments

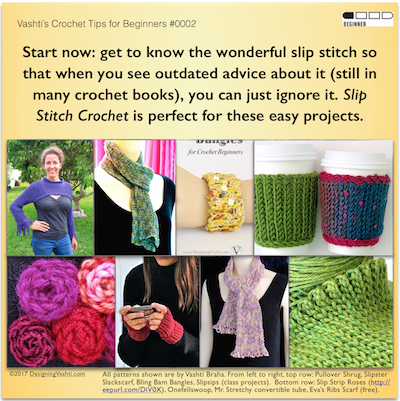
Crochet Beginners’ Tip: Slip Stitch Fake Facts

Beginner Crochet tip: tune out the fake facts still being circulated about our most basic and versatile crochet stitch, the slip stitch!

About Today’s Tip for Crochet Beginners

I’m going to unpack that “outdated advice” part in the tip pictured above.

For reasons I still haven’t figured out, misconceptions and outright errors (“alternative facts”?) about slip stitches are still repeated uncritically in English-language crochet books.

This has been going on for decades. Think about how it affects whole generations of crocheters. It’s the only reason it took me 30 years to try crocheting a whole swatch of just slip stitches. I was immediately smitten. My first slip stitch design was the 2004 Pullover Shrug (the cropped purple top I’m wearing in the tip above).

I have distilled every fake fact about slip stitches into the following four sentences, below. I begin my Slip Stitch Crochet 101 classes with them so that we can deal with them head on.

Can you spot all the unhelpful advice?

  1. There is one kind of slip stitch and you crochet it tightly.
  2. It is useful only occasionally, for a few things, such as joining a round, closing a picot, or seaming.
  3. Don’t bother trying to make anything with it, it has no height.
  4. It doesn’t really count as a stitch at all; it’s a nonstitch

(I underlined the fake facts to help you.) This false information discourages crochet beginners and all crocheters from exploring only slip stitches, not other basic stitches. Why? It’s not because slip stitches are tricky for beginners. It’s the most basic crochet stitch of all, along with the chain stitch! In my classes, the experienced crocheters struggle more—but that’s just due to the years of misinformation.

The more I explore slip stitch crocheting, the more insight I get into all crochet. This is why I want every crocheter to know about it. (The things you can make are also awesome.)

New Rules About Slip Stitches

1. Think of slip stitches as a group of stitches.

Lattice textured border of a 100% slip stitch crochet mobius "Bosnian" style (in rounds with no turning).
“Bosnian” crochet: slip stitches crocheted in the round with no turning.

Slip Stitch Crochet is actually a whole technique. When you know this, you can retain what you learn about them easier. It also spurs innovation, and aids pattern writing. I use the abbreviation SSC, as do others in the international SSC community.

Slip stitches look, feel, and behave very differently when crocheted with turning or without (“Bosnian”), and in just the front or back loop or both (or between stitches!). Invert them or twist their loops for more slip stitch types.

2. Go up at least two crochet hook sizes to crochet them loosely. 

Big-hook slip stitch is especially fun! Start with your bounciest wool yarns. 

3. Slip stitches are exceedingly versatile, useful, and pleasing for many of the things crocheters make.

In fact, slip stitches are often preferable to other stitches, such as for ribbing, or for a thin, supple fabric that conserves yarn.

A slip stitch may also be fine for joining a round, closing a picot, or seaming, but not always. For example, slipping a loop through to join is more invisible than a slip stitch. A single crochet sometimes closes a picot better with some yarns or for certain patterns. For seaming, sometimes alternating a slip stitch or single crochet with a chain-1 is better. (I also like to use inverted slip stitches for seams.)

4. Slip stitches clearly have height.

How odd that it needs to be stated. The simple evidence is the heaps of very wearable scarves and sweaters. You should see the overflowing table of them that I bring to classes!

Not only does a slip stitch have height, the height varies depending on the type of slip stitch. As a starting point, expect front-loop types to be taller than back-loop types. (This is the case for single crochet too.) 

Yes, you can even crochet around the post of a slip stitch.

Please Don’t Wait Like I Did.

I learned about crocheting slip stitch projects decades after learning how to crochet everything else. There’s no reason for crochet beginners to wait decades like I did!