Posted on 5 Comments

All Crochet Hook Sizes in Charts

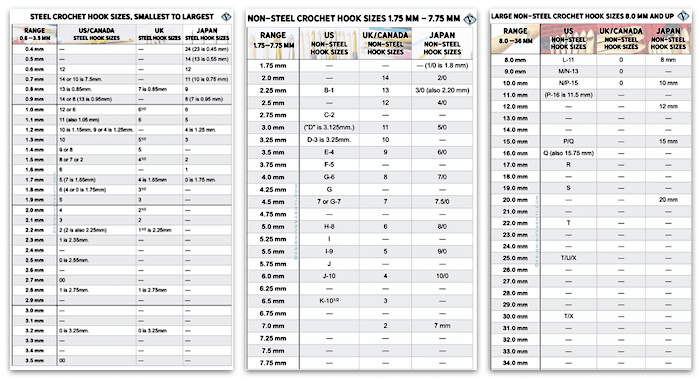
Crochet Hook Sizing with easy to see size gaps: my size charts (for steel, for medium-range, and for jumbo hooks) include the MISSING sizes.
Download the three charts shown above—with extra columns!—as a free PDF. See below. There was no room for this material in my newsletter issue about crochet hooks. It pairs well with this one: Deluxe Crochet Hook Diagram.


Hey there, New Crocheter?: On the face of it, crochet hook sizes are beginner-level stuff. Question one quirky thing and you can end up in a maze. I did. Over the years I’ve had five key realizations. They build on each other in a logical order, below. I wish I could have read this post when I started questioning! Bookmark this if you’re not quite ready for it yet. Better yet, add a comment about where you’re at.

Crochet Hook Sizes Explained

Charts of all crochet hook Sizes! Easy to see size gaps. My size charts (for steel, for medium-range, and for jumbo hooks) include the MISSING sizes.
Vashti’s Charts of Crochet Hook Sizes

First, download my Crochet Hook Size Charts, and then the Deluxe Crochet Hook Diagram. You might want to refer to them as you read further.

I originally created these charts for my own use.The PDF has more information than the three charts pictured at the top of this blog. For example, two more columns, and how to use the charts and understand the size increments. Each chart is a full-page size:

  1. All Steel Crochet Hook Sizes in 0.10 mm increments: 0.40 mm – 3.50 mm
  2. NON-Steel Crochet Hooks, medium-range in 0.25 mm increments: 1.75 mm – 7.75 mm
  3. NON-Steel Crochet Hooks, jumbo sizes in 1.00 mm increments: 8.00 mm – 36.00 mm

Crochet Hook Sizes, the Five Keys

1. I watch exactly where on the hook I make each stitch.
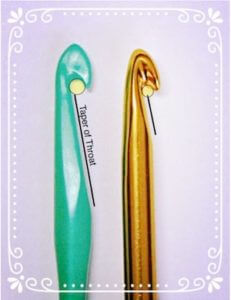
I especially watch the starting loop on the hook because it will become the top two loops of the new stitch. My goal is to avoid forming stitches on the tapered part (“throat”) of the crochet hook.

Some hooks have such a long throat that I can’t avoid making my stitches there. This is a big deal with some stitches. The taper will give my tall stitches loose top loops.

Pictured at right is my first crochet hook (green) and one of my current favorites (gold). My green crochet hook made my stitches look more stringy and uneven than they had to, even for a newer crocheter.

A big revelation for me (thank you Nancy Nehring) was that the crochet hook’s true size is where my stitches are made on it. So the other reason I watch where I make stitches on the hook is to know where to measure the hook size.

2. I treasure my slide gauge tool.

Needle gauges, the kind with holes, are everywhere. They’re even given out for free at yarn shops and conferences. I tossed them all out and only use a slide gauge. If I could find a reliable source for my favorite slide gauge I’d have it in my shop already. Lacis has had this one for a long time. It’s now also at JoAnn Fabrics, Amazon, Walmart, etc. Here’s another one. You can also search for millimeter calipers.

Once I know where on the hook I make my stitches (see #1 above), I measure that with a slide gauge or caliper. I get my true size of each hook in a jiffy. No forcing a hook in or out of the holes of a needle sizer with the risk of scratching the hook in the process!

When I did this with all of my crochet hooks, I found out that about a third of them were not the sizes I thought they were (based on how I use them).

3. I base my stitch gauge on my hook size.
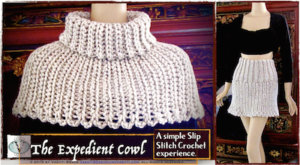
Beginner slip stitch crochet with a big hook!
So stretchy! Easy slip stitch Expedient Cowl.

At some point in my crochet life I realized why we have so many crochet hook sizes. When the stitch gauge is based on the hook size and not on the yarn thickness, or personal habit, some amazing crochet fabrics are possible! Starwirbel, Weightless, stretchy slip stitches, and many more.

There are two more reasons: it’s the way to get the most polished stitching gauge for each project. It also standardizes our results as an international crochet community.

Before this realization I thought the different hook sizes were there to make crocheting with different yarns more pleasant. “I think this yarn is too thick for this hook. Must mean I need a bigger hook size”. That’s a fine reason, but if it were the real reason for the sizes, we’d only need about eight sizes—one per yarn thickness category. See the How Many Crochet Hooks? section of my other crochet hook post.

4. I think in millimeter (mm) sizes.

Instead of the “H hook” of my childhood I now think “5 mm hook”. It has improved every day of my crocheting life. I no longer have to deal with traditional hook size systems that are riddled with overlaps and exceptions.

Not only that, the mm sizing makes it plain where there are gaps in the standard hook sizes, and how large each gap is. This in turn opened up to me a wonderland of in-between or nonstandard crochet hook sizes. Hello handmade crochet hooks, imported hooks, and other collectibles, including odd manufacturing runs of established brands.

5. The actual number of crochet hook sizes? Infinite.

The American Craft Yarn Council (CYC) maintains a chart of 29 steel and 28 non-steel crochet hook sizes according to American and British standards. It’s a good start and includes equivalent mm sizes. I build on it in my crochet hook sizing charts by adding Japanese hook sizes and placeholders for missing sizes.

The millimeter measure accounts for all possible hook sizes, including the sizing standards of other countries. I love seeing how US, UK, and Japanese hook sizes all fit together.

Does an infinite number of crochet hook sizes seem overwhelming? Every crocheter needs a different number of sizes. Check for yourself with my list of five factors.

How Did We Get Here?

I think of the non-metric crochet hook sizing systems as being two great crochet traditions (cotton/silk threads vs. wool yarns) that got mushed together, then sprinkled with sizing standards of different countries. It’s quite the heady brew.

Steel crochet hooks were designed for lace crochet with thread. Steel is very strong for even the finest hook sizes. They’re numbered from 00 to 14 (sometimes 16). The larger the number, the smaller the hook.

Non-steel crochet hooks, whether made of aluminum, wood, bamboo, plastic, or glass, get numbered and lettered sizes (from B to U so far) according to an American system. Sizing systems in other countries use different numbering systems. Unlike the steel sizes, the large the number, the larger the hook.

Let’s talk about the size “G” hook. The CYC lists three non-steel G hooks: 4.0 mm, 4.25 mm, and 4.5 mm. Each one is a useful size. Labeling all of them size “G” is unnecessarily confusing.

The Way of Peace

Just focus on the millimeter size. A crochet hook that measures 4.0 mm (on the part of the hook where you make the stitches) will always be that size for you. It won’t matter what it’s made of, where you live, or which country manufactured the hook. Feels peaceful, doesn’t it?

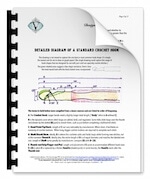
I’ve added this to an experimental blog post series: Vashti’s How to Crochet Book
Posted on 1 Comment

Deluxe Crochet Hook Diagram: Free Download

Part of the crochet hook diagram I sketched for "Beyond Crochet Hook Debates" issue 71.
I’ve greatly expanded this page since first posting it in 2015, when it was a follow up to newsletter issue 71, “Beyond Crochet Hook Debates”. It’s also now part of an ongoing Crochet Basics series.


Thumbnail of Vashti's deluxe crochet hook diagram PDF

At first glance the crochet hook is a very simple tool, so why are there so many different kinds? What makes crocheters fiercely devoted to some and not others? You could make your own crochet hook by carving a notch into the end of a stick or dowel and sanding it smooth. I realized how carefully designed hooks really are when I reshaped a store-bought one.

Please enjoy my deluxe crochet hook diagram and a “hook heat map” from my newsletter (free PDF)Complete Diagram of a Standard Crochet Hook.

Creating a crochet hook diagram also helped me tease out the finer elements that make all the difference between one hook and another. My first sketch grew into a comprehensive map! It brings together terms from several different sources.

How Many Crochet Hooks?

How many crochet hook sizes should there be? How many crochet hooks does a crocheter need? It turns out the answer is different for every crocheter because it depends on about five factors, below.

Consider the yarn you like to crochet with.

Some crocheters are very partial to one or two yarn thicknesses, called weights. Medium or worsted weight is a crowd-pleaser, for example. If you like to crochet with yarn of any weight, from cobweb to roving, you need a few different hook sizes for each of the eight yarn weight categories (#0 Lace to #7 Jumbo)!

How about fiber types?

I’m still surprised sometimes when a crochet hook gets along much better with one yarn than another. If you like to experience the full menu of fibers and fiber blends, from the fuzziest to the slipperiest all spun in different ways, you’re going to need hooks with different head shapes and surface finishes.

  • I really notice this when I crochet with a non-yarn like wire, jewelry cords, and fabric strips.
  • I can pick up a lot of speed with a hook that has a glossy aluminum finish except with very glossy silk yarn. That’s when a brushed matte finish is better.
  • When a fluffy microfiber (synthetic) yarn drags on a giant plastic hook because of static electricity, I switch to a wood hook.
  • When a yarn is dense and round like spaghetti (Jelly Yarn, rayon-wrap cordé, wire, tubing, leather lacing, etc.), a crochet hook with a roomy “bowl”[see diagram] is much better than one with a slit-style bowl.

What kinds of things?

Want to try every possible kind of project, from beaded jewelry to exploded lace to sturdy totes to thick blankets to…so many more kinds of things!? Projects can require very particular crochet hook sizes, styles, and finishes.

Situations, events, and physical conditions.

I have favorite hooks for marathon crocheting (when I have a big crochet deadline to meet). You might like to have a hook set just for traveling like I do; for plane flights I try to avoid metal hooks. Plastic and wood hooks are lighter in my bag, and less quick to slide down between seats to be lost forever.

For those crocheters with hands that are particularly small or large, sensitive to cold, tire easily, are arthritic or in recovery from surgery, and so on, there are crochet hooks specially designed for you. Look for hooks in ergonomic shapes. You can also add your own ergonomic handle with clay, pencil grippers, wrapped fabric, and other materials.

What if you need to crochet in a low- or no-light situation? Light-up hooks, and those that don’t match the color of your yarn are best.

Any special techniques or stitches?

Like to try dramatically different stitches like bullions, split clusters, and picking out that bump loop of single crochets? Tunisian and double-ended crochet? Crochet along the edge of fabric? Cro-tatting? The right crochet hook for the job sure makes a big difference with these.

Loop Picking”: Hooks with a pointier head are very helpful when trying to pick specific loops to crochet into. Camel crochet is a classic case. I usually reach for one when I do Tunisian or slip stitch crochet. Some brands are naturally pointier. I like how easy it is to file the heads of my inexpensive bamboo hooks in different shapes to learn what works best for me.

Beading: I need to have steel crochet hooks of several sizes on hand. You’ll need some with hook heads that are small and streamlined enough to pull a loop of thread or yarn through bead holes. Tulip has done this with their bead crochet hooks.

Tunisian: (Projects can really vary, so I’m going to do a separate post on Tunisian hooks.) Generally I need the length of the hook head to be as short as possible [see diagram], and I need the surface to be frictionless with the particular yarn.

Hard Crochet”: The 1970’s crocheter Mark Dittrick emphasized the difference a large steel hook (size 0 or 1: 2.35–3.25 mm) makes for his ultra tight and stiff sculptural crocheting.

Crochet Hooks as Treasure

Did a family member teach you how to crochet? My mother taught me. I treasure her crochet hooks and the brown moiré jewelry wrap that she used as a hook case.

When you teach a family member, you create a future where your favorite crochet hooks will be cherished!

If you know someone who would like this detailed crochet hook diagram, please be kind and send them to this blog post so that they can download their own copy directly. Right-click this direct link to copy it: https://www.designingvashti.com/crochet-hook-diagram-free-download. Thanks!

The next post in this series is on the surprisingly rich topic of crochet hook sizing.
Posted on Leave a comment

Hand Chaining How To’s

How to videos are a great way to learn hand chaining. I viewed several this past week. My favorites are listed below.

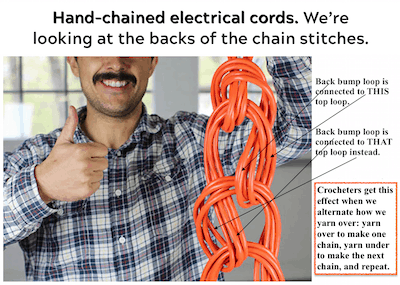
A man holds up electrical cords that have been hand chained together for a more manageable length.
Here’s an example of a knot tying approach to hand chaining. Image is from artofmanliness.com; text is mine. For a front-facing view of chains with mixed yarn overs, see my Yarn Overs, Yarn Unders post.

After watching so many hand chaining videos, I found that only some show how to do it the crochet way. Other videos show a knitting style, or as a form of knot tying.  I’ve chosen a few video links for each approach so that you can try them and see which you like best.

Hand Chaining the Crochet Way

This is the chenille yarn that Kathleen Sams shows in her crochet video (see link below).

Hand chaining the crochet way means you’re using your fingers or whole hand the same way that you’d use a crochet hook. In crochet, if we put a loop on the crochet hook by winding the yarn around it, it’s called a yarn over. It’s also possible to just “grab” the yarn with the hook and pull it through with no actual yarn over. This has sometimes been called a yarn under. The yarn over is the standard, correct one.

Watch for when a hand chaining video shows the yarn over, or the yarn under, or mixes them. It’s tempting to use the yarn under when hand chaining because you can just reach through a loop, pinch the yarn, and pull it through. The simple pull-through of the yarn under makes for very quick hand chaining! However, if you plan to do most of your crocheting with a crochet hook, the yarn over is a very good habit to establish. 

Three videos that show yarn overs:

These next three videos show yarn unders:

  • Donna Wolfe of Naztazia.com starts off her video showing hand chaining by pinching the yarn with her two fingers to pull it through a loop: a yarn under. When she shows how to do the same thing with a crochet hook, she uses a standard yarn over.
  • Watch Kathleen Sams make hand chaining look so fast and easy with yarn unders and the thickest chenille yarn ever!
  • ThePreschoolMommy adds adorable sound effects to her yarn unders: “The fingers go ‘Hel-LOO’ and bite the yarn and pull it through.”

By the way, in most of these the adjustable slip knot is made instead of the locking one. Donna Wolfe uses the locking slip knot. Now try some of the other videos below for contrast. Whichever one you enjoy the most is the best one for you!

Hand Chaining the Knitting Way

Hand chaining with a knitting approach means that a finger or hand is held like a knitting needle while a loop is worked off of it. A possible advantage is that one tends to work at a smaller scale, keeping the loops closer to the fingers. This can help one to control the size of each chain stitch.

  • This video is a good example of a knitting style of hand chaining. She keeps a loop on her left finger, wraps the yarn over it with her right hand, then pulls the loop over the new loop and off the finger. (It reminds me of spool knitting, if the spool had only one peg.).
  • Laura Eccleston of Happyberry Crochet does it the same way.  She cautions that it is fiddly, not very easy.
  • Here’s a variation by Beadaholique. She uses beads and beading thread for making a necklace.

Hand Chaining the Knot Tying Way

The most noticeable thing to me about a knot tying approach is the terminology. A rope is bent, which is called a “bight,” and then pushed through a loop. Terms like “sinnet” or “knot” are used; never “stitch.”

There are a few other differences too. The purpose of hand chaining in these videos seems to be of practical interest mainly to men who need to make long lengths of heavy rope more manageable for storage, cleaning, or for a “quick deploy” survival bracelet. It’s also called a “zipper sinnet” and “chain shortening” because it quickly unravels when the rope is needed. It ranks as one of the Four Knots You Need to Know.

Here are a few knot tying videos on hand chaining:

Which videos do you enjoy? Which one can you do the most quickly? Which one produces the nicest-looking chain stitches for you?

Updated November 2018. It’s part of an experimental blog post series: Vashti’s How to Crochet Book
Posted on Leave a comment

Hand Chaining, a Straddler of Worlds

Hand chaining is when you crochet chain stitches with your hands and fingers instead of with a crochet hook. It’s also called finger crocheting. Hand chaining is so easy! Kindergartners do it. It’s a popular way to crochet trendy necklace-scarves with fancy yarns in under 30 minutes.

Trendy Hand Chaining Trendy Necklace Scarves long
Love it! “Poseidon Scarf Kit” at loopymango.com

You might have learned hand chaining as a child in kindergarten, at camp, or from a babysitter. It’s often taught as a stand alone activity rather than as an introduction to the larger world of crochet, knot tying, or knitting. I don’t even remember how I learned it. I just already knew how by the time I officially learned how to crochet with a hook at the age of nine.

For the next blog post I viewed several videos that show how to do hand chaining as a crocheter, a knitter, or a knot tyer. It left me with a new way of thinking about the origins of crochet.

Not Just for Beginners

Hand chaining is so fun to do that even experienced crocheters are at risk of getting “hooked” (if they remember to try it). It’s often forgotten as a crochet method even though it offers nuanced control over unusual yarn combinations for edgy, artsy effects. I get new, deeper insights into simple stitches when I hand crochet them, thanks to the intimate, tactile experience of crocheting.

Hand chaining a special subset of crochet that merits a closer look than it usually gets.

Hand Chaining vs. Hook Chaining

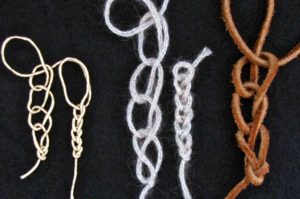
Hand chaining (finger crocheting) loosely and tightly in 3 different fibers: sain cord, wool tube yarn, suede lacing.
Hand Chaining loosely vs. tightly. L to R: Satin cord, wool knit tube yarn, suede lacing.

Hand chaining cuts out the middleman (er, the crochet hook). This is perfect for crochet beginners! Learning to use a new tool with yarn loops for the first time takes the focus off of the stitch. Shouldn’t getting to know a stitch be the most important part of learning to crochet? Especially when that stitch—the chain stitch— is the foundational core of all crochet? I think so.

The crochet hook is the one central tool of crochet. When researchers encounter an unfamiliar fabric, they consider the tool used to create it. An item made with a crochet hook is usually classified as crocheted. I wonder how hand-chained items are classified.

Earliest Crochet Roots?

Hand chaining straddles two worlds: Crochet, and Knot Tying. The same basic crochet stitches can be made with hand chaining as with a crochet hook: Chain Stitch, Slip Stitch, and Single Crochet. (Other stitches are more of a struggle without a hook.) The fingers or the whole hand simply take the place of the crochet hook. Perhaps hand chaining came first, at least in some early cultures, and the crochet hook evolved to substitute for hands and fingers.

Among knot tying aficionados, hand chaining is called many other things: Drummer Boy’s Sinnet, Zipper Sinnet, Monkey Braid, Sea Chains, Chain Knots, Caterpillar Sinnet, and Daisy Chains. Boys and men may have encountered hand chaining via knot tying. Some practical uses among knot tyers include:

  1. To quickly neaten long lengths of rope or electrical wire for storage. (To this linked video, a commenter added, “This is used by riggers [who set up e.g. the ceiling on stages for rock concerts] as a cool way of shortening and storing several long ropes in a hurry.”)
  2. Launder climbing rope so that it can be easily machine washed, allowed to dry, and then “unzipped” for use afterwards.
  3. Watch James Dean absent-mindedly finger crochet with a rope while doing an interview in 1955! (Video starts as the camera is about to pan down to the rope he’s holding.)

-:———:-

Even if you already know how to crochet, I think Chain Stitch In Depth and other posts about crochet basics offer some new ways to think about our most basic and important crochet stitch of all, the Chain Stitch.

Updated November 2018. It’s part of an experimental blog post series: Vashti’s How to Crochet Book. Next post: Hand Chaining How-To’s.
Posted on 1 Comment

How to Crochet Slip Knot Variations

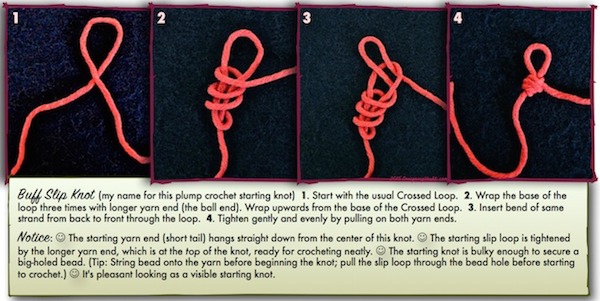
Steps to do a slip knot with more wraps when you need a decorative one.
View the above image full size.


Here’s the follow-up how-to for yesterday’s “Pros & Cons of the Starting Slip Knot” post. I’ve created photo step outs for two promising alternatives to the basic starting slip knot. The first is what I call the Buff Slip Knot, shown above. The second is the Three-Loop Starting Slip Knot.

Special Slip Knots for Crochet

The Buff Slip Knot

Like our general-purpose slip knot, the Buff version offers a slip loop that you adjust by tugging on the longer yarn end. Unlike many other knots I tested, the longer yarn end is waiting for you up where the slip loop is rather than down at the bottom of the knot near the short yarn end. Stays tidy-looking this way.

Tying it is like tying a basic slip knot that has more wraps. A crochet beginner might wish to come back to this one later. Follow the four steps shown above. (View the high-resolution image).

I listed ten possible functions crocheters might need from the starting slip knot in yesterday’s post. The Buff Slip Knot variation is an especially good candidate for advantages #6 and #10 on the list. Try it when you need or want a visible crochet slip knot that is nice looking. It’s symmetrical in more than one way. It’s also beefier if you wish to start with a large-holed bead accent.

The Three-Loop Slip Knot

This one may seem odd. Why would anyone want a crochet slip knot with three starting loops? This one is a great way to start right off crocheting with a finished, usable button loop, hanging loop, or other handy use for a secure loop. Think jewelry, cords and straps, and how about potholders?

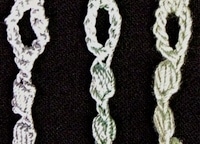
Chained loops look less delicate than the satiny fine-grained texture of the puffpearls.
Puff stitches look finer than the chain stitches of the clasp loop!

Normally we’d start with a basic slip knot, crochet some chain stitches, then slip stitch them together to form a loop of chains. These work great for most things. Occasionally, chain stitches are too thick or textured for what I need. This tends to happen for me with jewelry projects. I’d like a slim loop to fit under a button clasp. The chained loops of these Puffpearl necklaces look unnecessarily chunky to me.

Another example is when a crocheted charm or pendant is designed to dangle. I’m thinking the Three-Loop one would have been a sleeker choice for the tops of the Lovebud Vines.

Three-Loop: How to Do It

The Three-Loop Slip Knot variation is similar to making a basic slip knot except: take the first 16″ or so* of your starting yarn end and fold it in half first. Use the fold to make the slip knot. Don’t pull the folded end all the way through.

3 steps to making a standard slip knot with a doubled length of yarn to result in 3 loops, not 1.
View higher-res image.

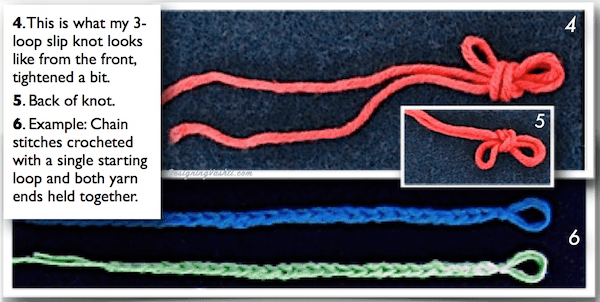
*Use a longer length than 16″ if you’ll be crocheting both ends together throughout, like I did in image #6 below. It’ll depend completely on each project. (It’s a great way to avoid weaving in the end.)

Adjust and tweak the final desired size of the loops first before tightening completely. Then, pull the knot tight enough to give it a streamlined look.

Starting slip knot variation: this one has 3 loops. One goes on your crochet hook; after crocheting, two loops are left.
How the 3-loop slip knot looks with a simple foundation chain. View full size.

Here again is a feature I appreciate: the long yarn end is waiting close to the loop that goes on the crochet hook. This means you won’t have to see a stringy strand of yarn traveling over the knot, which would look messy, asymmetrical, and unnecessary.

Updated November 2018. It’s part of an experimental blog post series: Vashti’s How to Crochet Book. Next post: Hand Chaining, a Straddler of Worlds.