Still getting the hang of basic crocheting? Feel free to give this a try. You’ll need to be able to find the top two loops of stitches, which is a beginner skill. Increasing or decreasing internally is for Intermediate-level projects, however. (Internal shaping happens within a row, while external shaping is at the edge of a row.) Also, its invisible effect makes it challenging even for more experienced crocheters!
This is an uncommon stitch insertion point. I found it in use as far back as about 1840 but have not found a name for it, nor a consistent modern use of it. Scroll down to see all the special reasons that I think we should all be making more use of it.
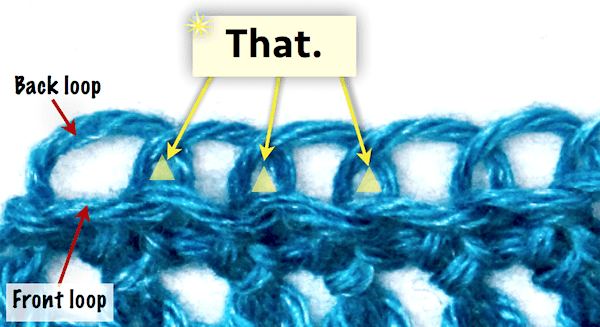
How to Crochet Between Top Loops
Here’s how to get your crochet hook into the yellow triangle spaces between loops as illustrated above.
If you’re crocheting in rounds and you don’t turn to begin a new round,
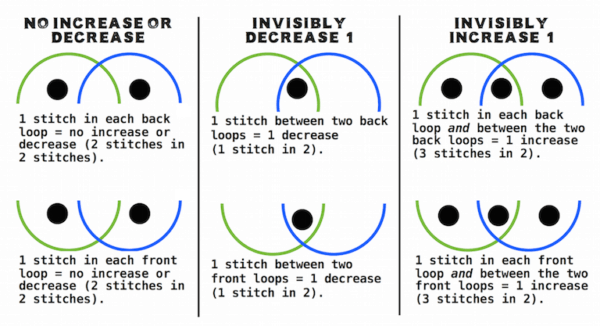
- Insert your crochet hook under the front loop of the next stitch AND under the front loop of the stitch after it
- Yarn over and pull a loop through the two stitches: 2 loops on hook; yarn over and pull through the 2 loops to complete a single crochet (sc, or dc outside of the US).
If you’re crocheting in rows and you turn to begin each new row,
- Insert your crochet hook under the back loop of the next stitch AND under the back loop of the stitch after it
- Yarn over and pull a loop through the two stitches: 2 loops on hook; yarn over and pull through the 2 loops to complete a single crochet (sc, or dc outside of the US).
You don’t have to use only front loops in the round, or back loops in rows; these are just easier to start with because of the way they overlap. Try it with front loops, and then with back loops. You’ll see what I mean.
You also don’t have to do a single crochet. I just used that stitch for convenience.
When and Why Though?
In short, it’s amazing. It’s invisibly effective when you want, and lovely when it’s visible. It brings out a fine-grained lacy charm to stitch textures whether you use it for shaping or not.
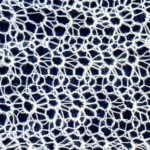
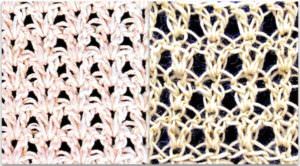
Lacy star stitches are already lovely; crochet them between top loops and you get the beauty at right. I still swoon when I see it.
Invisible Shaping Method
It’s not just one of many ways to increase or decrease stitches; it is often the best way.
You can easily add even the stitches you’d normally have to yarn over to add first, such as a slip stitch or a Tunisian simple stitch.
Amigurumi crocheters are already in on the secret. They love this method for decreasing invisibly.
Slip Stitch Crochet aficionados love it especially when increasing because it is so easy and invisible to do with slip stitches. To me it feels like the most natural method to use with slip stitches. It’s my favorite way to shape slip stitch ribbing.
Unique Textural and Decorative Effects
Any shaping method can also be used to create all-over stitch patterns. This “between the top loops” stitch insertion point changes the way holes look, in a really cool woven filigree way sometimes. Scroll down to see what it does to V-stitches.
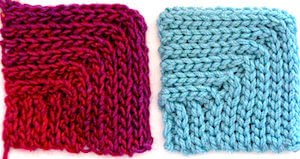
You can make the invisible visible when you stack your increases or decreases, such as to make a mitered corner. The result is a neatly polished look. No weird holes. No lumps or weird puckering. It doesn’t interfere with stretch or drape.
There are several ways to increase and decrease but few methods can pass so many tests.
Why It’s a Game Changer
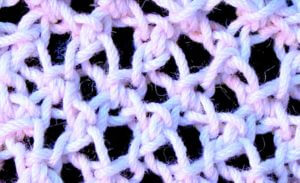
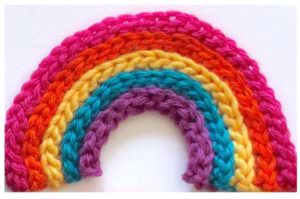
It transforms the most common crochet texture of all, its chain-topped look, into a filigree-like woven or lattice look. It’s like weaving air or a bit of cotton candy floss into links of chain mail. At right is some “air” added to slip stitches.
I think it works so well as a shaping method because it takes advantage of how the base of a crochet stitch is willing to compress into the tiny “magic triangle” between top loops. This helps it seem invisible; so does finding secret hiding places between the stitch line up that the eye usually spots.
Most of all I think this is an important stitch insertion point option because it points to deeper relationships between the stitches.
Two crochet stitches across a flat horizontal plane share a “magic triangle” of space where their top loops overlap. Instead of always starting a new stitch by inserting the hook from front to back (perpendicular to the row), we can move the hook alongside the row, parallel to it. This is something I love about Tunisian Simple Stitch: we crochet the next forward row into front vertical bars in a motion that runs parallel to the row and fabric surface. Great things result, including different kinds of drape, stretch, and texture.
