Learning how to let your crochet hook determine your stitch gauge is possibly the most valuable skill a crocheter could develop.
Why is it so Important?

Crocheters traditionally fall into a habit of making their chains and slip stitches tighter than their other stitches, regardless of their hook size. Some may be taught to do this unintentionally, or because it can improve some thread crochet patterns.
Other crocheters are actually using a”yarn-led gauge”. They use the yarn as a gauge guide. Crocheters accustomed to mostly cotton yarn or thread, which is not stretchy to work with like wool, tend to do this.
Hook-led gauge is necessary for:
- Stretchy and buttery-soft slip stitch crochet.
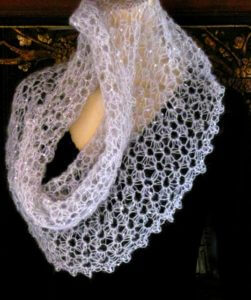
- Airy, translucent Tunisian crochet lace.
- Love Knots and other intermediate-level stitches that depend on being able to “eyeball” a loop size.
- Most polished and fashionable-looking crochet fabrics that also fit.
- Crocheting professionally as a teacher, designer or as a valuable pattern tester for other designers.
How Do You Do It?
Every crocheter starts out with a natural gauge, often called the “crocheter’s hand.” One person may crochet more tightly (or loosely) no matter the size of the crochet hook they’re using.
Start by watching the stitch loops as you crochet.
If the loops tighten, notice when and where. It might even be just after you complete the stitch. (I’ve seen crocheters purposely make a loose stitch, then unwittingly yank the yarn just before beginning the next stitch.) If taller stitches are consistently tight, you might be making each stitch on the tapered neck of your hook instead of the shaft, where it stops tapering nearer to the thumb rest. If you have a mixture of tight and loose loops, consider how you are holding the yarn. These are just a few things that could be happening.
How to know you’ve met your goal?
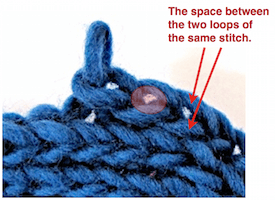
 Make stitch loops that accommodate the diameter of the hook. This means use the shaft part of the hook as a guide, where its neck stops tapering before the thumb rest. Compare the girth to the space between the top two loops of your stitches. It’s a very good sign if it looks like there’s enough space for your crochet hook to fit.
Now just practice enough to update the muscle memory in your hands. Your fingers will start to feel the difference and your eyes will develop visual cues.
You’ll be well on your way to creating dramatic effects with fancy, skinny yarns and oversized crochet hooks! Sometimes I think of it as “crocheting with air” — that’s how it might feel to use a very big crochet hook with a fine or very stretchy yarn.
What if You Don’t Like Your Hook-Led Gauge?

Say you’re accustomed to being a tight crocheter, but now you can crochet with a hook-led gauge. Congratulations! BUT—you need tighter stitches for a certain project. What do you do?
The answer is the same as if you crocheted too loosely before a hook-led gauge and need looser stitches: you change the hook size, not your crocheting. Change to a smaller hook size for tighter stitches, or a larger hook size for looser stitches. This is why patterns always add “or size needed for gauge” after the stated crochet hook size.
Hook-led gauge is actually an intermediate skill that leads to advanced crocheting, although it’s not listed in any of the standard skill level descriptions.
You might feel a bit outside of your comfort zone at first. If so, just tell yourself that you’re investing in your hobby: a world of exciting new stitches and designs will open up to you.

