You’re ready for this intermediate-level topic if you already know crochet basics like these: how to make a slip knot, and how to crochet chain stitches and single crochets (UK: double crochet).
This lacy iconic stitch is a unique crochet experience. As a member of two unusual stitch families (Foundations and Pulled Loops) it shares some traits with chain stitches, Acacia Stitch, and even Loop Stitch.
It’s known by many names. In my 19th century English-language sources it was primarily “Knot Stitch” and occasionally “Hail Stone Stitch”. These names were replaced by “Solomon’s Knot” and “Lover’s Knot” by the mid-20th century. I haven’t pinpointed why after searching in over a hundred sources.
“Love Knot” is my personal favorite because it’s associated exclusively with the stitch without also referring to macramé, embroidery, or religion like the other two modern names do.
Your First Love Knots
Love Knots can magically serve as their own foundation row. As students exclaim in my Love Knot classes, “You mean I just make them in the air?” YES. Like magic (or like the chain stitch), you can crochet Love Knots right out of thin air.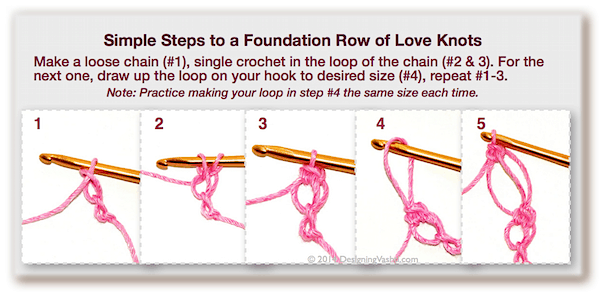
Step 1, The Loose Chain Stitch
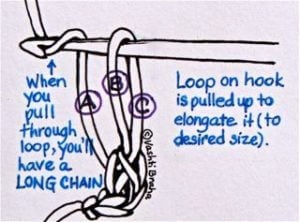
Use a smooth, light-colored yarn and a crochet hook size that goes with the yarn. Make a slip knot and place the slip loop on your hook. Crochet a chain stitch. Now loosen the loop on your hook so that it’s about an inch long. Yarn over and pull the yarn through to make a loose chain. Compare the three loops of your loose chain to the A, B, and C loops in the drawing at right. Know Your ABCs!
Love Knots have a reputation for being tricky. Feeling unsure about which loop of the chain stitch to use is a common hurdle. (The next page addresses other hurdles.)
Now you’re ready for Step 2.
Step 2, Tie the Knot in That Love with a Single Crochet
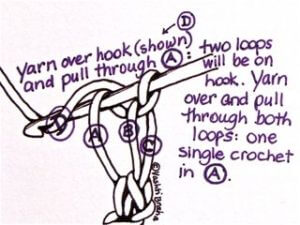
Single crochet in loop A: insert your hook between Loop A and the other two loops, yarn over (as shown in the next drawing), pull through the loop: 2 loops on your hook. Yarn over and pull through both loops on your hook to complete a normal single crochet. That’s it.
Step 3, One Love Knot, Now What?
You have one loop on your hook after completing the single crochet. You can now launch right into a second Love Knot, as shown in the pink yarn steps #4 & 5 above.
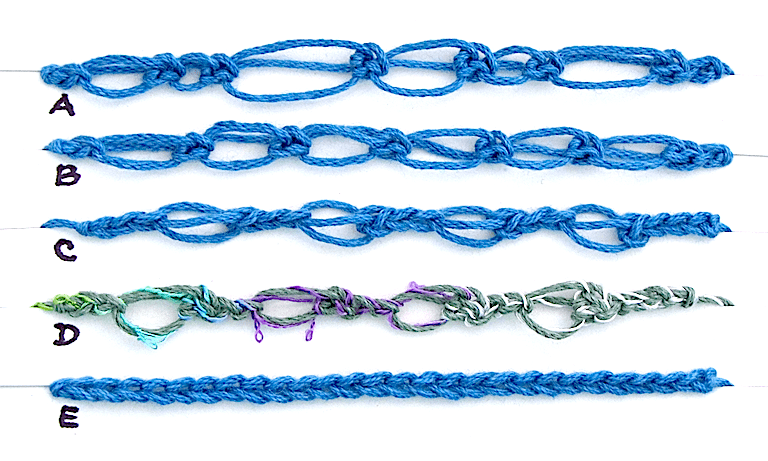
My suggestion to Love Knot newbies: Purposely make some of uneven sizes, like in the “A” row in the top photo (blue yarn). Once you feel confident, attempt to make each one the same size, like I did for the “B” one.
Beyond the Foundation Row
You might be thinking, “I’m here for the lacy Love Knot mesh. I still don’t know how to do that.” I hear you because the stitch name is often also used for only one of many stitch patterns of this stitch. Your next step is to learn how to crochet into a row of Love Knots.
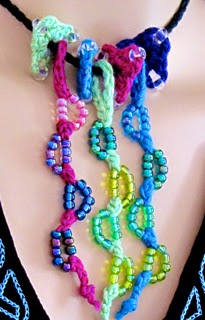
Wait though. Love Knots look so different depending on the yarn, and one row of Love Knots can be enough! I used a one row variation for the Lovepod Boa. Try a special thread and some beads for a quick necklace. I love wearing mine.
Explore some stitch variations. Instead of a single crochet in loop A (“the bump loop”) of the chain, I used a half double stitch for the Buffalo Knot Belt, a free pattern. For “C” and “D” in the topmost photo, I alternated Love Knots with chains and tried a novelty yarn.
You might also like:
- Love Knots Old and New inspiration board in Pinterest
- Vashti’s Crochet Inspirations Newsletter issue #39: Love Knot Research and #40: Pull Up a Long Loop.
- See several more interesting links at my Love Knots Class Resources Page.
