Posted on 2 Comments

Crochet Star Stitch How-To

This post is being revised and updated. Please check back.

A Guide to Star Stitches in Patterns

All right. Here’s the thing: star stitches are beautiful, and also tricky sometimes. This is a solidly intermediate level stitch that requires from 5 to 12 steps to complete, depending on the stitch variation.

Most of us use patterns when crocheting this stitch, so most crocheters will encounter star stitch types that vary a little, or a lot. Toward the end of this post I use colored dots to give you a heads-up on some variations you might encounter.

This is still a “basic” start stitch how-to, though! The stitch variations complicate it, but you need to know about them because we’re all equally likely to encounter a variation any time we use a new star stitch crochet pattern.

Want to follow along with hook and yarn? With blue (or a dark color) yarn, chain 15, double crochet (dc) in the 4th chain (ch) from your hook and in each remaining ch: 11 dc; 12 dc if you count the 3 chs you skipped. Change to white (or a light color) yarn. Chain 3 and turn.
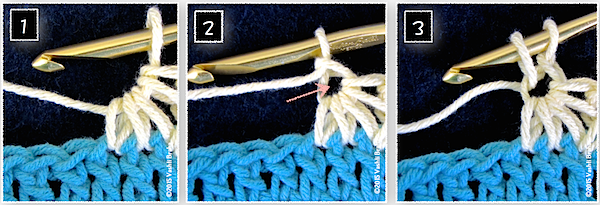
A star stitch is intricately linked with the stitch before it.
It may look like image #1 skipped some steps, but read the directions above and below.

Basic Star Stitch How-to:

  1. Pull up a loop in the second white ch from your hook, in the top of the first blue dc, and in each of the next two blue dc. Yarn over (yo) and pull through all 5 loops on hook. Your stitches should look like image #1 above.
  2. Ch 1 to form the eyeThis completes one star stitch. The arrow is pointing to the eye of the star.
  3. To begin another star stitch, insert your crochet hook in that eye, yarn over, and pull up a loop.

Really Look At the Loops

In image #4, we see the two loops on the hook from image #3, plus three more loops. One of the loops was pulled up in the same blue dc as the completed star. I marked that with a yellow dot. Notice the two pink dots. Those are the two next blue dc of the row. I’ll come back to these dots later.
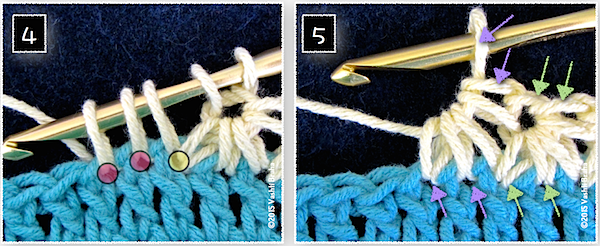
Two red dots (image #4) indicate the two next stitches of the row to crochet the new star stitch into. Image #5 identify what the stitch loops become in a completed star vs while a star in progress.
These two images illustrate how to avoid accidentally increasing or decreasing along the row.

When you yarn over and pull the yarn through all 5 loops on your hook, you get image #5. Here’s what those arrows are all about: The two pairs of green arrows point out that the base of that completed star take up two blue dc; the top of that star counts as two stitches (the eye and what is called its top in most patterns). Each star counts as a two-stitch group.

The two lower purple arrows point out the same thing about this new star-in-progress: the base of it takes up only two new blue dc of the row.

The purple arrow pointing to the loop on the hook will become the star’s eye the minute we chain 1 to complete the star.

Common “Side of Star” Option
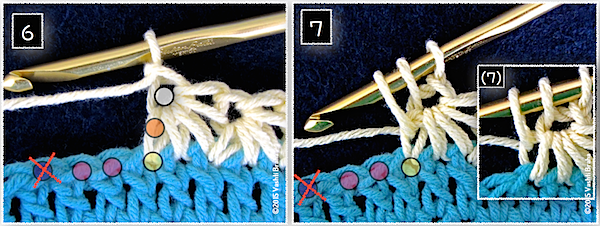
The side loops of the star are shown with an orange dot in image #6. Image #7 shows what it looks like when you pull up a loop in the side. Colored dots also indicated other places to pull up loops.
Pay attention to just the ORANGE dot for now.

Image #6: More colored dots! The orange dot indicates the side of the star. The side of the star has a front loop and a back loop. In many star stitch patterns, you pull up a loop in the side of the star. Sometimes it doesn’t matter which loop, other times the front or the back loop is specified.

In image #7 you can see that a loop has been pulled up in the side of the star. In the smaller inset (7), the loop was pulled up in only the back loop of the side.

Loop Priorities

The two most important places to pull up loops while making star stitches are:

  • the eye (the white dot in image #6), and
  • one of the two new stitches of the row (the pink dot that’s furthest from the star).

All of the other loops you pull up between these two places are flexible and variable, meaning you can omit pulling up a loop in one, or opt to add a loop in one. You needn’t have five loops on your hook before completing a star stitch; for example, you can ignore the place indicated with the yellow dot, or the orange dot in image #6. Or include both.

You’ll likely develop a favorite way to make your star stitches. Most likely you can substitute the star you want in a pattern you’re using, but of course swatch to make sure. (Occasionally the stitch or row gauge will change slightly.)

It’s like picots: most experienced crocheters have their own favorite way to make a picot and freely use their own where they wish.

The blue dot with the red X signals an error (image #6 & 7). If you pull up a loop past the two pink dots, you’ll start decreasing. Your star will take up 3 stitches of the row, but still only give back only 2 stitches in its top loops. Does that make sense? And that is what my newsletter issue #73 is about.

(Note: There’s a star stitch out there that does take up 3 stitches of a row instead of 2. The stitch count is adjusted in the next row.)

Want more Star Stitches?

I’ve written four newsletters about star stitches over the years: Star Stitch Lace Pretties, Star Stitch the Tunisian ConnectionShaping Star Stitches, Foundation Star Stitch. Although I’ve created star stitch step outs for patterns and for classes, I thought I’d already blogged one for star stitches—like I have for Love Knots, basics of Foundation Stitches, and “camel crochet” (third loop of single crochet).

I hope this star stitch how-to comes in handy.

Star Stitch Patterns by Vashti Braha: Starlooper Mobius, Starpath Scarf, Q-Star Coverlet, and Starwirbel.
Posted on Leave a comment

Beaded “Delta” Types of Crochet Lace

I have some fun photos of beaded crochet swatches to share: overflow from newsletter issue #62, “Delta-Type” Crochet/Hexagonal Lace Types. Click on each photo to enlarge it and see comments.

Note: I’m using “delta crochet” to refer to a category, not for a single kind of stitch pattern, and not for triangular items such as shawls. I mean geometrically a type of lace grid. In the four-sided lacy net category we have the filet type (square/rectangular spaces that stack up in columns), and the fishnet or diamond mesh type, which have diamond-shaped spaces that are offset/staggered. “Delta” is pretty well known to mean triangle, whereas a term like “isometric” might be less helpful. If you have a better term to suggest than “delta,” please leave a comment, thanks  🙂

The gist of the newsletter is: Crochet nets of three-sided triangular lacy holes (or “spaces”) have a fundamentally different kind of lace structure, or grid. You can create them with several different kinds of crochet stitches, and they all differ from nets with four-sided spaces in looks, stretch/drape properties, and the experience of crocheting them.

When I experimented with beading delta laces, interesting things happened. Adding beads to love knots is in some ways very similar to beading chain stitches. I haven’t even tried several more ways to add beads to the ones shown here. Adding beads to the classic tall-stitch delta type, though, is more limited. It would be super tricky* to add beads to a whole post of a tall stitch.

*By “super tricky” I mean unpleasant and perhaps impossible LOL.

Check back, I’m swimming in swatches and blogging them all – my goal is a short blog post most days per week. I love comments!

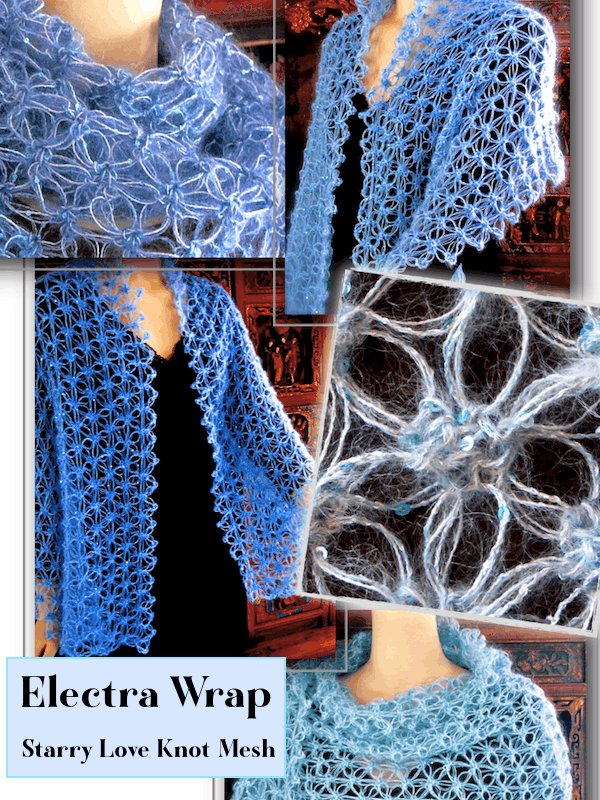
Electra Wrap

Elegant, weightless Electra Wrap is crocheted in a less common love knot mesh pattern. It’s edged with picot love knots as you go. Pictured wrap combines a fine sequined strand with one of mohair. Stitch diagram included.

I crocheted together two strands of fine celestial yarns to create this starry cloud of lover’s knot (Solomon’s knot) lace, all in one piece–no reattaching of yarn required for the picot edging. The original inspiration was a sequined Italian yarn called Crystal. Fun fact: crocheting it with a strand of fine mohair makes both yarns easier to use! 

This love knot crochet pattern is updated with a stitch diagram and more. The original edition appeared in the Summer 2013 issue of Interweave Crochet magazine. A stitch diagram essential because optical illusions are built into this design. Without a diagram, the stitch pattern is counterintuitive for some crocheters at first. Also, love knots serve as their own foundation chains and turning chains in this pattern. The yarns used contribute yet another (heavenly) illusion. 

Love knots are traditionally used to make a lacy square-holed net instead of this triangle-holed version. Please see issue #62 of my Crochet Inspirations Newsletter about this flower-like hexagonal lace structure. It’s reversible and warm because the bubble-like stitches create a lightweight web of air pockets.

Skill Level

Advanced Intermediate. The pattern may start off challenging for you until you get used to the optical illusions of this design! Instructions and links for how to crochet the love knot stitch are provided on page 3. I have written this pattern with few abbreviations. UK and Australian equivalents for American pattern terms are in brackets { }. 

View all love knot patterns here.

After using this pattern, you will know (if you didn’t already): 

  • How to crochet love knots (a.k.a. lover’s knot, Solomon’s knot, knot stitch)
  • How to understand the visual illusion of this starry type of love knot mesh.
  • How to reinforce their joining knots for this type of lace pattern.
  • How to finish the edges with picot love knots.
  • How to enjoy crocheting with fine mohair, and those tempting specialty yarns that have sequins and other notoriously tricky textures!

Finished Dimensions: 18″ {16.46 m} wide and 61″ {55.78 m} long.

Materials

  • Crochet hook: US H/8 (5 mm). Adjust hook size if necessary, see Gauge information below.
  • A stitch marker or two might come in handy.
  • Yarn needle for weaving in ends.
  • Yarns used for the project shown: 
  1. S. Charles Collezione Crystal (85% polyester, 15% cotton; 144 yd {131 m} per .88 oz {25 g}; CYC “#0 Lace Weight”): color #11, 3 skeins.
  2. S. Charles Collezione Luna (71% super kid mohair, 20% silk, 9% lurex; 232 yd {212.5 m} per .88 oz {25 g}; CYC “#0 Lace Weight”): color #25, 2 skeins.

Substituting yarns:  Choose a “#0 Lace Weight” or “#1 Super Fine Weight” yarn if you wish to crochet Electra with two strands held together. (The #0 weight category encompasses a range of yarn sizes, and mohair can make a #0 yarn appear to be a thicker #1 or #2.) Try pairing yarns that have recommended hook size ranges of 1.5 mm to 3.25 mm. 

  • If a yarn has mohair, sequins, or other fancy bumps like beads, crocheting two strands of it held together will neutralize its uneven textures. This makes it much more enjoyable to crochet with. Isn’t that a fun solution? I also find that love knots are much easier to rip out than other stitches, even when I use a mohair yarn.
  • To crochet this pattern with only one strand of a yarn, look for a “#3 Light Weight” (DK or light worsted weight) yarn. 

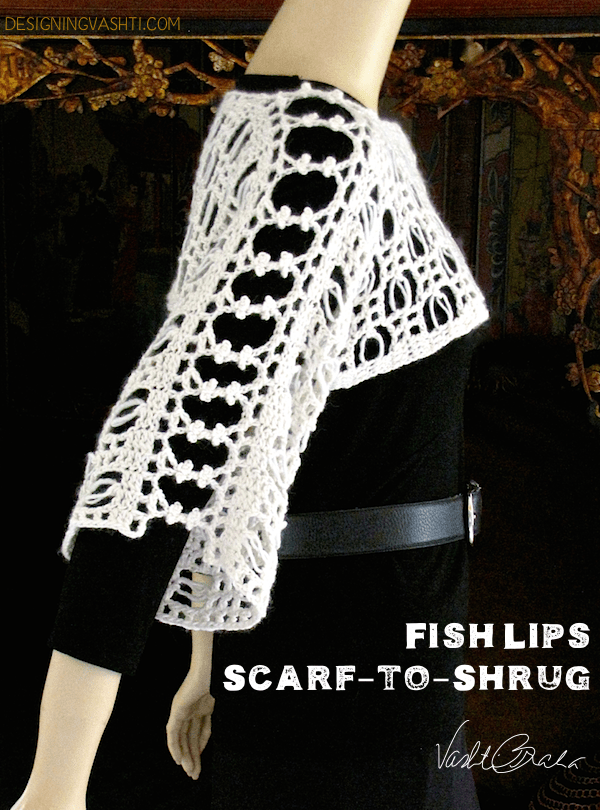
Fish Lips Scarf-to-Shrug

Fish Lips brings out the bold, modern side of Love Knot stitches (a.k.a. Lover’s Knot, Solomon’s Knot) for a trendy pullover shrug. The shrug is created by joining two simple shapes—scarves—with a lacy seam. The wide seam also modifies the bateau neckline for a comfortable fit.

It’s also a scalable method for adding freeform love knots anywhere: I’ve been using it to sculpt the size and shape of Love Knots. I developed the method while exploring new material for my 21st Century Love Knot Adventures crochet classes.

Crocheters with more experience can use the scalable method to substitute any yarn, thread, or hook size. Once you know how to scale the size of Love Knots yourself, it’s easier to add them anywhere, and “sculpt” their shape in a freeform manner.

The stitch pattern is fast and easy to memorize. A finished edge (selvedge) is built in to stabilize the “fish lips.” Stitch pattern multiples, a stitch diagram, schematics, and other information for customizing the width and height of your rows are included. I’ve also included some yarn and swatch talk, because different yarns add their own effects to Love Knots.

Skill Level

Advanced Intermediate due to the scalable approach to making Love Knots. Complete, in-depth, tested information on how to crochet it for all skill levels is provided.

View all of our love knot patterns here.

Included: international English equivalents for American terms.

?After using this pattern, you will know (if you didn’t already):

  • How to crochet a standard Love Knot Stitch (a.k.a. Solomon’s Knot, Lover’s Knot).
  • How to customize the size and shape of your Love Knots.
  • How to add Love Knots of any size anywhere in a crochet pattern for unique lacy effects.
  • How to crochet two scarves together with a decorative Rosebud Bridge seam.
  • How to construct a pullover shrug with a scarf pattern.

Finished Dimensions

Pattern includes options for customizing the dimensions, and information for using thicker or thinner yarns with the Fish Lips stitch pattern.

Fish Lips Lace Scarf: 60″ X 7-7.25″ wide {152.4 cm X  17.75-18.4 cm}.

Shrug Option: One size fits Small to Large (see schematic, p. 8).

  • Head opening: 12.5″ {31.5 cm}.
  • Bust: 42″ {106.7 cm}. Designed for roomy fit. Easy to adjust during seaming.
  • Sleeve opening: 8″ {20.3 cm}. Bust opening/hem adds extra ease to armhole drop.
  • Sleeve length (adjustable) from shoulder point to cuff: 15″ {38 cm}.

Materials

  • Crochet Hook: Size US-8/H/5 mm and US-7/G/4.5 mm crochet hook. Smaller hook is used for the shoulder seam of the shrug.
  • A spray bottle filled with fresh water. A tiny travel size is great to have on hand for the first few rows while you are establishing the scale of your Love Knots.
  • Yarn Shown: The Alpaca Yarn Company Astral (50% Tencel, 30% Alpaca, 20% Wool; 197yds/180m per 3.5oz/100g) color 8100 cream. For scarf, .75 skein; for Shrug, 1.5 skeins.

Substituting a yarn: Look for a Standard Medium Weight #4 Yarn that has some bounce, and that is at least 50% natural fiber so that damp blocking will bring out some drape. (Steam blocking, such as for “killing” acrylic to create drape, is not recommended for this pattern because it could cause the “fish lips” to collapse.) This yarn weight usually pairs well with a hook size in the range of US7/G/4.5mm to US9/I/5.5mm. These yarns may also be referred to as DK (Double Knitting), Light Worsted, or Worsted weight.

Buffalo Knot Belt

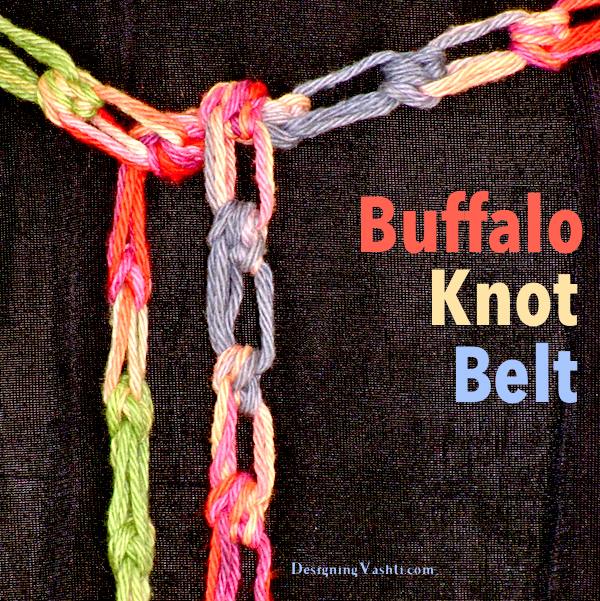
This quick crochet belt pattern for the hippie in (most) all of us uses a beefier Love Knot variation that I developed (although surely someone else has before me). Crocheting these “Buffalo Knots” with two strands of medium weight cotton yarn held together gives them even more heft than Love Knots usually have.

Whether or not you already know how to make Love Knots (a.k.a. Lover’s Knot, Solomon’s Knot, Knot Stitch), this Buffalo version is a pleasure to make, and a handy addition to a crocheter’s toolbox.

Skill Level

Easy Intermediate. Some crocheters consider the Love Knot to be an Intermediate-level stitch because of the hand-eye coordination needed to make each stitch evenly. Please don’t be intimidated by this. It’s a fun stitch to know! Just resist the temptation to expect perfect Buffalo Knots for this folksy boho belt and you’ll be fine.

Have a look at the Love Knot Adventures Class Resource page, and my other love knot patterns.

This is a very simple tie belt pattern. You work one row and you’re done: no foundation chain needed. Avoid weaving in the yarn ends by adding wood beads to the ends! It’s easy to customize the length of your belt.

I’ve written the pattern with no stitch abbreviations for practicing pattern readers. UK and Australian equivalents are included with American terms.

After using this pattern you will know (if you didn’t already):

Finished Dimensions

Belt shown is 43” {109 cm} long worn doubled around a standard size Small waist. Length of Buffalo Knot Belt is a helpful guideline only. Add about 5” {12 cm} more for each larger size if you’re not trying it on as you go.

Materials

Yarn: Choose a yarn that’s not too slippery or silky so that the Buffalo Knots don’t loosen with time.
Optional: Medium to Large wood beads, 0.5”-1.25” {1.5mm-3.25mm}, about ten.