It’s “hook ready” because the starting yarn end of its center-pull ball is waiting for you: it’s attached to the yarn label. (No more “yarn barf”.)
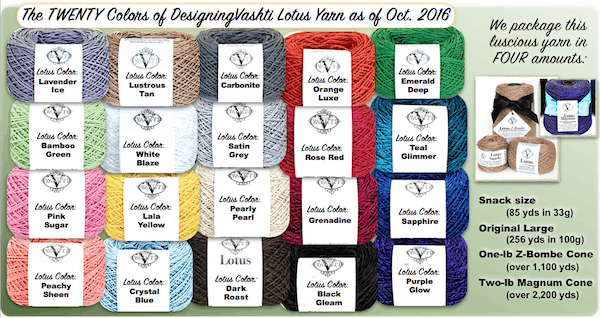
It’s made in an American mill that serves the fashion industry, so this yarn is designed to gleam and drape, to hold up, and to have virtually zero knots per ball.
Machine wash and dry Lotus gently with like colors, although as with most fashion fabrics, hand washing and air drying will extend its life.
Patterns for Lotus
See all of our Lotus patterns in one place. Designers Doris Chan and Vashti Braha carefully chose the Z-twisted plying and fiber blending of Lotus to optimize the crochet experience. It interacts beautifully with crochet stitches. Of course knitters and weavers love working with it too.
To find out when we add new patterns for Lotus, subscribe to our free Crochet Inspirations newsletter. Need advice about substituting Lotus for a specific crochet pattern? Visit our helpful forums in Ravelry: Doris Chan Crochet, Vashti’s Crochet Lounge.
How to Substitute Lotus Yarn with Your Favorite Patterns
If the crochet hook called for in the pattern is a US F-5 (3.75 mm), G-6 (4.00 mm), or G-7 (4.50 mm), then look next at the type of yarn listed. If it’s primarily cotton or rayon (a.k.a. viscose, bamboo, tencel) and looks smooth, chances are great that Lotus will give you the results you’re looking for. (As for any pattern, swatch and damp block it. You’ll see its lovely drape too!)
Especially with lacy projects, Lotus may also work great with a pattern calling for a US H-8 (5.00 mm) crochet hook. Doris Chan crocheted a lovely Jolimar Skirt with Lotus and a US H-8 hook. (It was originally designed with the discontinued Naturallycaron Spa and a US I-9/6mm hook.)
Especially with jewelry, bags, belts, and kitchen projects, Lotus Yarn works great in a tighter gauge, such as a US E-4 (3.50 mm) crochet hook. For example, Vashti successfully substituted Lotus colors for her Aran Rozsana pattern.
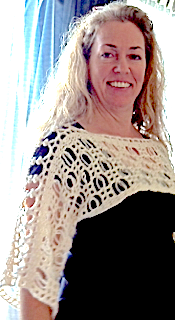
Welcome to DesigningVashti.com. I’m Vashti Braha (wearing Fishlips Shrug at a yarn conference). Need help? Find a broken link? Email me directly. You’re at the home base for my in-depth crochet classes, intrepid newsletter, long-running blog, and crochet shop of over 100 items. (The shop URL used to be www.shop.designingvashti.com/. The permanent URL for it is now https://www.designingvashti.com/.)
In the shop you’ll find: Doris Chan’s exclusive DJC pattern line, my own indie patterns, the complete line of Jelly Yarn®, and crochet hooks of several sizes, brands, lengths, and combinations. We always order direct from the manufacturer, person to person. It’s always nice to connect, plus it also safeguards against counterfeits and inflated costs. As always, shipping is free in the USA. Shopping is certified secure.
COVID-19 measures
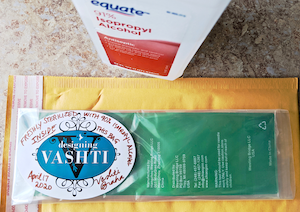
For each shipment we freshly sanitize the original plastic wrapper of each item with 91% isopropyl alcohol. Then it goes immediately into a new clear plastic bag.
A signed sticker on the outside of the bag includes the date this was done (example shown at left).
Vashti’s Online Crochet Classes for 2022
I’ve been creating new classes and teaching them online for the Crochet Guild of America. As of 2022, CGOA’s virtual classes are scheduled throughout the year. See my newest classes scheduled through May 2022 so far.
Hand chaining is when you crochet chain stitches with your hands and fingers instead of with a crochet hook. It’s also called finger crocheting. Hand chaining is so easy! Kindergartners do it. It’s a popular way to crochet trendy necklace-scarves with fancy yarns in under 30 minutes.
Love it! “Poseidon Scarf Kit” at loopymango.com
You might have learned hand chaining as a child in kindergarten, at camp, or from a babysitter. It’s often taught as a stand alone activity rather than as an introduction to the larger world of crochet, knot tying, or knitting. I don’t even remember how I learned it. I just already knew how by the time I officially learned how to crochet with a hook at the age of nine.
For the next blog post I viewed several videos that show how to do hand chaining as a crocheter, a knitter, or a knot tyer. It left me with a new way of thinking about the origins of crochet.
Not Just for Beginners
Hand chaining is so fun to do that even experienced crocheters are at risk of getting “hooked” (if they remember to try it). It’s often forgotten as a crochet method even though it offers nuanced control over unusual yarn combinations for edgy, artsy effects. I get new, deeper insights into simple stitches when I hand crochet them, thanks to the intimate, tactile experience of crocheting.
Hand chaining a special subset of crochet that merits a closer look than it usually gets.
Hand Chaining vs. Hook Chaining
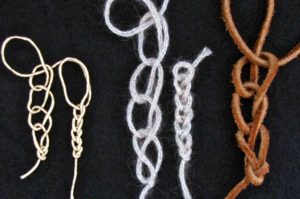
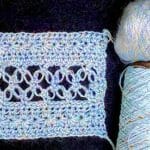
Hand Chaining loosely vs. tightly. L to R: Satin cord, wool knit tube yarn, suede lacing.
Hand chaining cuts out the middleman (er, the crochet hook). This is perfect for crochet beginners! Learning to use a new tool with yarn loops for the first time takes the focus off of the stitch. Shouldn’t getting to know a stitch be the most important part of learning to crochet? Especially when that stitch—the chain stitch— is the foundational core of all crochet? I think so.
The crochet hook is the one central tool of crochet. When researchers encounter an unfamiliar fabric, they consider the tool used to create it. An item made with a crochet hook is usually classified as crocheted. I wonder how hand-chained items are classified.
Earliest Crochet Roots?
Hand chaining straddles two worlds: Crochet, and Knot Tying. The same basic crochet stitches can be made with hand chaining as with a crochet hook: Chain Stitch, Slip Stitch, and Single Crochet. (Other stitches are more of a struggle without a hook.) The fingers or the whole hand simply take the place of the crochet hook. Perhaps hand chaining came first, at least in some early cultures, and the crochet hook evolved to substitute for hands and fingers.
Among knot tying aficionados, hand chaining is called many other things: Drummer Boy’s Sinnet, Zipper Sinnet, Monkey Braid, Sea Chains, Chain Knots, Caterpillar Sinnet, and Daisy Chains. Boys and men may have encountered hand chaining via knot tying. Some practical uses among knot tyers include:
To quickly neaten long lengths of rope or electrical wire for storage. (To this linked video, a commenter added, “This is used by riggers [who set up e.g. the ceiling on stages for rock concerts] as a cool way of shortening and storing several long ropes in a hurry.”)
Launder climbing rope so that it can be easily machine washed, allowed to dry, and then “unzipped” for use afterwards.
Even if you already know how to crochet, I think Chain Stitch In Depth and other posts about crochet basics offer some new ways to think about our most basic and important crochet stitch of all, the Chain Stitch.
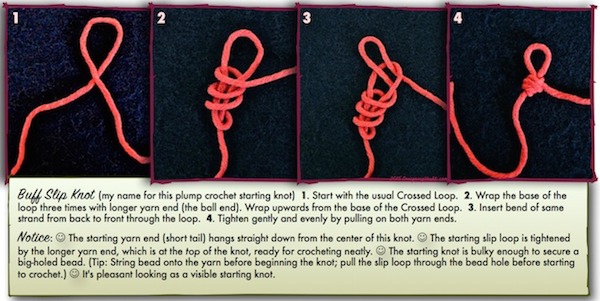
Here’s the follow-up how-to for yesterday’s “Pros & Cons of the Starting Slip Knot” post. I’ve created photo step outs for two promising alternatives to the basic starting slip knot. The first is what I call the Buff Slip Knot, shown above. The second is the Three-Loop Starting Slip Knot.
Special Slip Knots for Crochet
The Buff Slip Knot
Like our general-purpose slip knot, the Buff version offers a slip loop that you adjust by tugging on the longer yarn end. Unlike many other knots I tested, the longer yarn end is waiting for you up where the slip loop is rather than down at the bottom of the knot near the short yarn end. Stays tidy-looking this way.
Tying it is like tying a basic slip knot that has more wraps. A crochet beginner might wish to come back to this one later. Follow the four steps shown above. (View the high-resolution image).
I listed ten possible functions crocheters might need from the starting slip knot in yesterday’s post. The Buff Slip Knot variation is an especially good candidate for advantages #6 and #10 on the list. Try it when you need or want a visible crochet slip knot that is nice looking. It’s symmetrical in more than one way. It’s also beefier if you wish to start with a large-holed bead accent.
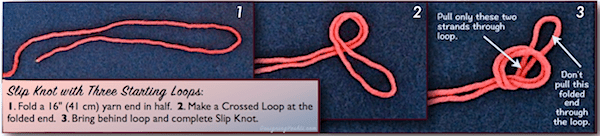
The Three-Loop Slip Knot
This one may seem odd. Why would anyone want a crochet slip knot with three starting loops? This one is a great way to start right off crocheting with a finished, usable button loop, hanging loop, or other handy use for a secure loop. Think jewelry, cords and straps, and how about potholders?
Puff stitches look finer than the chain stitches of the clasp loop!
Normally we’d start with a basic slip knot, crochet some chain stitches, then slip stitch them together to form a loop of chains. These work great for most things. Occasionally, chain stitches are too thick or textured for what I need. This tends to happen for me with jewelry projects. I’d like a slim loop to fit under a button clasp. The chained loops of these Puffpearl necklaces look unnecessarily chunky to me.
Another example is when a crocheted charm or pendant is designed to dangle. I’m thinking the Three-Loop one would have been a sleeker choice for the tops of the Lovebud Vines.
Three-Loop: How to Do It
The Three-Loop Slip Knot variation is similar to making a basic slip knot except: take the first 16″ or so* of your starting yarn end and fold it in half first. Use the fold to make the slip knot. Don’t pull the folded end all the way through.
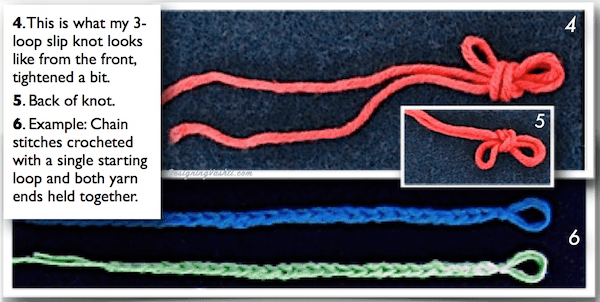
*Use a longer length than 16″ if you’ll be crocheting both ends together throughout, like I did in image #6 below. It’ll depend completely on each project. (It’s a great way to avoid weaving in the end.)
Adjust and tweak the final desired size of the loops first before tightening completely. Then, pull the knot tight enough to give it a streamlined look.
How the 3-loop slip knot looks with a simple foundation chain. View full size.
Here again is a feature I appreciate: the long yarn end is waiting close to the loop that goes on the crochet hook. This means you won’t have to see a stringy strand of yarn traveling over the knot, which would look messy, asymmetrical, and unnecessary.
After decades of crocheting and writing about it, I’ve reconsidered the essential character and fundamentals of crochet. I’m an even bigger fan than I already was! Consider what is remarkable about crochet with me:
Why I’d Want to Learn How to Crochet
Easy Control
Terms like easy and simple come up often about crochet. They usually imply not complicated, but I think that’s misleading. What’s easy about crochet is that you have a lot of built-in control. The hook provides it, and the logical structure of one “locked down” loop at a time does it.
The whole piece is easily “unzipped.” Crocheters call it frogging (because you “rip-it”). The yarn can then be reused, unlike with macramé, for example, which requires you to use several cut pieces instead of one continuous length.
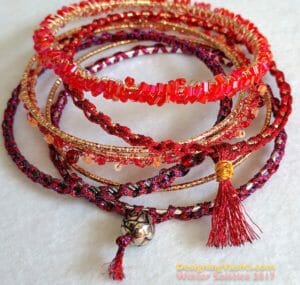
Experience Every Color & Fiber
Crocheted wire, fancy embroidery braids, and metallic flosses: Solstice Bangles.
If I didn’t already know how, I’d want to learn how to crochet just to try crocheting with yarns of different fibers, colors, and thicknesses. It’s a new experience each time. I’m in control of what I spend, too: each crochet project can be as economical or expensive as I want it to be.
I’d say that anything based on manipulating several yards (meters) of stringy stuff will not be easy initially for some folks, but the small challenge is so worth it. Wielding that crochet hook gives you the edge you need to control the yarn while it flows through your fingers at a good rate. It takes just a bit of practice to get up to speed.
As Fast & Portable As Needed
Crochet is as fast, lightweight, and portable as you want it to be. You’re in control there too. No bulky or heavy frames or looms to manage with crochet. Even hairpin lace, a crochet lace technique that uses a type of “loom,” is portable. Most of these mitts were crocheted in one day during a road trip!
I learned how to play the piano, and how to weave, and neither of these was very portable. I’d want to learn how to crochet like some people want to learn guitar: so that they can play anywhere.
Varied & Versatile
Finally, I’d want to learn how to crochet because it adapts to every phase of my life. It’s a distinctly useful, accessible, and versatile construction method. As a child I crocheted things for my sister’s dolls, and for my teachers and friends. As an expectant mother I crocheted things for the baby and to help me wait. I’ve crocheted trendy accessories, toys, Halloween props, protective shields for tech items, educational aids, and the best thing I’ve ever worn to a memorial service.
I designed Lovelace to see a northern stitch & southern stitch together in a project!
Historically, crochet developed in several places worldwide. Too bad the specifics of when, and in relation to where, are under-researched and inconclusive.
Given that crochet is a dramatically responsive technique, its development is likely to show marks of time, place, and purpose. For example, doesn’t it seem likely that crochet used in icy climates would develop different stitch patterns, methods, and materials from crochet that developed in tropical climates?
About the Name Crochet
It’s French and means small hook. It’s properly pronounced cro-shay. (Many crochet how-to books don’t give the pronunciation, so I thought I should.) Occasionally I see it spelled crotchet, so perhaps some people pronounce it that way.
All of us English speakers use the French term. In other languages, to crochet is called:
tejer in Spanish,
häkeln in German,
szydelkowac in Polish,
Gōu biān in Chinese,
virkning in Swedish,
hekle in Norwegian, and
haken in Dutch.
Defining Crochet
Crochet how-to books start out with some kind of introductory description of crochet. I started to write that for this post, then remembered that I did this for the launch of my DesigningVashti.com website! I still like what I wrote there, so please have a look.
Update: In 2018 I suggested this definition of crochet to the Center for Knit and Crochet. As a starting point the group has been using The Getty’s indexing description:
Textile construction involving the interlocking of looped stitches, employing a single cord or strand of yarn and a single hooked needle.
My preference:
Textile construction involving the continual loosening, tightening, wrapping, and interlocking of adjustable loops to form a range of stitch types. A fabric can be built in any direction by adding new stitches anywhere, including “in the air” to add a foundation for new stitches. This freeform property distinguishes crochet from linear grid-based textiles such as weaving (and perhaps nålbinding and knitting). Usually, a single strand of cord or yarn is employed at a time. More than one strand may be held together and used as one, or alternated in use (such as to change colors frequently).
The primary tool is a crochet hook, which resembles a dowel of any diameter with a hook at one end (sometimes at both ends). Stainless steel is the preferred material for the crochet hooks of extremely small diameters (typically 1.75 mm down to .5 mm, for use with superfine threads) for greatest strength and durability. This is probably why the crochet hook may still be referred to with the outdated term “needle”.