Posted on Leave a comment

New Angle on Diagonal Tunisian

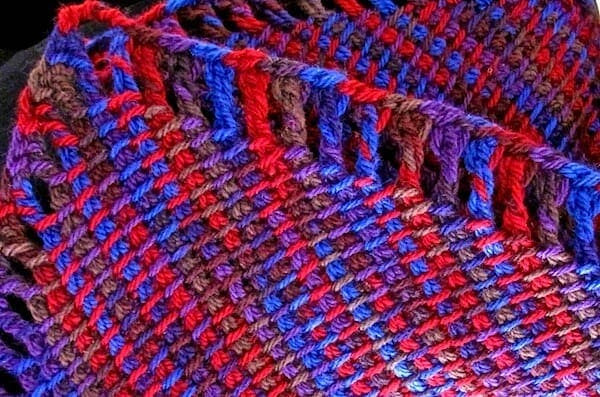
A diagonal corner of the Four Peaks scarf.

I put off writing about the Tunisian on the Diagonal class because I kept feeling like I had nothing to say, but also too much! Here’s another paradox: I feel like I’ve been teaching this class since 2010 and yet I never have, exactly. How can all of this be true?

I figured it out after writing the section about its 2009 roots below. Crocheting Tunisian diagonally is a huge topic based upon simple and powerful principles. Vary one thing a little, factor in some momentum, and everything ends up dramatically different.

I’ve taught big sections of this. The 2018 class will be the master class. (It’s great for all skill levels, thanks to the “simple principles” part I just mentioned.)

For contrast, travel back to 2009 with me for a bit.

2009 Tunisian Increase Methods

Nine years ago my first diagonal crochet design happened: the Five Peaks Shawl prototype. (The pattern was published in 2010 in Interweave Crochet Magazine).
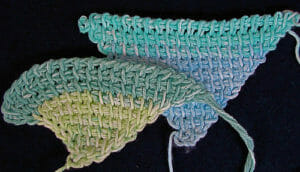
Left triangular swatch is starting to curl along one edge. Other triangle is symmetrical with nice drape.
Effect of the “squeeze-it-in” method shows in the left swatch. Not recommended for a shawl.

 There was almost nothing on diagonal Tunisian crochet from corner to corner, or “C2C”. With C2C you increase steadily along both row ends to widen, then decrease steadily until you end at the opposite corner.

The default increase method back then didn’t have a symmetrical, polished drape. I blogged about it (and the photo at right) in June 2009 because that’s when I was working out the increase method for the Five Peaks Shawl.

2009 Tunisian Hook Choices

Tunisian crochet hooks larger than size 6.0 mm (J) were scarce in any style and length, whether straight, flexible, double-ended, short, or long. When you found one, you put up with whatever its material, surface finish, and hook shape was. Remember that?

My options were either a long straight 6.5 mm (K) or a discontinued 9 mm (“M/N”) flexible hook from eBay. I needed a size between these two. Too bad!

Back then, publishers needed designers to use crochet hooks that were commonly available in stores. I worried that I wouldn’t be able to sell the Five Peaks pattern to a magazine. Fortunately, Tunisian hook choices were improving. Only three months later I blogged “Heaven is a Crochet Hook for Every Need”. Nowadays I keep a range of Tunisian hook sizes and lengths.

The Evolving Tunisian Crocheter

We Tunisian crocheters have been enjoying a renaissance for our craft! It had barely started in 2009. Back then, most crocheters still assumed the nature of Tunisian crochet was to be thick, kind of stiff, and with a stubborn curl. Not something that could cascade and swing from the shoulders like a waterfall, or look like a lacy weightless veil.

Each time I’ve taught a Tunisian crochet class since 2010, the students bring more skills and experience to the room. Newer Tunisian crocheters understand things faster. This became really noticeable around 2013. 

Five Peaks classes were the first I taught on diagonal Tunisian crochet. It was ahead of its time in 2009. Since then I’ve learned to start every Tunisian topic with a quick review of the relevant basics. People of all skill levels seem to welcome this. It seems to pull together and standardize the new things everyone is learning from different designers. 

For 2018 I’m excited to be starting out with a review of a different set of basics because when we crochet Tunisian on the diagonal, there are clues we can be looking for but may not recognize for awhile. Things may look wrong for awhile and yet be so, so right. 
Posted on Leave a comment

Last Minute Crochet Jewelry Gift–How to

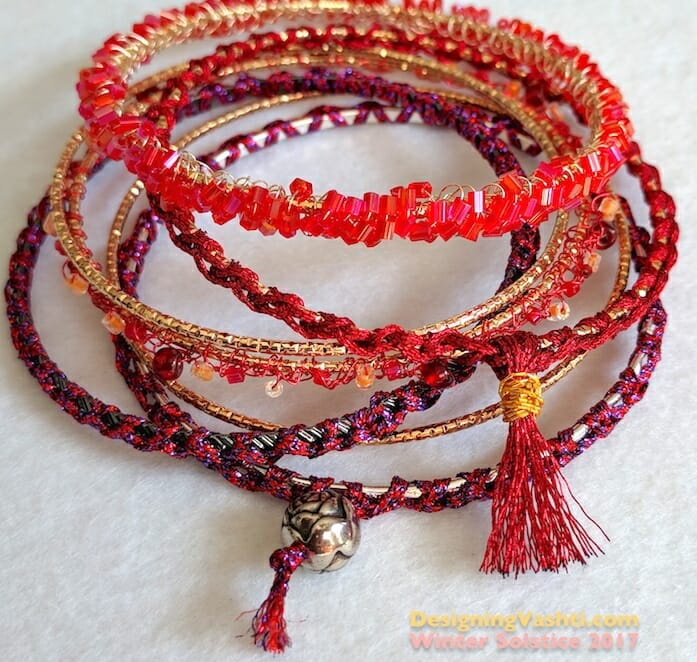
I’m crocheting these festive bangles for quick holiday gifts (Hanukkah, solstice/yule, Christmas), hostess gifts (I have five holiday parties to attend), and for myself. It’s relaxing now to make them. I’ll wear some to the parties.

Each completed bangle is costing me about 50¢ (not including labor, a.k.a. the love in every stitch ❤️).

“Solstice Bangles” Free Pattern

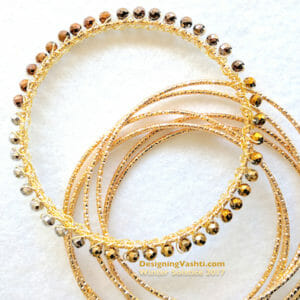
Below is the complete pattern for what I’ll call “Solstice Bangles” because tomorrow morning is the Winter Solstice (first day of winter). I contemplate this sometimes as I crochet around the bangles; it’s a satisfying “full circle” feeling. I’m completing another sparkly “wheel of the year”.

Skill level

The starter pattern is Beginner-friendly. So many ways to get fancy with it. Add some challenge with wire or beads.

Materials

This section looks long because it includes tips for substituting with items you have on hand.

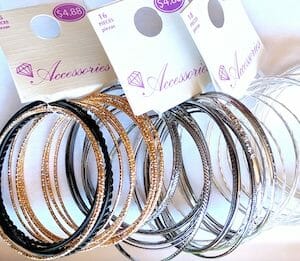
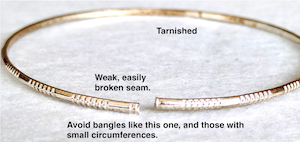
  1. Bangle “blanks”: Look for thin, narrow, permanently closed (not hinged or locking) metal bangles. They’re often sold as a group to be worn stacked, meaning all at the same time. If they are labeled with a size, choose only “large” because any crocheting you add will reduce the final inner circumference. I don’t want any tarnishing or chipping, so I prefer to buy them exposed to air without a package wrapper. If they have soldered seams, check them for strength. This is especially important for gifts because you don’t know how much force someone will use to slide it on over their hand. I only buy them locally so that I can test the seam and finish of each one. Over the years I’ve kept an eye out for them in places like Claire’s, Wal-Mart, Target, etc. The quality varies wildly. I can recommend the ones in Wal-Mart now (pictured). They come in bunches of 15-18 bangles for $4.88.
  2. Yarn, if you’re not adding beads: Here’s where you can use the interesting embroidery braids, flosses, and fine novelty yarns languishing in your stash. My first choice is a fancy metallic Kreinik braid type if I’m not adding beads. My little 5-meter spool can cover two, possibly three skinny bangle blanks. Some fingering and lace weight yarns would work, and any crochet thread size. Beginners: start with a sock yarn or size #3 or #5 crochet thread, and no beads. Then graduate to a fancy metallic floss/braid type, then try very fine wire without beads first (30ga to 32ga thickness).
  3. Yarn if you’re using beadsI’ve had the best luck crocheting with wire. The wire holds the beads in place the best for me. Wire is a unique crochet experience. If you’ve never tried it, please see my newsletter issue on it, or the Embracelet pattern.
  4. Crochet hook: This is easy. Use whatever hook size that makes it easiest for you to crochet tightly and evenly.
  5. Beads (optional): I like very small beads for this. I don’t go much larger than “e-beads” (size 6 seed beads). Beads with small holes also work better for this so that they don’t jiggle and shift around. This means gem, chip, and pearl beads are great! You can use a larger accent bead for a tassel finish.
  6. Sealer, stiffener, adhesive, fine yarn needle, etc. (optional): You might wish to use a fabric protectant such as Scotchgard if your yarn is an absorbent fiber. I used three coats of clear nail polish to secure a tassel of metallic embroidery floss because it doesn’t hold knots well. I may use this, or some clear fabric paint, on the inner surface of a bangle to keep the stitches from twisting around the bangle.

Pattern Abbreviations

  • ch = chain stitch
  • sc = single crochet (UK/AUS: dc)
  • ss = slip stitch

Crochet a Basic Solstice Bangle

Step 1: Leave a 4″ yarn end that you can crochet over it, weave in later with a needle, or leave hanging with a bead or tassel. Crochet all stitches tightly. Slip stitch around the metal bangle tightly, *ch 1, ss, repeat from * until bangle is covered.

This is up to you: use fewer stitches to cover the bangle by stretching them taut around the bangle. They’ll be less likely to twist and shift around the bangle, and you’ll see more of the metal. Or, use an excess of stitches for a different look: I love the wavy zig-zag texture of the (ch 1, ss) combo. You’ll see much less of the metal this way.

Step 2: When you’ve crocheted the number of stitches around the bangle that you like, join the last stitch to the first one. I remove my hook from the stitch loop, insert the hook in the first ss, and pull the last stitch loop through it with the hook, then fasten off.

Step 3: Decide what you want to do with those yarn ends. Weave them in. Or, string an accent bead onto both ends, knot them, and trim ends close to the bead. A third option is to tie the ends together, cut more yarn lengths, then add to the yarn ends and tie into a bundle to make a tassel.

Step 4, optional: If you add a fabric protectant, test a swatch first. You could coat the inner rim with a glue or sealer to prevent stitches from twisting around the bangle. Add a drop to knots if they might loosen with wear.

Add Challenge

The basic Solstice Bangle pattern is crazy simple, right? Add just one variable and it’s a different experience. For example:

Add other stitches or change them completely. You could try all sc. I used such a fine red wire for a beaded bangle that I had to use sc instead of ss to make them more visible. Embracelet is an example of using love knots.

Hold two different glittery strands together as you crochet, or use 6-strand embroidery floss. (Managing multiple plies as you crochet so tightly around a bangle does get tricky.)

Just add beads. That’ll keep you busy! I like to add one or more beads to the ch of the (ss, ch 1).

Use wire as the yarn. A thicker wire such as 26ga may be difficult for some people to crochet with, but it sure shows up well, and makes a statement even without beads. It also holds up nicely and is less likely to twist around the bangle. Finer wire is great for showing off beads.

Try to crochet the wire as tightly as you can. (It will still be looser than you intend.) When you’re done, tug on each bead a bit while also giving it a half-twist. This will tighten the stitch around the bead and bangle. I also compress everything by pressing and scrunching the stitch loops together into the bangle. I guess you could consider this a “blocking” method for wire jewelry?

Posted on 9 Comments

Yarn Overs, Yarn Unders (Newsletter Overflow)

If an image is missing, view it herehttp://www.flickr.com/photos/vashtirama/

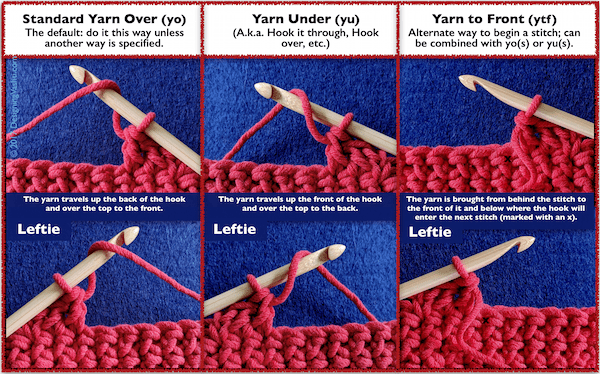
Close-ups of Yarn Overs, Yarn Unders, and Yarn-to-Front.
If image is not displaying, go to https://flic.kr/p/DyV1A3.

Yesterday’s issue 88 of Vashti’s Crochet Inspirations Newsletter had only enough room for yarn over highlights. Who knew I’d discover too much material for a newsletter?

Here’s the rest of the story.

More on Yarn Over Basics

I described the basics of yarn overs and yarn unders in the issue already, but that only goes so far. Yarn overs are actually kind of tricky—at least when you think about them and watch yourself in slow motion. I see this in classes. Yarning over is one our most ingrained habits. Prefer a video to the close-ups above? I like PlanetJune’s.

“Clockwise” Depends on Your Point of View

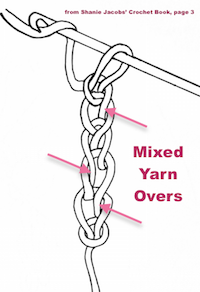
Mixed yarn overs in a foundation chain.
This can also happen if the loop falls off the hook while crocheting the chains and twists before you place it back on the hook. If image isn’t displaying, see it at https://flic.kr/p/DyXB97

Another thing about yarn overs is the rotational movement. It would be easier to describe them if they were linear (just move your hook along a line from point A to B). Instead, we describe what the hook’s motion is, or focus on the yarn’s motion: a “yarn under” is also a “hook over”.

Some describe the motion as clockwise vs. counter (anti-)clockwise, which adds its own ambiguity. The motion your hook and yarn make for a yarn over is counterclockwise…IF you’re looking at it from the shaft end of the hook and IF you’re crocheting right-handed. The same motion suddenly appears clockwise if you watch it head on (from the head end of the hook).

Yarn Unders For Simple Stitches

I’ve swatched several kinds of familiar stitches with yarn unders instead of yarn overs. The stitch didn’t always look different, but in every case, it’s denser and tighter. I struggled at times to maintain an even gauge and to loosen up, depending on the stitch and yarn.

When I’ve preferred the feeling of using yarn unders, they seem lean and efficient, like taking a shortcut. It’s tempting to use yarn unders when finger crocheting and when completing reverse single crochets and loop/fur stitches.  I’m sure a large project with them uses up less yarn! Usually I prefer yarn overs though. I’m used to rhythm of it and the control they give me over my gauge. Sometimes they feel sort of “luxe” or fancy, compared to yarn unders.

Slip Stitches and Single Crochets

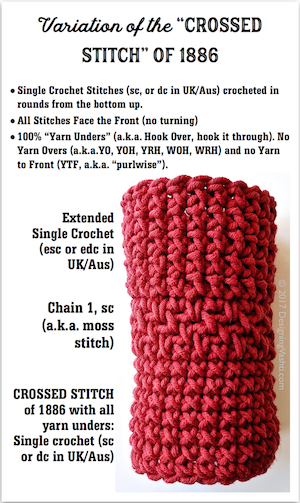
Swatch shows single crochet stitches crocheted with yarn-unders only, in rounds with no turning, and with variations: some rounds are moss stitch (chain 1, sc), some are extended sc.If you want to do the old style slip stitch crochet that is so dense it’s waterproof, use yarn unders!

The single crochet stitch (sc, or UK: dc) requires just two yarn overs and is visibly affected by changing just one of them to a yarn under. I expected to find yarn unders in Mark Dittrick’s Hard Crochet book on sculpturally stiff sc.

Change the first yarn over and you get sc with crossed or twisted fronts that look very much like my variation pictured here.The 1886 crossed stitch is significant to me because it was in the influential Complete Encyclopedia of Needlework by Thérèse de Dillmont. I’ve seen the same stitch repeated in other crochet books since. (I don’t know if it occurs before 1886.)

Change just the second yarn over and you get what Rebecca Medina‘s modified sc for tapestry crochet.

Here’s another interesting reason to use some yarn unders for your sc. In her Freeform Knitting and Crochet book, Jenny Dowde recommends alternating a yarn over with a yarn under when starting a surface sc. Doing this prevents the raised row of sc from slanting to the left or right.

Two other stitches that show off yarn unders nicely are half doubles (hdc or UK: htr) and love knots. See the issue for more on those. View the hdc swatch diagram from the issue in high resolution.

A newsletter subscriber mentioned to me that the designer Aoibhe Ni uses yarn unders for special texture effects in her lovely Tunisian crochet designs.

How Many Types of Yarn Overs?

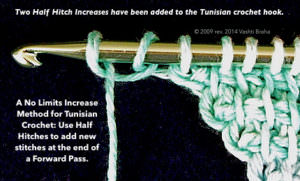
Two crossed loops (half hitches) have been "cast on" at the end of a Tunisian forward pass row.
A method I used for the Five Peaks Shawl.

I think of yarn over types in terms of how to get more yarn on the hook for making stitches. So we have the two obvious types: wrap it one way (Yarn Over), or the other way (Yarn Under).

A third way to add loops to the hook is the crossed loop, which is a simple cast-on in knitting. It’s also a half hitch in macramé. This loop has a twist in one direction or the other, so there are actually two types of them. I used them for Tunisian crochet to increase stitches along one edge of the Five Peaks Shawl.

This kind of loop was the subject of one of my earliest newsletter issues: “A Very Different Kind of Crochet Stitch“. I love Sue Perez’ “Forward Loop Chain” blog post about them.

The yarn-to-front (ytf) shows at the top of this page with the two yarn over types even though strictly speaking it isn’t one. It’s easily confused with the yarn under.

The Yarn Over in other Languages

I found this handy information in the 1989 Vogue Dictionary of Crochet Stitches by Anne Matthews. Here are the non-English pattern equivalents listed for Yarn Over (US) and Yarn Over Hook (UK):

  • Jeté (French)
  • Umschlag (German)
  • Gettato, abbreviated gett (Italian)
  • Arrollado (Spanish)

One More Thing!

I mentioned Jane Rimmer in the issue because I want to make sure you know about her two-part article for CGOA’s Chain Link newsletter: “Yarn Over History and Technique” (Autumn 2014) and “Yarn Overs Part 2: Techniques” (Summer 2015).

Posted on 2 Comments

Crochet Beginners’ Tip: Slip Stitch Fake Facts

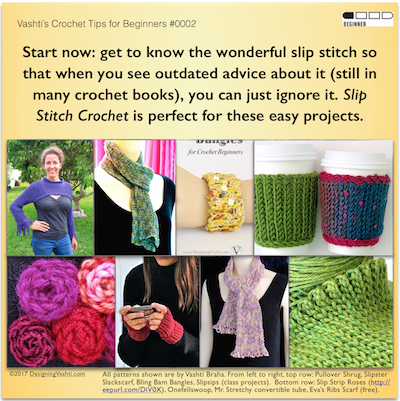
Beginner Crochet tip: tune out the fake facts still being circulated about our most basic and versatile crochet stitch, the slip stitch!

About Today’s Tip for Crochet Beginners

I’m going to unpack that “outdated advice” part in the tip pictured above.

For reasons I still haven’t figured out, misconceptions and outright errors (“alternative facts”?) about slip stitches are still repeated uncritically in English-language crochet books.

This has been going on for decades. Think about how it affects whole generations of crocheters. It’s the only reason it took me 30 years to try crocheting a whole swatch of just slip stitches. I was immediately smitten. My first slip stitch design was the 2004 Pullover Shrug (the cropped purple top I’m wearing in the tip above).

I have distilled every fake fact about slip stitches into the following four sentences, below. I begin my Slip Stitch Crochet 101 classes with them so that we can deal with them head on.

Can you spot all the unhelpful advice?

  1. There is one kind of slip stitch and you crochet it tightly.
  2. It is useful only occasionally, for a few things, such as joining a round, closing a picot, or seaming.
  3. Don’t bother trying to make anything with it, it has no height.
  4. It doesn’t really count as a stitch at all; it’s a nonstitch

(I underlined the fake facts to help you.) This false information discourages crochet beginners and all crocheters from exploring only slip stitches, not other basic stitches. Why? It’s not because slip stitches are tricky for beginners. It’s the most basic crochet stitch of all, along with the chain stitch! In my classes, the experienced crocheters struggle more—but that’s just due to the years of misinformation.

The more I explore slip stitch crocheting, the more insight I get into all crochet. This is why I want every crocheter to know about it. (The things you can make are also awesome.)

New Rules About Slip Stitches

1. Think of slip stitches as a group of stitches.

Lattice textured border of a 100% slip stitch crochet mobius "Bosnian" style (in rounds with no turning).
“Bosnian” crochet: slip stitches crocheted in the round with no turning.

Slip Stitch Crochet is actually a whole technique. When you know this, you can retain what you learn about them easier. It also spurs innovation, and aids pattern writing. I use the abbreviation SSC, as do others in the international SSC community.

Slip stitches look, feel, and behave very differently when crocheted with turning or without (“Bosnian”), and in just the front or back loop or both (or between stitches!). Invert them or twist their loops for more slip stitch types.

2. Go up at least two crochet hook sizes to crochet them loosely. 

Big-hook slip stitch is especially fun! Start with your bounciest wool yarns. 

3. Slip stitches are exceedingly versatile, useful, and pleasing for many of the things crocheters make.

In fact, slip stitches are often preferable to other stitches, such as for ribbing, or for a thin, supple fabric that conserves yarn.

A slip stitch may also be fine for joining a round, closing a picot, or seaming, but not always. For example, slipping a loop through to join is more invisible than a slip stitch. A single crochet sometimes closes a picot better with some yarns or for certain patterns. For seaming, sometimes alternating a slip stitch or single crochet with a chain-1 is better. (I also like to use inverted slip stitches for seams.)

4. Slip stitches clearly have height.

How odd that it needs to be stated. The simple evidence is the heaps of very wearable scarves and sweaters. You should see the overflowing table of them that I bring to classes!

Not only does a slip stitch have height, the height varies depending on the type of slip stitch. As a starting point, expect front-loop types to be taller than back-loop types. (This is the case for single crochet too.) 

Yes, you can even crochet around the post of a slip stitch.

Please Don’t Wait Like I Did.

I learned about crocheting slip stitch projects decades after learning how to crochet everything else. There’s no reason for crochet beginners to wait decades like I did!

Posted on Leave a comment

Hand Chaining How To’s

How to videos are a great way to learn hand chaining. I viewed several this past week. My favorites are listed below.

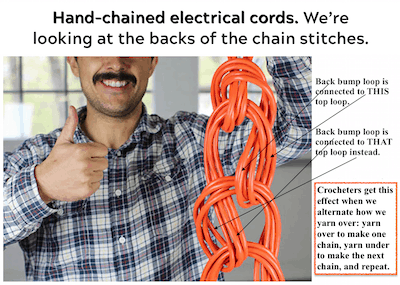
A man holds up electrical cords that have been hand chained together for a more manageable length.
Here’s an example of a knot tying approach to hand chaining. Image is from artofmanliness.com; text is mine. For a front-facing view of chains with mixed yarn overs, see my Yarn Overs, Yarn Unders post.

After watching so many hand chaining videos, I found that only some show how to do it the crochet way. Other videos show a knitting style, or as a form of knot tying.  I’ve chosen a few video links for each approach so that you can try them and see which you like best.

Hand Chaining the Crochet Way

This is the chenille yarn that Kathleen Sams shows in her crochet video (see link below).

Hand chaining the crochet way means you’re using your fingers or whole hand the same way that you’d use a crochet hook. In crochet, if we put a loop on the crochet hook by winding the yarn around it, it’s called a yarn over. It’s also possible to just “grab” the yarn with the hook and pull it through with no actual yarn over. This has sometimes been called a yarn under. The yarn over is the standard, correct one.

Watch for when a hand chaining video shows the yarn over, or the yarn under, or mixes them. It’s tempting to use the yarn under when hand chaining because you can just reach through a loop, pinch the yarn, and pull it through. The simple pull-through of the yarn under makes for very quick hand chaining! However, if you plan to do most of your crocheting with a crochet hook, the yarn over is a very good habit to establish. 

Three videos that show yarn overs:

These next three videos show yarn unders:

  • Donna Wolfe of Naztazia.com starts off her video showing hand chaining by pinching the yarn with her two fingers to pull it through a loop: a yarn under. When she shows how to do the same thing with a crochet hook, she uses a standard yarn over.
  • Watch Kathleen Sams make hand chaining look so fast and easy with yarn unders and the thickest chenille yarn ever!
  • ThePreschoolMommy adds adorable sound effects to her yarn unders: “The fingers go ‘Hel-LOO’ and bite the yarn and pull it through.”

By the way, in most of these the adjustable slip knot is made instead of the locking one. Donna Wolfe uses the locking slip knot. Now try some of the other videos below for contrast. Whichever one you enjoy the most is the best one for you!

Hand Chaining the Knitting Way

Hand chaining with a knitting approach means that a finger or hand is held like a knitting needle while a loop is worked off of it. A possible advantage is that one tends to work at a smaller scale, keeping the loops closer to the fingers. This can help one to control the size of each chain stitch.

  • This video is a good example of a knitting style of hand chaining. She keeps a loop on her left finger, wraps the yarn over it with her right hand, then pulls the loop over the new loop and off the finger. (It reminds me of spool knitting, if the spool had only one peg.).
  • Laura Eccleston of Happyberry Crochet does it the same way.  She cautions that it is fiddly, not very easy.
  • Here’s a variation by Beadaholique. She uses beads and beading thread for making a necklace.

Hand Chaining the Knot Tying Way

The most noticeable thing to me about a knot tying approach is the terminology. A rope is bent, which is called a “bight,” and then pushed through a loop. Terms like “sinnet” or “knot” are used; never “stitch.”

There are a few other differences too. The purpose of hand chaining in these videos seems to be of practical interest mainly to men who need to make long lengths of heavy rope more manageable for storage, cleaning, or for a “quick deploy” survival bracelet. It’s also called a “zipper sinnet” and “chain shortening” because it quickly unravels when the rope is needed. It ranks as one of the Four Knots You Need to Know.

Here are a few knot tying videos on hand chaining:

Which videos do you enjoy? Which one can you do the most quickly? Which one produces the nicest-looking chain stitches for you?

Updated November 2018. It’s part of an experimental blog post series: Vashti’s How to Crochet Book