Posted on Leave a comment

Flat Bead Crochet Tests

Four swatches of two-color flat bead crochet
Flat bead crochet of slip stitches in two colors, seamed into a tube shown fitting nicely to the wrist.

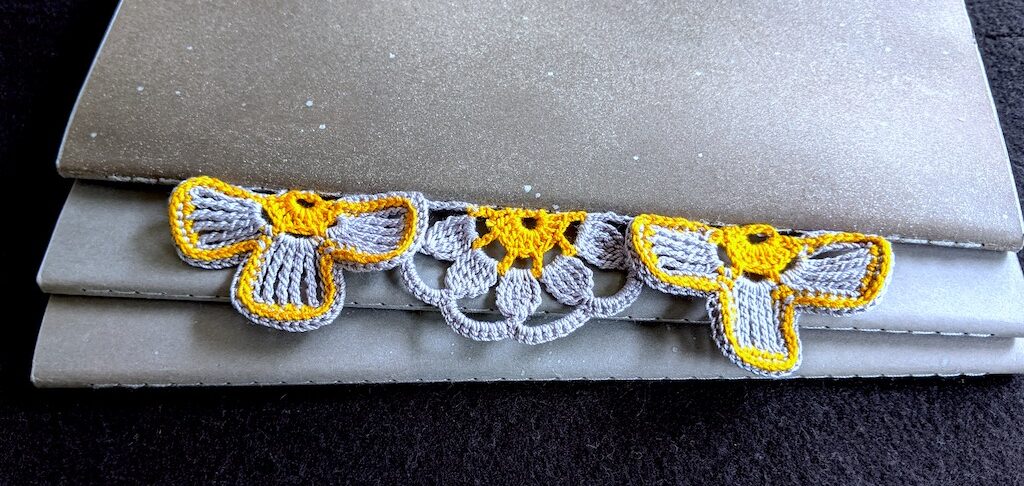
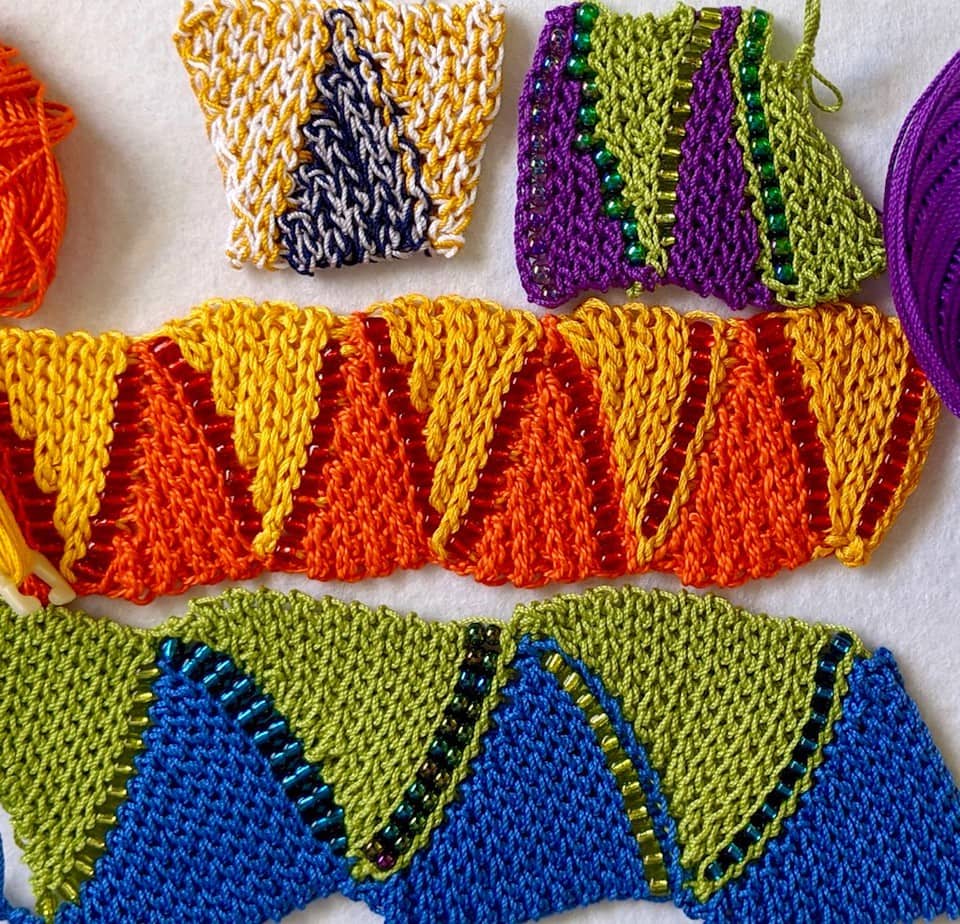
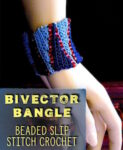
These four swatches test beads, threads, and stitches for my upcoming jewelry class, “Bivector Bangle, The Class”. I’ve specified flat bead crochet in this blog post for two reasons.

First, I photographed them flat before seaming into a stretchy tube. Slip stitch crochet makes it easy to slip it on the wrist with a good fit; that’s the “bangle” part.

Not the Rope Kind

Second and maybe more important, they’re not crocheted in the round. I’ve learned that this is unusual. Crocheted ropes of seed beads, a.k.a. “tubular bead crochet”, are the most common kind of crochet jewelry I’ve seen; my Candied Pony Beads pattern is a humble example of the art. Slip stitches are the preferred stitch, but some use single crochets.

Crocheters in English-speaking countries have enjoyed making bead ropes for a long time. (Oddly, this hasn’t prevented crochet how-to books from claiming whole projects shouldn’t be made from slip stitches.) In the world of Slip Stitch Crochet “Bosnian” distinguishes slip stitches in the round from the ones crocheted flat, in rows.

Instead of crocheting in constantly spiraling rounds, I crocheted these swatches in rows, and turned to begin each new row. So, flat bead crochet!

Other Kinds of Flat Bead Crochet?

Here’s another curious thing. Although bead crochet ropes are popular examples of Bosnian crochet, plenty of other Bosnian crochet items aren’t beaded at all. Compare this with flat slip stitch crochet: I almost never see beaded examples.

I crocheted these beaded slip stitches flat:


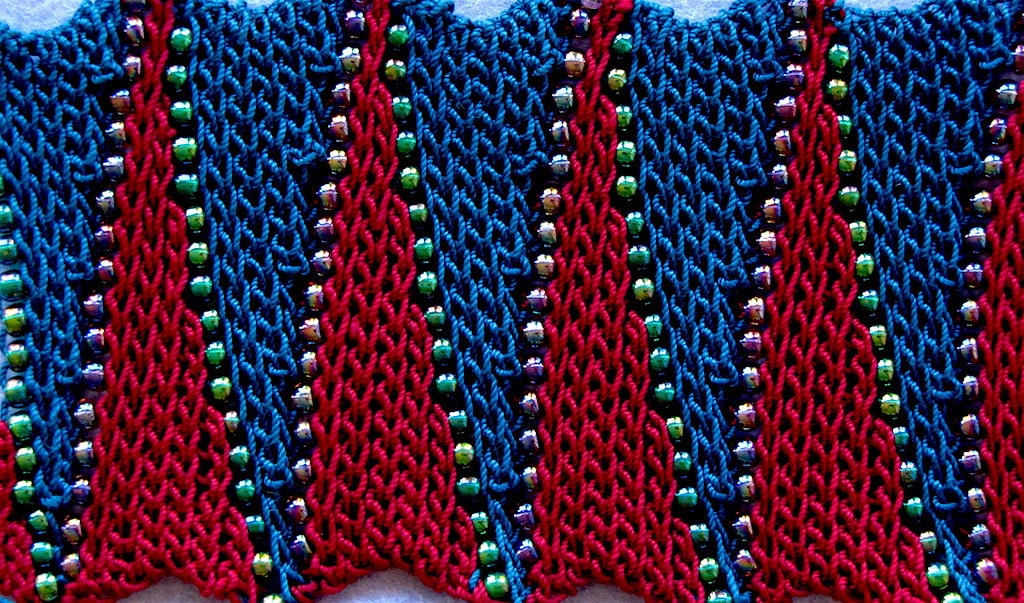
Test Results of Swatches

As for my test swatches, here’s what I learned. Too much to write here! Some quick highlights though.
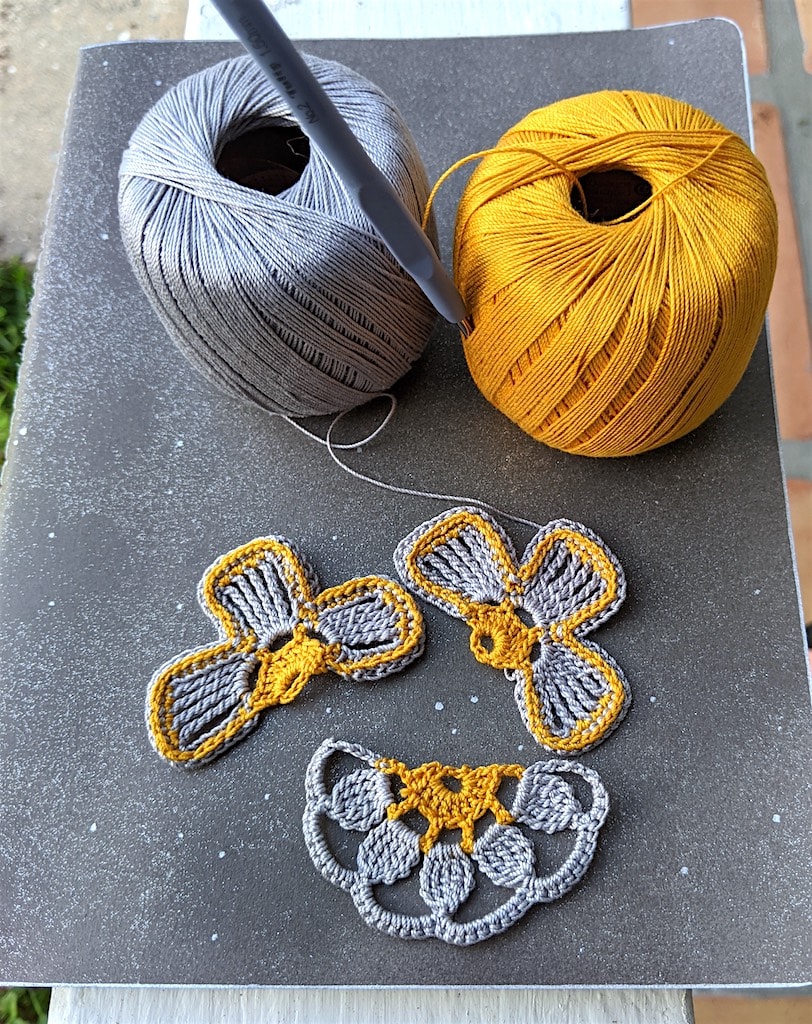
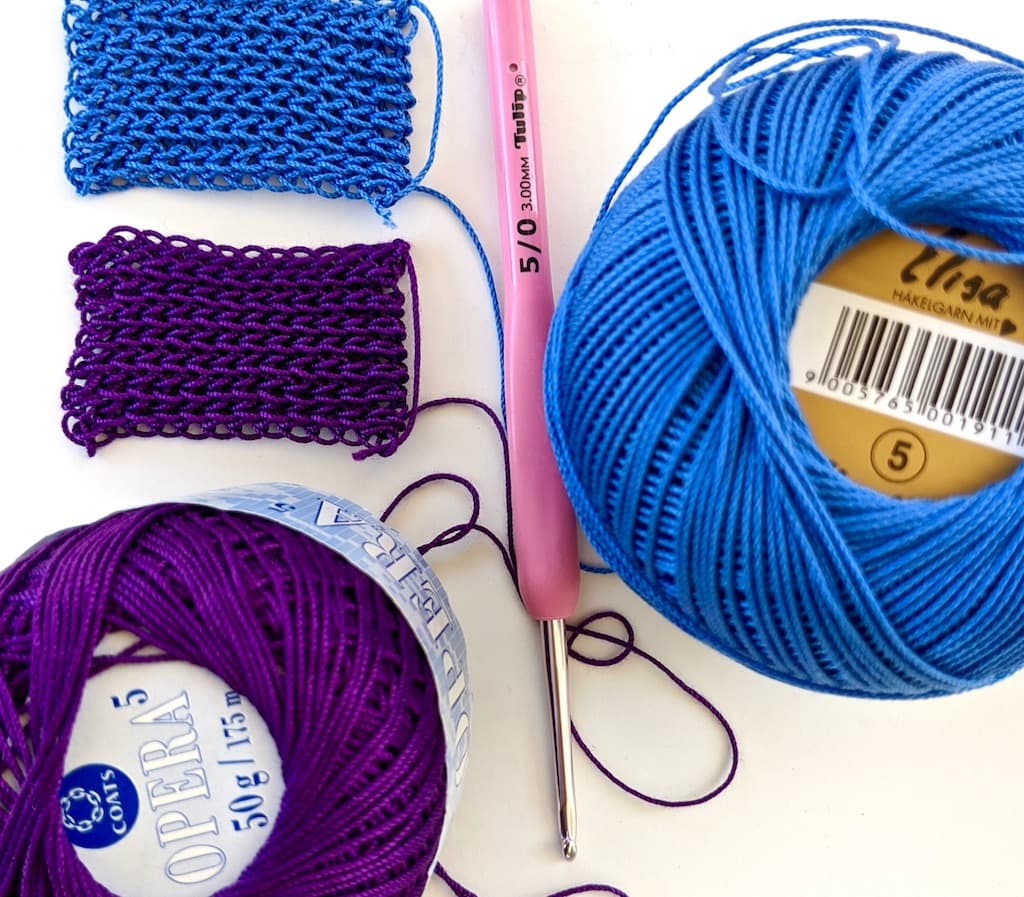
Threads

Four swatches of two-color flat bead crochet
Here’s the photo again.

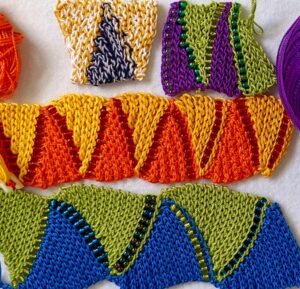
For the yellow wedges (middle row) I used cotton embroidery floss. It worked fine even though I used all six strands. It could have been too thick.

Six strands of floss are roughly equivalent to sport weight yarn and to size #3 crochet thread. I need it to be closer to fingering weight yarn and size #5 crochet thread. It felt a bit thick while crocheting it, but it was ok. It comes out slightly more raised than the orange wedges, in an interesting way.

I tested two strands of size #10 thread held together throughout. (This is the small heathered sample in the top row.) It works fine. Two strands of size 10 are equivalent to one strand of size 5 for this pattern. (For a full project I’d use two strands of the same color so that the beads stand out well.)

Beads, Stitches

I tested different wedge widths. The green and purple one (top row) is the only one that matches the way I crocheted the wedges of the original two Bivectors I made ten years ago. I still prefer them. In class I’ll explain wedge variations.

Lastly, I tested different ways to add the beads. I also revisited doubling them up in wee stacks, which I’d flirted with doing years ago. You can see some bead stacks in the bottom row. The major lesson for me here is, Japanese seed beads for this design are a shortcut to easy happiness, as a general rule.

Posted on Leave a comment

Moleskine Crochet Fix

Three half-flowers in antique gold and silver colors attached to spine of large Molestine crochet notebook.

I have a pack of three large Moleskine notebooks. They started out identical and very plain. I use two of them for crochet work. How to distinguish them all from each other? Hmm.

Moleskine + crochet go together so nicely. I see folks using the notebooks for crochet journaling, and crocheting covers for them. They’re great for me too except in two ways.

I can’t wait to show you my new crochet solution. The spine of my crochet notebook now sports a title in a universal language.

Pre-Crochet Prep

Moleskine crochet notebook completed: 3 crocheted half-flowers sewn to the binding and the cover is a protective coating.

I mention this because I needed to try a paper-coating idea before adding the crochet to its spine. This is why its cover color ends up differing from the other two in this image.

First, about the cover. It’s plain cardstock. (My old design notebook was a fat spiral-bound graph paper pad with a durable plastic cover.) I like this slim one better, although its rather absorbent cover retains every scuff and stain. Its medium gray color is also fading.

First, I lightly spray-painted it with fine silver glitter. Then I used a fat metallic silver paint marker to add random speckles of different sizes, and a border. These cover up spots and marks.

Unfortunately, even though it’s spray paint, the glitter rubbed off. After I took the next photo below, I lightly sprayed a few layers of glossy sealer on it. It works on the glitter and adds a durable feel to the cover. It also darkened and changed the gray color of the paper, even more than the spray paint did.

Moleskine crochet hook fit: find the steel hook size that fits in the seam stitch without stretching it.
This steel crochet hook is very small, about 1.10 mm. A larger one would be hard to insert without fraying or stretching the thread. I don’t want to weaken the binding!
You can also see how the upper notebook has faded and yellowed a bit compared to the unused one under it.

The Crochet Fix

Here’s what I said when I started swatching the first of these three flower pieces:

The 3 half-flowers in pewter and antique gold colors before sewing Molestine crochet notebook seam

I’m trying out a tall-stitch flower motif but as an edging, and alternating an old gold color with an old silver color of thread I bought in Paris to see what happens with a glass of wine, to then see if this is the way I want to spruce up a Moleskine notebook. If it is, I shall blog it.

I’m wondering if this Scheepjes Maxi Sweet Treat crochet thread might satisfy my longing for the discontinued Opera thread ?

I adapted these flower pieces from flowery motif patterns in old Duplet magazines in my Tall Stitch Virtuosity class prep pile. The color changes made it easy to cover yarn ends, so weaving ends wasn’t an issue.

The second of the three notebooks is for slip stitch teaching thoughts. It will be fun to crochet a spine trim for it with slip stitches.

Crocheting Into Non-Crochet

I’ve blogged before about crocheting along the edge of a greeting card, a t-shirt, and foam sheets. (Crocheting a wide border onto a plastic-coated tablecloth is an adventure I thought I blogged; link goes to its Ravelry page.) I’ve even crocheted pages of a book together. I don’t recall ever wanting to stick a crochet hook into the saddle-stitch binding of a simple notebook before.

My Plans Changed as I Swatched

I figured I’d pick a half-flower I liked and then create a whole repeating strip of it to form an edging. Instead, my Moleskine crochet ended up being 3 flower fragments that I attached one by one. I so love it.

The other thing I assumed was that I’d crochet right onto the notebook binding. This was the original inspiration! I worried more and more about weakening the binding string. Ultimately, I fastened off the third flower piece with a very long yarn end. I used this to sew each crocheted piece to the binding with a sewing needle and simple overhand stitches.

Moleskine’s no-frills design is easy to find in other brands too. I love Moleskine’s rounded corners and the paper quality.

I’m not sure this Moleskine crochet idea would have occurred to me if it weren’t Day 27 of the Great Quarantine! Maybe it would have, but would I have followed through on it? Or blogged about it?

Posted on Leave a comment

New-to-Me Size 5 Crochet Thread

Pattern of short row wedges in alternating colors separated by beads shown flat

I’m excited to learn that Handy Hands now carries a size 5 crochet thread called Elisa. Like Lizbeth (the thread that Handy Hands is known for), Elisa is 6-cord gassed, singed mercerized cotton. If you don’t understand all of these terms, just know for now that they indicate improved strength, durability, and appearance. In other words, Elisa is a good choice for crocheting heirloom items, and in my case, jewelry.

This excites me because it’s the kind of thread needed for my Bivector Bangle class. Finding size #5 cotton thread for jewelry (roughly equivalent to fingering weight/sock weight wool yarns) is not always easy. I’ve tested Lizbeth for jewelry and it would be great for its color range, but size 5 is pretty much the only size it doesn’t come in.

Initial Elisa Test

Elisa differs from Lizbeth in more ways besides its size 5 weight: Elisa is made in Austria, in a limited number of colors. (In addition to the five pictured above, a yellow and white are available.) Lizbeth is made in China and the color range is unbelievable. The two threads feel slightly different: Elisa has a softness and slight bounce whereas Lizbeth has the crisp feel that is more typical of this very hard wearing, hard twist thread category. Lizbeth’s “bounce” is a bit more wiry.

My quick Elisa swatch (blue) came out slightly larger than the purple Opera one. I think this is due to the added bounce of a 6-cord thread; the loops want to stand out from my hook a bit as I crochet. I’ll try being more aware of this when I swatch it again, with beads added.

Bivector Bangle Threads

For my first Bivector Bangle I used size 5 Coats Opera thread in burgundy and teal (pictured at the top). It has since been discontinued. Opera is a 3-cord (meaning 3 plies), not a 6-cord thread. This enables it to have a silky, supple feel. Many widely available crochet threads in the USA are 3-cord; some are even 2-cord and may be called perle or pearl.

Crochet Thread Quality

When you’re using a crochet thread with a low number of plies and/or a low amount of twist for crochet jewelry (as well as heirloom items), the quality of the cotton fiber itself matters even more. The longer the fibers, like Pima or Egyptian (“mako”), the better. Mercerizing also adds strength to any cotton fiber.

For me the closest thing to Opera nowadays is DMC’s Cébélia. It’s an elegant mercerized 3-cord with a good color range for its size 10 and 20 weights. Unlike Opera, Cébélia was never a size 5 crochet thread, to my knowledge. I’ve seen it here (USA) in the big chain craft stores for years.

L’il Bivector

2nd version, less wide (smaller wedges): light and dark blue with pinka nd red glass beads.

My second Bivector is a narrower bracelet in two blue threads and glass beads in alternating pink and red. For both colors I used a 6-cord size 5 crochet thread by Manuela. Its dense, wiry-crisp texture is very similar to Lizbeth thread. Maybe you can get a sense of its texture from its photo.

I crocheted both Bivectors about eight years ago. For a third one I tried a sock yarn of loosely twisted silk and merino wool in yellow and green, with pairs of stacked beads.

Understanding Thread Sizes

There’s plenty more to know about crochet thread. It takes a surprisingly long time to understand how the thread and yarn weight categories work (longer than it takes to progress from one crochet skill level to the next!).

Size 5 crochet thread is thicker than Size 10 and thinner than Size 3. Perhaps Size 5 is less common because by traditional Victorian standards even Size 10 was considered “coarse”. Nowadays crocheters use a lot of Size 10. Within each size, there is some slight variation in thickness among brands. Sound familiar? Crochet hook sizing is like this too.

I’ve been blogging about crochet thread types for a long time. For more details on the basics, see Cotton Crochet Thread Sizes and Equivalents and Choosing Cotton Thread for Crochet Jewelry. Also Plying and Spinning Cotton Crochet Thread. See my more recent posts tagged with crochet thread.

Posted on 1 Comment

Starry Crochet for Wire Mesh Panel Decor

Crochet DIY for Wire Mesh Panel Decor!

I have a fun summer crochet project to share. I’ve been bitten by the DIY wire mesh panel decor trend and have made several styles. Today’s focus is a cosmic one: wire mesh panel as Starry Firmament.

Unique crochet stars for wire mesh panel decor
Half of these were made with the pattern below, or a simple variation of it (described in the pattern).

Shown above is a cosmic condominium for air plants, but it could just as easily be a photo memo board. Or see below for other decor ideas.

There’s a free crochet pattern for the stars below.

Wire mesh panels are not hard to come by at all. Not only are they easy to find, they’re a bargain: just a dollar or two for strong, durable, and very serviceable 14-inch {35.5 cm} square panels. In fact, they’re so low-priced and common that it costs more to ship them across the US than it does to buy new ones locally. Hence my problem.

I have stacks of them because they’re great for building show booths, like I’ve done at crochet conferences over the years. It only makes sense to keep them if I do show booths I can drive to. Some panels are getting a bit of surface rust here in the subtropics.

Most people would throw the panels away. I know because that’s the advice I’ve gotten. There’s a creative DIY decorating trend going on with wire mesh panels though! Why spend $15-$50 on one when you could spray paint it rose gold yourself? Or do like I did: add a constellation of stars?

Some wire mesh panel decor ideas I’ve found are: hang them over a desk to organize photos, memos, etc; string fairy lights into them and add a small shelf. Especially inspiring: sprinkle on some quirky air plants.

Crochet Pattern: Basic Firmament Star

I’ve used only the most elementary crochet stitches for this pattern. A new crocheter might struggle with it, though, if s/he isn’t accustomed to using very fine crochet thread yet.

Materials

I used a size #20 white crochet thread by DMC call Cordonnet Special. It’s on the stiff side because it has many plies that are highly twisted. This makes for crisp-looking stars that will hold their shape. If you can’t find it, Handy Hands Tatting make a cordonnet type called Lizbeth in many different sizes and colors. If you don’t have size #20, the next thinner/finer size, #30, seems to give me very similar results.

It doesn’t matter what steel crochet hook size you use. Choose the smallest size that still makes crocheting with the thread easy. For me it’s a size 1.25 mm in the brand I had at hand. For the thinner size #30 thread I needed a slightly smaller hook size. Psst, you might like what I wrote about steel crochet hook sizes!

Three thread sizes are represented here: the pink one in progress is size #10, and the two middle ones are the thinnest: size #30. The star on the far left and far right: size #20.

Pattern

Leave the thread ends 4 inches {10 cm} long.

Make a slip knot and place the loop on your crochet hook. Chain 5, slip stitch in the second chain from your hook to make a tiny picot, chain 2 or 3, double crochet in the first chain of this spoke (the chain that’s nearest the slip knot). In the photo above, two pink spokes have been completed. *Chain 5, slip stitch in the second chain from your hook, chain 2 or 3, double crochet in the first chain of this spoke.* Repeat from * to * one or more times, depending on how many spokes you wish the star to have. Then slip stitch in the first stitch nearest the slip knot. Fasten off.

To vary the appearance:

  • Use half double crochets in place of the double crochets.
  • Add another stitch (a slip stitch, or single crochet) in the next chain after the picot, then chain one less before finishing the spoke with a tall stitch.
  • Begin each spoke with 4 looser chains instead of 5 (then chain one less before finishing the spoke with a tall stitch). Or begin with more than 5 chains and add more chains after the picot.

To finish and use the star:

  1. With a fine needle, weave one of the ends to the opposite edge of the star. Notice in the photo above that the ends of the two outermost white stars are opposite each other while the middle two have ends coming from the same place of the star.
  2. Wet it, stretch, pinch the spokes, and allow to dry perfectly flat and as symmetrical as you can get it. Meanwhile prepare your wire mesh panel by sanding off rust if necessary, spraying with a primer and then a dark glossy blue. I then sprayed on a fine multicolored glitter too.)
  3. Tie each star onto a place where the grid wires intersect. Tie one direction and then the other tightly around the intersection. This keeps them stationary. Snip the ends close to the final knot on the back of the panel and apply a drop of glue to the knot.
  4. My one additional step was to spray a light coat of clear acrylic sealer onto the back of the panel. Mod Podge makes one that did not cause the stars to yellow, unlike a few other sealers I tested. Have a toothpick handy to smooth down the sealer where it shows on the stars (it will look hairy or like tiny dew drops in places). This helps keep them crisply starry.
  5. Now add air plants, or use those tiny wood clothespins to clip photos and things to it.

See more images of the Starry Firmament wire mesh panel decor at its Ravelry project page.

Posted on Leave a comment

Rosebud Argyle Color Pooling Stitch

Moss Stitch (linen, granite, seed stitch) modified for longer crochet thread color sequences.
Size 10 variegated Lizbeth cotton thread, color #10-104 Spring Garden. I created a “Color Eater” variation of the moss stitch for it. Row by row pattern below.
View hi-res size.


Have you seen the planned color pooling crocheters are doing to get a cool argyle or plaid look with variegated afghan yarns? You can use lots of different stitches for this, but the height of single crochets (sc, or in UK/AUS: dc) is great, especially with moss stitch (a.k.a. linen, granite, seed stitch).

Planned Pooling with Cotton Thread

I pooled the colors of a size 10 crochet thread into an argyle and “Rosebud Argyle” is the result. It’s 3.5″ x 3.5″ and dense because I used a color-gobbling stitch pattern, so I added a border and turned it into a “mug mat” (coaster). I’ll be bringing it to the Creative Planned Color Pooling class.

If I had used the classic moss stitch pattern of [sc in next ch-space, skip next sc, ch 1], my swatch would have come out more than double that size: over 7″ x 7″ (I ripped it out before measuring exactly how much smaller it is with my stitch variation).

Even the 3.5″ size is bigger than I expected! My original goal was only 1″ or 2″. New lesson learned: the color changes in variegated thread look short until you start crocheting with it. The stitches just don’t take up much thread.

Stitches Change the Color Width

I really wanted the experience (and general look) of a moss stitch pooled argyle, so I needed to substitute with stitches that eat up a lot more thread. Why? The length of each color in a variegated thread or yarn is fixed. When the colors repeat, their sequence is also fixed. The total length of one whole sequence is your fixed width. The way you alter this fixed width is with the stitches you use. (There are other options but not for this post.)

Each row of moss stitch is [sc in next chain-space, skip next sc, ch 1]. With each new row, the sc’s are over the ch’s and the ch’s are over the sc’s. It is common to use half double crochets (hdc, or UK/AUS: htr) instead of sc. I haven’t seen much of it lately, though. I hope crocheters are feeling free to alter the moss stitch, especially if you’re doing planned pooling.

Below I’ve written up the stitch pattern instructions for my color-gobbling moss stitch variation. It’s the one I used for the swatch pictured above. I wrote it as if you’re using a solid colored yarn or thread.

Vashti’s “Color Eater Stitch”

Pattern Notes

  1. The “color eater stitch” is [slip stitch, 2-hdc puff] in the next ch-space. The slip stitch is to keep the hdc puff closer to the height of a sc and puffy (rosebud-like). It also helps keep the color changes distinct when you’re pooling.
  2. Like moss stitch, each row is [color-eating sc substitute in next ch-space, skip next color-eating sc substitute, ch 1]. With each new row, the color eaters are over the ch’s and the ch’s are over the color eaters.
  3. It’s easy to fine tune how much you use of a color when you’re pooling with it. For example, sometimes I did a 3-hdc puff instead of 2 to eat up more color. Or, a tighter ch-1 and shorter puff to eat less color. I got better at this with the later rows. Maybe you can tell in the swatch.
  4. When color pooling with it, do whatever you need to at the row ends: just a ss and hdc to use less color, or even a 4-hdc puff to use much more.

Abbreviations

  • ch – chain stitch
  • hdc – half double crochet (hdc, or UK/AUS: htr)
  • 2-hdc puff – [yarn over, pull up a loop] twice in the same designated stitch, yarn over and pull loop through all 5 loops on hook.
  • ss – slip stitch

How to Crochet It

Foundation chain: With a solid colored thread or yarn for your first swatch, chain an even number.

Row 1: Skip 3 chs, *[ss, 2-hdc puff] in next ch, ch 1, skip next ch, repeat from * until one ch remains, [ss, 2-hdc puff] in last ch, ch 2, turn.

Row 2: Skip first puff and ss, *[ss, 2-hdc puff] in next ch-space, ch 1, skip next puff and ss, repeat from * for rest of row, [ss, 2-hdc puff] in space of turning-ch 2, turn.

Repeat Row 2 for pattern.

For more on planned pooling, you might like this recent blog post: Color Pooling Developments.