Posted on 6 Comments

Crochet Mask Lanyard, A Hook-Only Free Pattern

Crocheted fasteners before and after attaching to mask

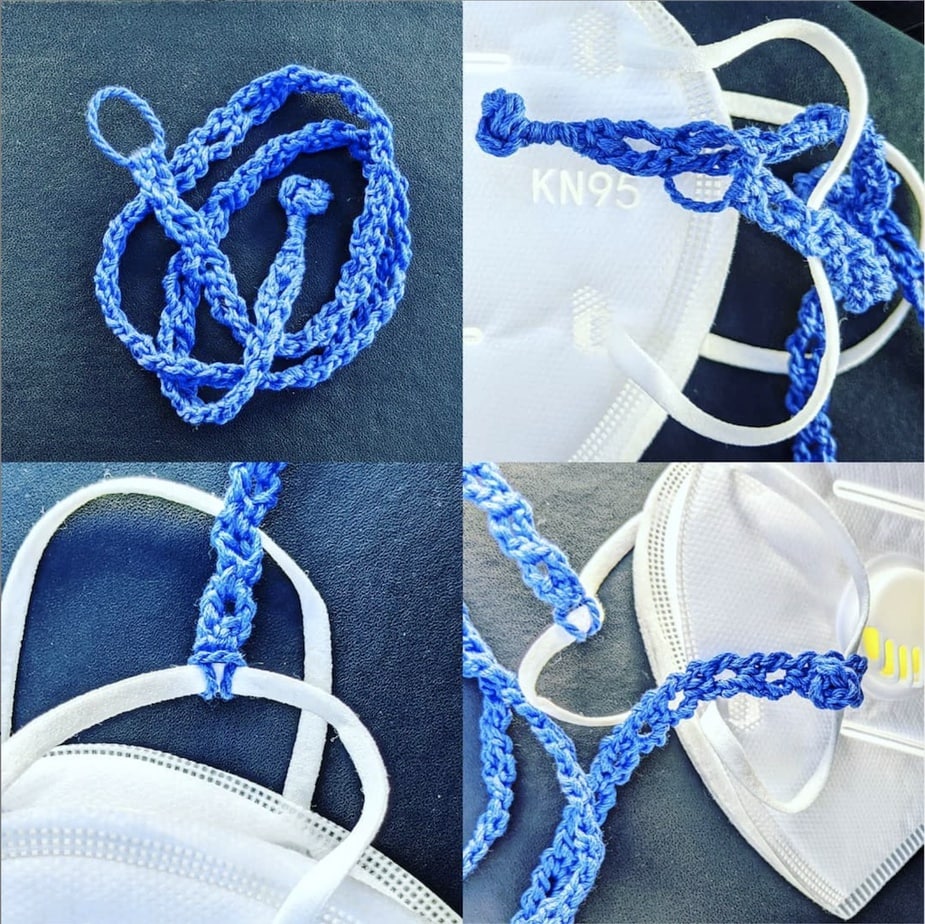
This reversible crochet mask lanyard attaches to each ear loop of a face mask with 100% crocheted fasteners. No sewing on buttons or metal hardware!

Wear the lanyard around your neck. If you remove your mask, there it hangs, already found, like wearing reading glasses on a chain.

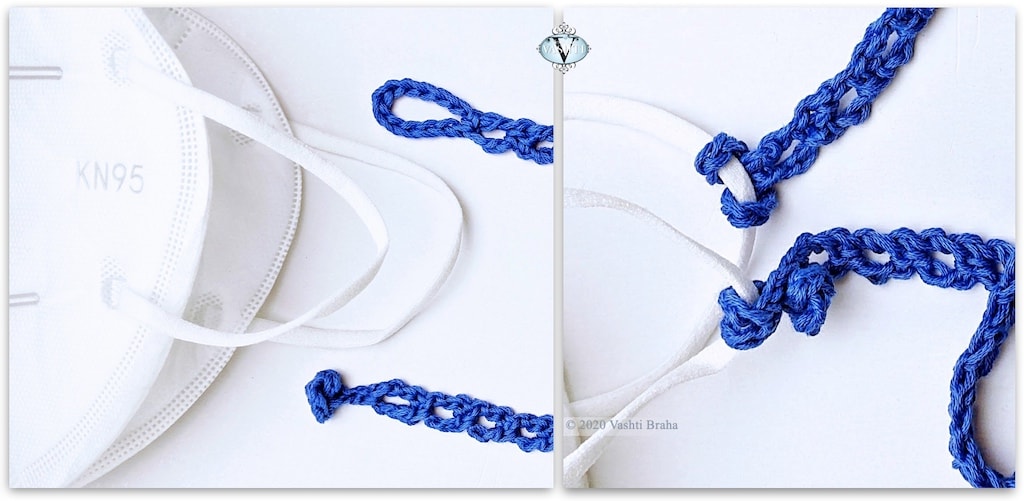
The chain loop end attaches with a lark’s head knot, explained below. The other end has a crocheted peg-like “shank” button. It loops around the other ear loop and buttons into a stitch space of the lanyard. This makes the length easy to adjust. The mask loops can be any thickness.

Three Favorite Things

My favorite thing about this pattern is that it’s “hook-only”: 100% crochet, even the fasteners.

My second-favorite thing is it’s a chance to use my new rosebud button idea for a project. It’s reminiscent of a Chinese frog closure, but like I say, no sewing! Also, unlike some button knots, zero chance of it coming unknotted.

Crochet mask lanyard button in two thread sizes
Free crochet mask lanyard pattern below is for the blue one in sport weight cotton yarn.
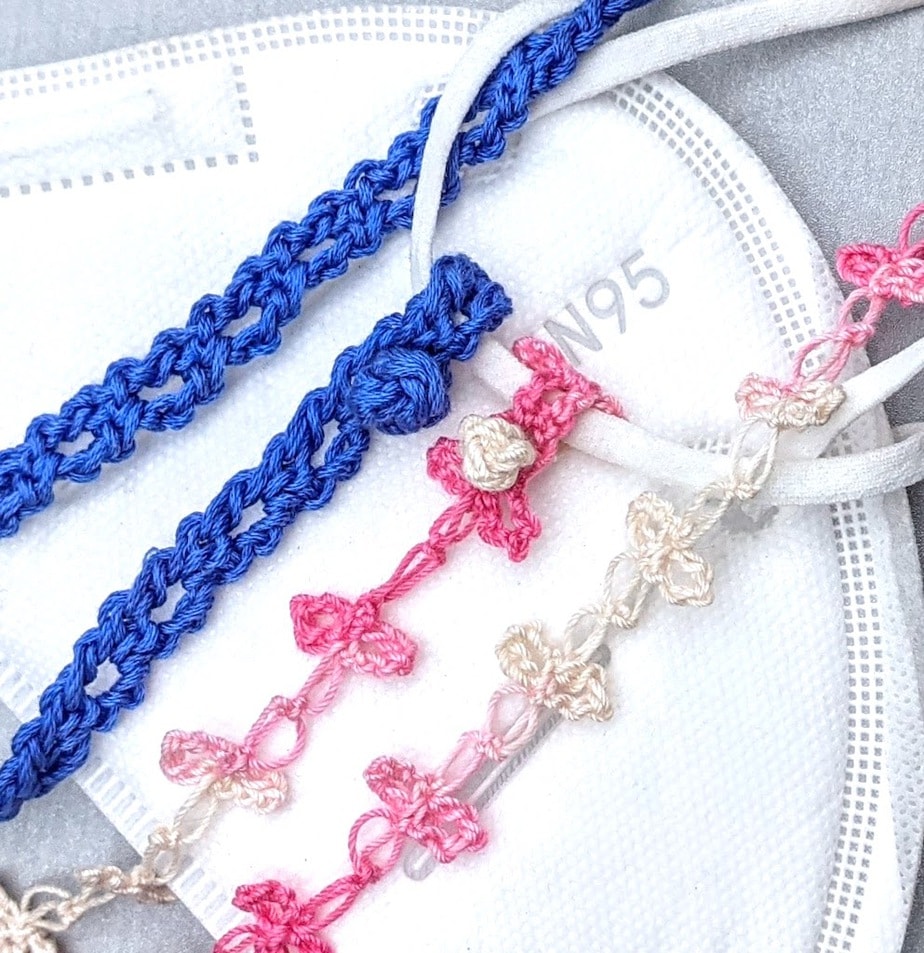
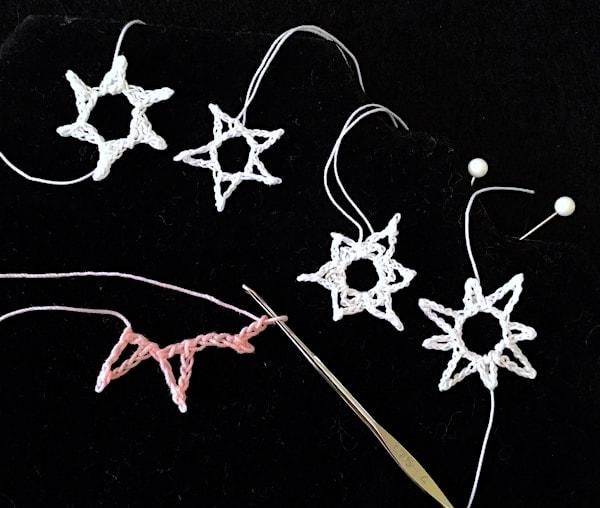
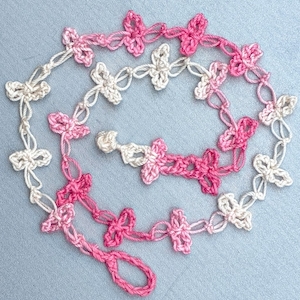
The pink one in size 10 thread uses parts of the same pattern.

And, third, this pattern doubles as a versatile template. I’m already borrowing individual elements from it. The lacy pink love knot lanyard has the same chain-loop end, rosebud button end, and even a few repeats of the blue cord to serve as buttonholes (near the button end). If you have a cord pattern you like, add a few elements from this pattern to keep it hook-only.


Crochet Mask Lanyard Pattern

A PDF version of this pattern was emailed to members of the Crochet Guild of America (CGOA) as a part of a Holiday Shopping Guide, December 1, 2020.

Materials 

  • About ten yards of a sport weight (CYC Size #2 Fine Weight) yarn. Shown (in blue): Lang Fiorina (100% cotton, 135 yds / 125 m per 1.75 oz/50 g)
  • Size E / 3.5 mm hook
  • A stitch marker is recommended for the first few rows
  • Yarn needle

Abbreviations used

Pattern uses US terms. UK/AUS terms are in { }

  • ch = chain
  • dc = double crochet {UK: treble}
  • hdc = half double crochet {UK: half treble}
  • sc = single crochet {UK: double crochet}
  • sl st = slip stitch
  • st = stitch
  • yo = yarn over {UK: yarn over hook}

Gauge 

8 pattern repeats (row pairs) = 4″ {10 cm}. Exact gauge is not necessary for this pattern to work.

Size

21 inches {53.34 cm} long. Length is determined by the number of pattern repeats so it’s easy to choose a different finished length.

Pattern Notes

  • Pattern begins at the fastening loop and ends at the other end with the button. The strap between these two ends has a two-row repeat: it’s a long narrow column of just one stitch per row.
  • To begin each new row, turn your work clockwise. (If you’re crocheting left handed, turn the other way.) The yarn will end up in back of the hook and turning chains instead of in front of them.

Instructions

Time needed: approximately 30 minutes


Chain 12. Hdc in 12th ch from crochet hook to form a ring.
This is the fastening loop.

  1. Ch 3, dc in the same ch as the hdc.

    Simple chain loop lanyard fastener close up

  2. Ch 1, turn, place marker in bump of ch and in a top loop of dc, sc in space between dc and ch-3.

  3. Ch 3, turn. Dc in bump of turning ch-1 and back loop of dc (the marked loops). 

  4. Ch 1, turn, move marker (until you can identify the loops to crochet into), sc in space between dc and ch-3.

  5. Repeat steps 3 & 4: 38 times or until it’s the length you prefer.

    Do not fasten off.

  6. Rosebud Button

    Crochet all stitches tightly. Ch 13, sl st in the front loop of the 2nd ch from crochet hook, sl st in the front loop of each of next 10 chs. Leave last ch unworked to form the “shank” at the button’s base. Remove crochet hook from loop for the next step. Place marker in loop to secure.
    Tie the strip of 11 sl sts into a simple overhand knot so that the tip of the sl st strip peeks out. Ignore how it looks for the moment. Replace hook in loop and in two or three strands of the sl st tip, and tightly sl st around the unworked ch-1 of shank. (Knot will bend over.) Sl st in same ch, sl st in nearest next stitch, fasten off, and weave in ends.
    Tug on sections of the button knot to even it out; plump it up to make it cute. The goal is to center the shank under a mushroom cap shape. Spritz with water to set it.
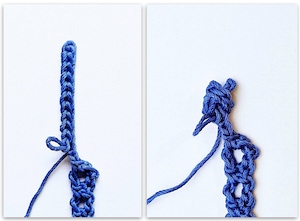
Crochet Rosebud Button steps 1 & 2 of 4 © Vashti Braha 2020

  7. Attach to face mask

    Slide loop end under an ear loop of the mask. Feed the button end through the loop end and pull the full length of the lanyard through so that the loop wraps around the ear loop tightly with a lark’s head knot.
    Slide the button under the other ear loop of mask. Fold button over and press it through one of the nearby spaces of a dc row. (Reverse these steps to release lanyard from mask.)
    If the length you made doesn’t fit over your head, attach the button end after you’ve placed it around your neck.
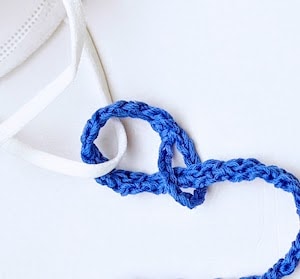
How to attach crochet loop to mask ear loop

  8. Variation I

    Wrap the fastening loop with the starting yarn end, and wrap the shank of the button with the other yarn end when you’re about to weave in the ends. It’s a nice look. I did this for the button shank of this prototype.Crochet mask lanyard prototype shows a wrapped fastening loop and button shank.

  9. Variation II

    Use your own favorite crochet cord pattern and incorporate sections from this pattern. Here’s how the complete pink love knot example looks:Crochet mask chain of lacy pink love knots and crocheted fasteners.


FAQ About Crochet Mask Lanyards

Why crochet a face mask lanyard? Is it better to crochet one?

Crocheting a lanyard is easy and fast, especially when you can also crochet the fasteners. Crochet makes a strong and durable lanyard with very little yarn (about ten yards).

Are crocheted lanyards washable and comfortable to wear?

Yes: use a soft, washable yarn. It’s comfortable and almost weightless. I forget that I’m wearing it sometimes.

How much yarn do I need to crochet a mask lanyard?

The pretty blue one shown here required only ten yards of a sport weight cotton yarn, and a size E (3.5 mm) crochet hook. Even the lanyard clips are crocheted!

What’s the difference between a mask holder, mask extender, mask chain, and mask lanyard?

“Mask holder” and “mask extender” usually refer to a small strip that has a button at each end. Wear it to eliminate pressure or irritation behind the ears. It shows at the back of the head where the ear loops of the mask hook around the buttons instead of the ears. Another term is “ear saver”.
“Mask chains” and “mask lanyards” drape around the neck like necklaces. It’s the same idea as wearing a badge holder, or a chain for reading glasses.

How long does it take to crochet mask lanyards?

The simplest one of all—just crochet chain stitches—would take 5-10 minutes. The fancier one shown here took 30 minutes.

Do I have to sew buttons or metal clips onto a crocheted mask lanyard?

No. It’s possible to crochet the whole lanyard, even the fasteners! That’s what it means when a crochet project is “hook-only”.

Posted on 1 Comment

Starry Crochet for Wire Mesh Panel Decor

Crochet DIY for Wire Mesh Panel Decor!

I have a fun summer crochet project to share. I’ve been bitten by the DIY wire mesh panel decor trend and have made several styles. Today’s focus is a cosmic one: wire mesh panel as Starry Firmament.

Unique crochet stars for wire mesh panel decor
Half of these were made with the pattern below, or a simple variation of it (described in the pattern).

Shown above is a cosmic condominium for air plants, but it could just as easily be a photo memo board. Or see below for other decor ideas.

There’s a free crochet pattern for the stars below.

Wire mesh panels are not hard to come by at all. Not only are they easy to find, they’re a bargain: just a dollar or two for strong, durable, and very serviceable 14-inch {35.5 cm} square panels. In fact, they’re so low-priced and common that it costs more to ship them across the US than it does to buy new ones locally. Hence my problem.

I have stacks of them because they’re great for building show booths, like I’ve done at crochet conferences over the years. It only makes sense to keep them if I do show booths I can drive to. Some panels are getting a bit of surface rust here in the subtropics.

Most people would throw the panels away. I know because that’s the advice I’ve gotten. There’s a creative DIY decorating trend going on with wire mesh panels though! Why spend $15-$50 on one when you could spray paint it rose gold yourself? Or do like I did: add a constellation of stars?

Some wire mesh panel decor ideas I’ve found are: hang them over a desk to organize photos, memos, etc; string fairy lights into them and add a small shelf. Especially inspiring: sprinkle on some quirky air plants.

Crochet Pattern: Basic Firmament Star

I’ve used only the most elementary crochet stitches for this pattern. A new crocheter might struggle with it, though, if s/he isn’t accustomed to using very fine crochet thread yet.

Materials

I used a size #20 white crochet thread by DMC call Cordonnet Special. It’s on the stiff side because it has many plies that are highly twisted. This makes for crisp-looking stars that will hold their shape. If you can’t find it, Handy Hands Tatting make a cordonnet type called Lizbeth in many different sizes and colors. If you don’t have size #20, the next thinner/finer size, #30, seems to give me very similar results.

It doesn’t matter what steel crochet hook size you use. Choose the smallest size that still makes crocheting with the thread easy. For me it’s a size 1.25 mm in the brand I had at hand. For the thinner size #30 thread I needed a slightly smaller hook size. Psst, you might like what I wrote about steel crochet hook sizes!

Three thread sizes are represented here: the pink one in progress is size #10, and the two middle ones are the thinnest: size #30. The star on the far left and far right: size #20.

Pattern

Leave the thread ends 4 inches {10 cm} long.

Make a slip knot and place the loop on your crochet hook. Chain 5, slip stitch in the second chain from your hook to make a tiny picot, chain 2 or 3, double crochet in the first chain of this spoke (the chain that’s nearest the slip knot). In the photo above, two pink spokes have been completed. *Chain 5, slip stitch in the second chain from your hook, chain 2 or 3, double crochet in the first chain of this spoke.* Repeat from * to * one or more times, depending on how many spokes you wish the star to have. Then slip stitch in the first stitch nearest the slip knot. Fasten off.

To vary the appearance:

  • Use half double crochets in place of the double crochets.
  • Add another stitch (a slip stitch, or single crochet) in the next chain after the picot, then chain one less before finishing the spoke with a tall stitch.
  • Begin each spoke with 4 looser chains instead of 5 (then chain one less before finishing the spoke with a tall stitch). Or begin with more than 5 chains and add more chains after the picot.

To finish and use the star:

  1. With a fine needle, weave one of the ends to the opposite edge of the star. Notice in the photo above that the ends of the two outermost white stars are opposite each other while the middle two have ends coming from the same place of the star.
  2. Wet it, stretch, pinch the spokes, and allow to dry perfectly flat and as symmetrical as you can get it. Meanwhile prepare your wire mesh panel by sanding off rust if necessary, spraying with a primer and then a dark glossy blue. I then sprayed on a fine multicolored glitter too.)
  3. Tie each star onto a place where the grid wires intersect. Tie one direction and then the other tightly around the intersection. This keeps them stationary. Snip the ends close to the final knot on the back of the panel and apply a drop of glue to the knot.
  4. My one additional step was to spray a light coat of clear acrylic sealer onto the back of the panel. Mod Podge makes one that did not cause the stars to yellow, unlike a few other sealers I tested. Have a toothpick handy to smooth down the sealer where it shows on the stars (it will look hairy or like tiny dew drops in places). This helps keep them crisply starry.
  5. Now add air plants, or use those tiny wood clothespins to clip photos and things to it.

See more images of the Starry Firmament wire mesh panel decor at its Ravelry project page.

Posted on 2 Comments

Holiday Crochet Project Habits

This blog post is part of today’s newsletter issue #96. That issue has a storewide 25% off coupon code in it as a thank you to my subscribers. Look for it in your inbox later today. Also check your spam folder because this is a high-volume week for email. (Not a subscriber? It’s not too late.)

The clean, bold holiday template I used for issue #96 limits how I want to write, so here’s the rest of the story. This year I look at my holiday crochet project habits over the years. (By “holidays” I mean from Thanksgiving in the USA to New Years Day.)

Holiday Crochet Project Types

It turns out I look for about eight kinds of holiday crochet projects! Sounds like a lot but they usually overlap. I wonder if you are the same way? I’ve compressed my list into three in no special order.

Feel the Peace of the Season

Relaxing & rejuvenating holiday crochet projects of Decembers past (2011-2017)
Image #1. View full size.

Crochet is my go-to to relax and recharge, and it has been ever since I was nine years old. (When I learned how to do Transcendental Meditation, my first thought was, “This is like crocheting.”)

The crochet that replenishes me during the holidays is an instinctive thing and unique to each year. I loved looking back at these!

Clockwise from top left of image #1:

  • Big Hook Bucket of 2016 (I made three). Seeing it daily in my studio makes me happy.
  • Luckyslip Mitts of 2013: I just kept making ’em in all kinds of yarns, sizes, and stitch accents.
  • Antoinette Sparklescarf of 2011: The one shown is made with the same breathtaking yarn that inspired Starwirbel later. I made about ten and turned some into reusable gift wrapping ribbon.
  • Solstice Bangles of 2017. I really needed a lot of gem-like bling last year. Each was a tiny retreat: I got totally immersed for short moments because the materials were tricky, but each bangle was quick to complete.
  • Bling Bam Bangles of 2014: Took me by surprise. I wondered what it would be like to crochet Lotus yarn with a strand of sequined thread and I couldn’t stop. Very simple. A mindless, familiar rhythm.

Last-Minute Gift Making

I’m easily inspired by great new gift ideas to crochet, but I typically don’t have a sense of occasion until the last minute. (Fortunately crocheting smaller items is fun. They often become new designs instead of gifts though.) I greatly admire event planners and others who can plan ahead well, like those who have crochet gift lists they work through months ahead.

Last minute gift crocheting puts a burden on a crochet pattern to be easy to understand, and to call for no-fuss materials. It’s sort of like freelance crocheting for magazines in the sense that it’s tight deadline crochet.

If the item is a crowd pleaser, then it’s production crochet territory. Ideally the pattern is easy to memorize for make multiple items from it, efficiently (and still be fun).

Niche Crochet Gifts

Crochet patterns for niche gifts: no-fuss materials, easy pleasers.
Image #2, Niche Gifts. View full size.

Niche items are about specialized appeal and could be the perfect thing for someone. I focused on some in the newsletter: men, boys, teens, tweens, teachers, and mothers-in-law. These are the patterns shown clockwise from top left of image #2:

  • Expedient Cowl: Has trend appeal for teens and 20-somethings, including as a skirt! What makes it fast and easy enough is the super-bulky yarn, big hook size, and simple stitches.
  • Aran Rozsana cuff: Folk-boho jewelry trend. A mood boost to crochet with fingering or sport yarns and embroidery flosses because of the colors. Mostly single crochet (UK/AUS: dc).
  • Petticoat Cozy: Just a token gift item. It’s the double layer of lace that appeals to people. Same yarns as Aran Rozsana.
  • Frostyflakes: A really popular pattern and addictive to crochet! It has special appeal to women over 30. Use any yarn; I even made a bookmark with size 20 thread.
  • Gallon Friend: This curio is very niche. Make them for grade school and ESL school teachers, children, and for home cooks. I’ve always wanted to try a keychain size in thread!
  • Lucky Twist Mitts: One of the patterns that comes to mind for men. Has sizing for both sexes, same with Luckyslip Mitts.
  • Slip Slope: The scarf is a crowd pleaser and Google Trends tells me the boot cuffs are still trending high for younger folks! Also see the Lucky Twist Boot Cuff pattern in Ravelry.
  • Burly (center) and Burly Bias: The basic Burly scarf for men and boys, and the niche diagonal Tunisian necktie for the man who has everything. I love making the ice creamy one and like how it settles on my shoulders and frames my face.

Crochet Gifts for Mothers-in-Law

Seems oddly specific, doesn’t it? I’m surprised by the number of times someone has told me they used one of my patterns, or took one of my classes, specifically so that they could make the item for their mother-in-law. (My own mother-in-law wanted a white angora hat to keep her ears warm.) The mother-in-law patterns:

Hostess Gifts

Some Decembers I go to so many parties. A pile of small crocheted gifts on hand would be great. Maybe a sack or decoration for a wine bottle, to decorate the lid of fresh-spiced nuts, etc.

Last year I had extra Solstice Bangles to toss onto a wine bottle neck—so festive! And the hostess ends up with new bangles.

Trend-Inspired

I checked on this season’s knitwear trends and this is what I found:

  • Creative use of fringe remains a strong fashion trend. My first thought is the Starpath Scarf because at this time of year it’s easy to set it down and remember what you were doing when you get back to it. Also, no ends to weave in, no matter how many colors you use.
  • Giant yarns, stitches, and accessories. Burly and the Expedient Cowl in super-bulky yarn (see Image #2 above) are tame compared to what’s on the runway. A Q-Star Coverlet in bulky yarn would be a lavish winter blanket! Or rug/bath mat?
  • Asymmetry, and diagonal/multidirectional seams and surface grain. Hello, Burly Bias (see above).

Go Luxe!

Splurge-worthy for 2018: Doris Chan patterns, Vashti's investment patterns, yarns, hooks, and the new Delicate Crochet book
Image #3, Splurge-worthy. View full size.

The holidays is when I splurge and reinvest in my craft. I hope you also treat yourself or another crocheter. Beyond shopping and spending, to me it’s about using this time to crochet with my fanciest yarn stash and maybe break in some new crochet hooks.

Other years it has been about bling. This year I’m feeling very angora-luxe. I’ve been hoarding angora yarn for too long.

If someone asked me what they should get from my shop and money was no object for them (or they want to make the most of the coupon code in the newsletter), these come to my mind in no special order:

I wish for you the experience I aim to have with my 2018 holiday crochet projects: peace, cheer, inspiration, and warmth inside and out.

Posted on Leave a comment

Last Minute Crochet Jewelry Gift–How to

I’m crocheting these festive bangles for quick holiday gifts (Hanukkah, solstice/yule, Christmas), hostess gifts (I have five holiday parties to attend), and for myself. It’s relaxing now to make them. I’ll wear some to the parties.

Each completed bangle is costing me about 50¢ (not including labor, a.k.a. the love in every stitch ❤️).

“Solstice Bangles” Free Pattern

Below is the complete pattern for what I’ll call “Solstice Bangles” because tomorrow morning is the Winter Solstice (first day of winter). I contemplate this sometimes as I crochet around the bangles; it’s a satisfying “full circle” feeling. I’m completing another sparkly “wheel of the year”.

Skill level

The starter pattern is Beginner-friendly. So many ways to get fancy with it. Add some challenge with wire or beads.

Materials

This section looks long because it includes tips for substituting with items you have on hand.

  1. Bangle “blanks”: Look for thin, narrow, permanently closed (not hinged or locking) metal bangles. They’re often sold as a group to be worn stacked, meaning all at the same time. If they are labeled with a size, choose only “large” because any crocheting you add will reduce the final inner circumference. I don’t want any tarnishing or chipping, so I prefer to buy them exposed to air without a package wrapper. If they have soldered seams, check them for strength. This is especially important for gifts because you don’t know how much force someone will use to slide it on over their hand. I only buy them locally so that I can test the seam and finish of each one. Over the years I’ve kept an eye out for them in places like Claire’s, Wal-Mart, Target, etc. The quality varies wildly. I can recommend the ones in Wal-Mart now (pictured). They come in bunches of 15-18 bangles for $4.88.
  2. Yarn, if you’re not adding beads: Here’s where you can use the interesting embroidery braids, flosses, and fine novelty yarns languishing in your stash. My first choice is a fancy metallic Kreinik braid type if I’m not adding beads. My little 5-meter spool can cover two, possibly three skinny bangle blanks. Some fingering and lace weight yarns would work, and any crochet thread size. Beginners: start with a sock yarn or size #3 or #5 crochet thread, and no beads. Then graduate to a fancy metallic floss/braid type, then try very fine wire without beads first (30ga to 32ga thickness).
  3. Yarn if you’re using beadsI’ve had the best luck crocheting with wire. The wire holds the beads in place the best for me. Wire is a unique crochet experience. If you’ve never tried it, please see my newsletter issue on it, or the Embracelet pattern.
  4. Crochet hook: This is easy. Use whatever hook size that makes it easiest for you to crochet tightly and evenly.
  5. Beads (optional): I like very small beads for this. I don’t go much larger than “e-beads” (size 6 seed beads). Beads with small holes also work better for this so that they don’t jiggle and shift around. This means gem, chip, and pearl beads are great! You can use a larger accent bead for a tassel finish.
  6. Sealer, stiffener, adhesive, fine yarn needle, etc. (optional): You might wish to use a fabric protectant such as Scotchgard if your yarn is an absorbent fiber. I used three coats of clear nail polish to secure a tassel of metallic embroidery floss because it doesn’t hold knots well. I may use this, or some clear fabric paint, on the inner surface of a bangle to keep the stitches from twisting around the bangle.

Pattern Abbreviations

  • ch = chain stitch
  • sc = single crochet (UK/AUS: dc)
  • ss = slip stitch

Crochet a Basic Solstice Bangle

Step 1: Leave a 4″ yarn end that you can crochet over it, weave in later with a needle, or leave hanging with a bead or tassel. Crochet all stitches tightly. Slip stitch around the metal bangle tightly, *ch 1, ss, repeat from * until bangle is covered.

This is up to you: use fewer stitches to cover the bangle by stretching them taut around the bangle. They’ll be less likely to twist and shift around the bangle, and you’ll see more of the metal. Or, use an excess of stitches for a different look: I love the wavy zig-zag texture of the (ch 1, ss) combo. You’ll see much less of the metal this way.

Step 2: When you’ve crocheted the number of stitches around the bangle that you like, join the last stitch to the first one. I remove my hook from the stitch loop, insert the hook in the first ss, and pull the last stitch loop through it with the hook, then fasten off.

Step 3: Decide what you want to do with those yarn ends. Weave them in. Or, string an accent bead onto both ends, knot them, and trim ends close to the bead. A third option is to tie the ends together, cut more yarn lengths, then add to the yarn ends and tie into a bundle to make a tassel.

Step 4, optional: If you add a fabric protectant, test a swatch first. You could coat the inner rim with a glue or sealer to prevent stitches from twisting around the bangle. Add a drop to knots if they might loosen with wear.

Add Challenge

The basic Solstice Bangle pattern is crazy simple, right? Add just one variable and it’s a different experience. For example:

Add other stitches or change them completely. You could try all sc. I used such a fine red wire for a beaded bangle that I had to use sc instead of ss to make them more visible. Embracelet is an example of using love knots.

Hold two different glittery strands together as you crochet, or use 6-strand embroidery floss. (Managing multiple plies as you crochet so tightly around a bangle does get tricky.)

Just add beads. That’ll keep you busy! I like to add one or more beads to the ch of the (ss, ch 1).

Use wire as the yarn. A thicker wire such as 26ga may be difficult for some people to crochet with, but it sure shows up well, and makes a statement even without beads. It also holds up nicely and is less likely to twist around the bangle. Finer wire is great for showing off beads.

Try to crochet the wire as tightly as you can. (It will still be looser than you intend.) When you’re done, tug on each bead a bit while also giving it a half-twist. This will tighten the stitch around the bead and bangle. I also compress everything by pressing and scrunching the stitch loops together into the bangle. I guess you could consider this a “blocking” method for wire jewelry?

Posted on Leave a comment

CGOA Award Event Plans

I’ve mostly blogged lately about getting ready to teach and have a market booth at the big crochet conference next month. Here and there I’ve mentioned some special events I also plan for, such as the fashion show banquet and design contest. This year I’m making special preparations for the Hall of Fame event when my friend accepts the CGOA award. 

The CGOA Hall of Fame recipient for 2016 is my close friend Doris Chan. We met at CGOA’s 2004 conference in Manchester NH. There could be no Lotus yarn if we’d never met.

For the past few days I’ve been tracking down which of Doris’ earliest designs I have. My mom has the most important one of all, and she’s in Iowa. Back in March 2004 I used a pattern by Doris called Celebration Shawl to crochet a Mother’s Day gift.

Back then I had no idea who designed the shawl I made. I just leafed through my issue of Crochet! magazine and thought it looked like fun to make. The yarn was soft, cheerful and warm. I knew my mom would enjoy wearing it in a dreary Iowa winter.

Doris didn’t know that her design had been published somewhere. When she saw the bag I made to go with it, that really threw her off. The bag wasn’t part of her pattern. I just crocheted it on the plane from the leftover yarn.

Of course she had to ask me about it, and the rest is history. The next year I crocheted her a silver wire bracelet that is a miniature replica of her shawl pattern. (Blue bugle beads kind of look like Fun Fur yarn, right?)

Twelve years later, Doris gets the Hall of Famer CGOA award! This will be a very special conference.