Posted on 2 Comments

Slip Stitch Crochet Hearts Free Pattern

Gallery from the original 2016 "Slip Stitch Hearts Free Pattern" blog post.
If image is missing, see this album.

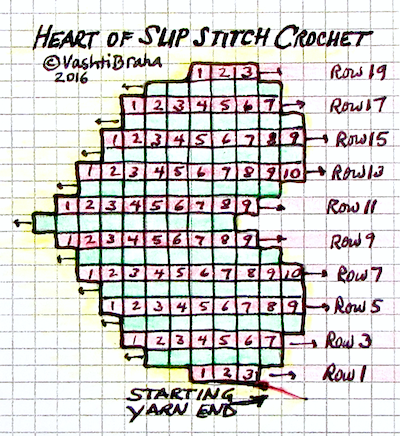
This blog post is an overflow page for issue #76 of my crochet newsletter. Scroll down to see the heart shape chart, and then the full text of the Slip Stitch Crochet Hearts Free Pattern. To print, click on the little printer icon at the end of this post.

We Need to Talk: Slip Stitch Skill Levels

I rate this pattern Intermediate for slip stitch crocheters, and Advanced if you’re new to Slip Stitch Crochet. A good free crochet pattern for slip stitch beginners would be Eva’s Ribs Scarf. After that, Slip Tectonics or Undaria would bring novices solidly up to speed for these hearts.

Seriously.

These crochet hearts were originally used for a three-hour intermediate-level class on slip stitch shaping methods. “Slip Stitch Crochet 101” class was a prerequisite. After crocheting this heart, students would be equipped to crochet fitted sleeve caps and gracefully shaped armholes!

You’ll be adding or subtracting only a stitch or two to make this heart. Not a big deal if you’ve ever increased and decreased with single crochets. It takes practice, though, to shape every row of slip stitches.

Consider that even if you’ve already completed some slip stitch projects, most existing slip stitch crochet patterns involve only occasional shaping, if any. (If you’ve crocheted a slip stitch pattern with a significant amount of shaping, please tell me about it in the comments.)

For a slip stitch beginner, the biggest challenge is recognizing what the stitches are doing to avoid increasing or decreasing by accident. It’s like learning to crochet all over again—and that’s humbling if you don’t expect it, but what a beautiful thing! How many of us long-time crocheters remember what it was like to learn how to crochet for the first time? If you’ve crocheted for at least ten years already, you can revisit this life changing moment.

Challenge Accepted? Great!

Welcome to the “heart” of slip stitch country. Start with a thick smooth yarn and a big hook.

Slip Stitch Crochet Hearts: Project “Shortbread Cookie”

A Valentine Heart Pattern in Vertical Fss Rows.

Abbreviations: ch=chain, Bss=back-loop-only slip stitch, Fss=front-loop-only slip stitch, sc=single crochet, ss=slip stitch,  st(s)=stitch(es).

Cross off each row when you complete it to easily keep track of where you are. (I have to. For these crochet hearts it’s easier to count stitches, not rows.) For pattern help, visit my fabulous forum.

Slip Stitch Hearts Free Pattern charted diagram: each square is a stitch. Right side rows are green, other rows are pink. 19 rows total.
This heart shape is crocheted from side to side. Use any yarn. Image missing? See this album.

Chain 4.

Row 1: Skip ch nearest your hook, ss in any loop of each remaining ch, turn: 3 ss. Easy, right?

Notice that every odd-numbered row ends at the top of the heart and every even-numbered row ends at the bottom of it. The yarn end (called “tail” from now on) is at the top of the heart, so when you crochet toward the tail end, you must be on an odd-numbered row.

Row 2: Ch 2, ss in 2nd ch from your hook (an increase of one st), Fss in first ss, 2 Fss in each of next 2 ss, turn: 6 ss. 

No row will ever have more than 10 sts in it. If you have trouble seeing which loops to crochet into:

  • It will get easier after 3 rows or so. You won’t see the heart shape develop until you’re halfway there (Row 9).
  • The st count matters more than choosing the correct loop. Count as you crochet and add a st in a good enough loop if need be. The most common problem for slip stitchers is identifying which st is the last one of the row. Counting as you go helps and you won’t need to use a stitch marker.
  • I don’t count my rows. As I complete each row I put a check mark next to it on the pattern. I also rely heavily on the yarn tail to know whether I’m crocheting a row toward the tail or away from it.
  • Questions? Ask in my forum

Row 3: Ch 2, ss in 2nd ch from your hook, Fss in each ss, turn: 7 ss.

Rows 4 & 5: Repeat Row 3. At the end of Row 5 you’ll have 9 ss.

Row 6: Ch 1, Fss in each ss, turn: 9 ss.

Row 7: Repeat Row 3: 10 ss.

Row 8: Ch 1, skip first ss (a decrease of one st), Fss in each remaining ss, turn: 9 ss.

Row 9: Ch 2, ss in 2nd ch from your hook, Fss in each ss to last st, turn leaving last st unworked: 9 ss.

Row 10: Ch 1, skip first ss, Fss in each ss to last st, 2 ss in last st, turn: 9 ss.

Row 11: Repeat Row 10: 9 ss.

Row 12: Repeat Row 9: 9 ss.

Row 13: Ch 1, Fss in each ss to last st, 2 ss in last st, turn: 10 ss.

Row 14: Ch 1, Fss in each ss to last st, turn leaving last st unworked: 9 ss.

Row 15: Repeat Row 6: 9 ss.

Row 16-18: Repeat Row 14. At the end of Row 18 you’ll have 6 ss.

Row 19: Ch 1, skip first ss, Fss in next ss, [skip next ss, Fss in next ss] twice, turn: 3 ss.

Before edging, the heart shape looks sort of "ragged" around the edges. Slip Stitch Heart Free Pattern, finishing step.
This is how it looks after a quick blocking, and before edging it with a round of slip stitches. (If image is missing, see this album.)

Round 1 (add a border of ss): Fss in each ss of Row 19, ss in one loop at the end of each row to bottom point of heart, [ss, ch 1, ss] in it, continue edging row ends to first row, ss in each of the 3 foundation chs, ss in remaining row ends, join to start of round with a ss.

Note: Edging these crochet hearts is not as laborious as it might seem. Even though it’s not easy to identify the same loop of each each row end, this needn’t slow you down. I mostly just estimate where to put my next stitch, and it comes out fine.

Finishing: Fasten off, or add another round of ss, or reverse sc. Be sure to damp block: stretch all edges in every direction then let it settle into a smooth, symmetrical-enough heart shape and let dry. Make another like the first so that you can seam them together with a ss seam, add a bit of stuffing and hide the ends.

Experiment Freely with this Free Heart Chart

The grid rows of the chart match Fss stitch height, but why impose limits on your heart? Try using single crochets instead; the heart shape may widen or narrow a bit. Or, try back-loop slip stitches (Bss) after you’ve made a few crochet hearts in all front-loop slip stitches (Fss). (The back loops of slip stitches are trickier to find than front loops for some folks at first.)

I hope you’ll show us your crochet hearts in my forum.

Posted on Leave a comment

Selling Crochet Items Based on DesigningVashti Patterns

Selling crochet items based on my patterns? Please do.

If you like to crochet things to sell at craft fairs or in a shop, please enjoy using my crochet patterns for that. I really appreciate that some crocheters care to ask a designer first! I love that about our crochet community. Not only is it your right in the USA, please also know that I feel honored that my designs inspire you to make and sell finished items.

I now state officially in several places that crocheters are welcome to sell the items they make from my patterns. (Patterns I’ve already published lack this notice. I’m updating each one as time allows.)

I’ve been a maker too.

Most recently in March 2014. Ananda, a dear friend I’ve known for forever, has an indie natural perfume business. Her cool idea for a trade: she would create a limited edition perfume with pure essential Lotus blossom oil.*

In return, I would crochet special little Lotus perfume pouches just for her and her best customers. The photos above are the pouches I made.

*She even named it Vashti.  :swoon:

It was good timing for me to revisit being a maker—not a designer, teacher, editor, etc. I say “revisit” because I had a macramé jewelry business back in the 1980’s. After that I had a calligraphy business. I loved being an indie maker and selling at fairs.

Why would designers object to people selling crochet items from their patterns?

In forums, makers complain that some designers and publishers try to limit how their patterns are used, and can’t imagine a good reason for it. I think it’s understandable. Here’s why:

Back when I first launched my own pattern website, craft bloggers were reporting instances of large companies taking advantage of “the little guy” (indie designers). These companies were allegedly looking online for designs and then copying them as their own.

Whether or not the law would side with the indie designers in any of these cases, 1) These watchdog bloggers revealed publicly that stealing intellectual property isn’t victimless nor is it invisible on the internet; and 2) It scared me as a new owner of a web-based pattern line.

I did not start out encouraging people to use my patterns for selling crochet items. (I hope I didn’t discourage anyone!) I figured I’d hear from someone on a case by case basis. It’s because I didn’t know there were so many indie makers looking for inspiring crochet patterns. Turns out I was only hearing from a tiny percentage.

One last thing: crediting me as the designer of the pattern, or listing my DesigningVashti.com URL on your labels, is greatly appreciated, but not required. Let me know how your items sell, or show me some pics. It inspires me to design more!

Now: if you wish to use my designs to produce crochet items on a mass scale, contact me: vashti AT designingvashti.com . Thank you.

Posted on 1 Comment

Picot Crochet Card Edge (Free Pattern)

I found my old notes!

The other day I posted a photo of a freeform crochet card edge I did over four years ago. In that post I described how to crochet it, to the best of my memory. Back then I mailed off the card right away. I have no memory of having written down any how-to info.

Well, I just now I found the notes to myself about it (pictured at right). I’ve been going through lots of old files, boxes, CD roms, etc. so I’m finding all kinds of things.

Below I’ve typed in everything from that paper to be readable. I suppose you could say this is a…

Picot Crochet Card Edge Free Pattern

Supplies Needed:

  • Size #7 Boye steel crochet hook (or size that will pull the thread you’re using through the holes punched in the card).
  • Size #10 cotton crochet thread: Coats Opera (100% mercerized cotton, 230m per 50g ball), 2 colors.
  • Greeting card: the thicker the card stock, the better. Glossy card stock is even stronger.
  • Single hole paper punch: 1/16″ diameter holes. (Look for one in the scrapbooking section of a craft store.)

Stitches and Abbreviations Used:

  • ch = chain
  • sc = single crochet
  • sl st = slip stitch
  • st(s) = stitch(es)

Begin Picot Petals Crochet Card Edge

Step One: I punched holes fairly randomly. Sometimes I filled in with additional holes later.

Step Two: With pink thread for flower petals, *ch 6 or 7, sl st in the 6th or 7th ch from your crochet hook, sc in the same or next hole, depending. (Depending on how it looks and how far away the next hole is. Bunching them here and there brings out the petal look.) Repeat from the *, or just sc again in a hole; add a ch or two to adjust the tension of the sts as you edge the card.

Step Three: With green thread for leaves, ch 6 or 7, sl st in 4th or 5th ch from your hook. Space these out a bit more than the petals were. I spaced them with only just enough chs to sc in the next hole gracefully.

I ended the pattern notes with, “I like how the bunched pink petals look next to the more spread out green sts.”

Posted on 1 Comment

Greeting Card Crochet with Picot Petals

Greeting Card Crochet with Picot Petals

Isn’t this greeting card crochet experiment lovely?

I made it about four years ago. The recipient was touched by it. I’m glad I took a photo before I gave it away—I smile whenever I see it.


My goal was to try crocheting a fine irregular edge in a freeform way. (I had already crocheted chunky, evenly-spaced borders into other things, such as with the Venus Flytrap Action Toy, and the Cheerful Chores.) tablecloth

The first step was to punch tiny holes randomly spaced along a portion of the card’s irregular edges. Instead of poking holes with a needle, I found a 1/16″ single hole paper punch at my local craft store. I’m glad I did. The holes are clean-edged and look like the card came with them.

Inside of Greeting Card Crochet with Picot Petals


Randomly spaced holes can vary in distance from each other, and from the edge of the card. When you’re crocheting into these holes, you just have to chain more to get to a hole that’s farther away, and chain fewer to get to a closer hole.

In standard pattern language, this is eyeballing (i.e. freeform), because it’s adjustable instead of being a fixed pattern. This automatically puts it in the Intermediate Skill Level category.

Sometimes I slip stitched (sl st) into a new hole, then chained one (ch 1) so that I could sl st again into the same hole.

The picot petals are just long picots. I added extra chains before the sl st or single crochet that closes the picot.

Greeting card crochet is a useful Intermediate Level skill to know for other kinds of crochet too.

I have a Pinterest board with lots of examples: http://www.pinterest.com/vashtibraha/crochet-mixed-media/

I’ve listed a few other links below to other crocheters’ blog posts about greeting card crochet edgings. Each blogger describes a similar step of adjusting the number of chains to accommodate the space between the holes.

http://onesheepishgirl.com/2012/01/adding-a-crochet-edge-to-paper-valentines-frames.html

http://vimeo.com/11981377

http://thimbleanna.com/projects/valentinecard.html

http://www.thriftyfun.com/tf95779670.tip.html

http://dutchsister-s.blogspot.com/2011/11/tutorial-recycled-christmas-card-with.html

Posted on 2 Comments

Crochet Mobius Cowl Wearing Styles

Simply add a mobius twist to an infinity scarf to multiply the ways it drapes.

A crochet mobius cowl pattern adds an easy mobius twist to a crochet infinity scarf (a.k.a. long loop scarf). This instantly increases the stylish ways to wear it!

Starlooper Ring Scarf: Turn it into an infinity scarf. Or not! Nine ways to wear it.
If you had to pick only ONE of these nine images, which would it be?

Have a look at this image I created for the downloadable new Starlooper Mobius Cowl crochet pattern. This montage of NINE images means I don’t have to pick just ONE wearing style to display.

I love a good crochet mobius cowl pattern because it flatters the face and neck effortlessly, no matter how it settles on the shoulders. Plus, of course, they offer easy warmth. You might enjoy an early newsletter issue I wrote called “A Fever for Crocheting Cowls” LOL!

For Starlooper I used a special kind of crochet star stitch pattern. It’s naturally a bit offset, reversible, and has accordion-like pleats. It’s also fast, soft, and warm for fall. (One of many star stitches.)

I’ve been learning ways to create draping montages like this image for years. Want to see earlier ones? Here’s Shakti Scarfythings. Check out Undaria!