Posted on 2 Comments

A Crochet Class in a Vest

The first corner of a hanky-hem love knot mesh vest in spring sunshine.
View full size image.

Want to see what I’m working on? This will be Flowerfall, a hanky-hem waterfall vest that I can wear when I teach 21st Century Love Knot Adventures this July in Portland, Oregon. I’m now two-thirds done.

Several Class Skills in a Vest

I’m designing Flowerfall to be a visual aid for several skill levels. I’ll also be adding the pattern to my shop for those who can’t attend the class.

Love Knot Beginner Skills
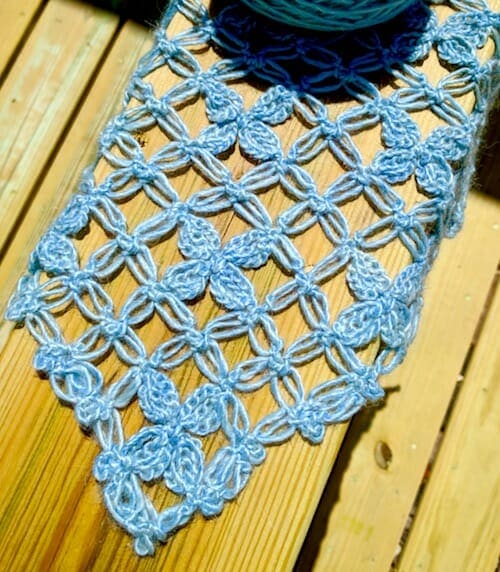
Another view of this diamond mesh would be the love knot sections of Lovelace. (It’s so iconic that the stitch is synonymous with the mesh in some how-to sources from the 1800’s to now.) Then, compare it with the Electra Wrap’s triangular love knot mesh.

For Students With a Bit of Experience

  • How to increase and decrease this mesh, and add picots as one way to finish the edges as you go.
  • The when, why, and the how-to: making love knots with slip stitches instead of single crochets (UK: dc).
  • My new favorite way to keep love knots from loosening later if the yarn is slippery.
  • A new way to crochet into love knots that I recommend for a project like this one.

For Those With More Experience

  • How to do corner to corner (C-2-C) love knot mesh in which you start in one corner and end in the opposite one.
  • How to sprinkle in other stitches with the classic love knot mesh to create lacy new stitch patterns!

Multi-Purpose Visual Aids = Ideal

This is my seventh year shipping teaching aids across the USA for crochet classes. I teach four to six different topics per event. Visual aids are everything! I always end up with a lot of crochet items to ship.

In the past few years I’ve started designing class items that combine several points of information in one. Not only do I cut down on the shipping this way, it’s a fun design challenge. I also love coming up with how a design for one class topic can double or triple as a visual aid for other topics I’m also teaching.

Self-Healing Stitch Alert

An example of this is I’ll be adding armholes to Flowerfall by cutting them open. Know what this means? It’ll also be a great visual aid for the Self Healing Stitches and How to Cut Them class! I might even bring it to the Tunisian on the Diagonal class if I don’t make a Tunisian one in time. Even though Flowerfall isn’t Tunisian, it’s an example of an easy shape to crochet from corner to corner in any stitch. (Flowerfall is even relevant to my slip stitch classes. It’s the first design I’ve done with slip stitch love knots.)

I’ll post again about this design so that you can see its modified diamond shape, how its armholes happen, and different ways to wear it. I’m smitten ? . Flowerfall’s Flickr album has three photos so far.

Posted on 1 Comment

Picot Crochet Card Edge (Free Pattern)

I found my old notes!

The other day I posted a photo of a freeform crochet card edge I did over four years ago. In that post I described how to crochet it, to the best of my memory. Back then I mailed off the card right away. I have no memory of having written down any how-to info.

Well, I just now I found the notes to myself about it (pictured at right). I’ve been going through lots of old files, boxes, CD roms, etc. so I’m finding all kinds of things.

Below I’ve typed in everything from that paper to be readable. I suppose you could say this is a…

Picot Crochet Card Edge Free Pattern

Supplies Needed:

  • Size #7 Boye steel crochet hook (or size that will pull the thread you’re using through the holes punched in the card).
  • Size #10 cotton crochet thread: Coats Opera (100% mercerized cotton, 230m per 50g ball), 2 colors.
  • Greeting card: the thicker the card stock, the better. Glossy card stock is even stronger.
  • Single hole paper punch: 1/16″ diameter holes. (Look for one in the scrapbooking section of a craft store.)

Stitches and Abbreviations Used:

  • ch = chain
  • sc = single crochet
  • sl st = slip stitch
  • st(s) = stitch(es)

Begin Picot Petals Crochet Card Edge

Step One: I punched holes fairly randomly. Sometimes I filled in with additional holes later.

Step Two: With pink thread for flower petals, *ch 6 or 7, sl st in the 6th or 7th ch from your crochet hook, sc in the same or next hole, depending. (Depending on how it looks and how far away the next hole is. Bunching them here and there brings out the petal look.) Repeat from the *, or just sc again in a hole; add a ch or two to adjust the tension of the sts as you edge the card.

Step Three: With green thread for leaves, ch 6 or 7, sl st in 4th or 5th ch from your hook. Space these out a bit more than the petals were. I spaced them with only just enough chs to sc in the next hole gracefully.

I ended the pattern notes with, “I like how the bunched pink petals look next to the more spread out green sts.”

Posted on 1 Comment

Greeting Card Crochet with Picot Petals

Greeting Card Crochet with Picot Petals

Isn’t this greeting card crochet experiment lovely?

I made it about four years ago. The recipient was touched by it. I’m glad I took a photo before I gave it away—I smile whenever I see it.


My goal was to try crocheting a fine irregular edge in a freeform way. (I had already crocheted chunky, evenly-spaced borders into other things, such as with the Venus Flytrap Action Toy, and the Cheerful Chores.) tablecloth

The first step was to punch tiny holes randomly spaced along a portion of the card’s irregular edges. Instead of poking holes with a needle, I found a 1/16″ single hole paper punch at my local craft store. I’m glad I did. The holes are clean-edged and look like the card came with them.

Inside of Greeting Card Crochet with Picot Petals


Randomly spaced holes can vary in distance from each other, and from the edge of the card. When you’re crocheting into these holes, you just have to chain more to get to a hole that’s farther away, and chain fewer to get to a closer hole.

In standard pattern language, this is eyeballing (i.e. freeform), because it’s adjustable instead of being a fixed pattern. This automatically puts it in the Intermediate Skill Level category.

Sometimes I slip stitched (sl st) into a new hole, then chained one (ch 1) so that I could sl st again into the same hole.

The picot petals are just long picots. I added extra chains before the sl st or single crochet that closes the picot.

Greeting card crochet is a useful Intermediate Level skill to know for other kinds of crochet too.

I have a Pinterest board with lots of examples: http://www.pinterest.com/vashtibraha/crochet-mixed-media/

I’ve listed a few other links below to other crocheters’ blog posts about greeting card crochet edgings. Each blogger describes a similar step of adjusting the number of chains to accommodate the space between the holes.

http://onesheepishgirl.com/2012/01/adding-a-crochet-edge-to-paper-valentines-frames.html

http://vimeo.com/11981377

http://thimbleanna.com/projects/valentinecard.html

http://www.thriftyfun.com/tf95779670.tip.html

http://dutchsister-s.blogspot.com/2011/11/tutorial-recycled-christmas-card-with.html