Posted on 73 Comments

Delicate Crochet Book Giveaway

Update: I’m so inspired by your comments! Your comment may take a few hours to show because they go into a moderation queue. 

I’m giving away a copy of the new Delicate Crochet book by Sharon Silverman to a randomly chosen commenter on this post. You’re welcome to enter even if you live outside of the USA. If you win and you have a non-USA shipping address, you’ll receive a free downloadable crochet pattern of your choice instead. Scroll down for the book giveaway details.


Pattern Riffing

Over the holidays I “riffed” on the patterns I wrote for Delicate Crochet. I’ll explain how, in case you have (OR WIN!!) this book and want to riff too.

Meet Zegue
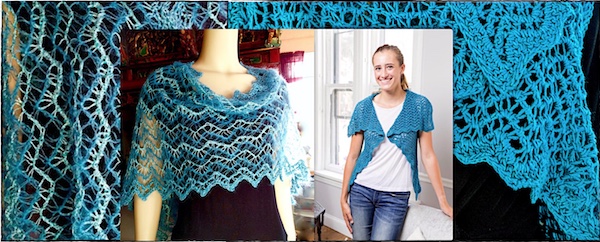
Tunisian ripple stitch Ziggy Vest with its variation Zegue
Zegue (left) with Delicate Crochet’s Ziggy Vest on the right.

Zegue is a simple wrap version of the Ziggy Vest. I used up scraps of fancy yarns in my stash. In Ziggy’s case the armholes are cut into the self-healing stitch pattern. I omitted that step for Zegue. (I could still add a hole later, such as for a one-sleeve wrap, or for a keyhole scarf style like I did for the pink Mesmer. Or go with my original idea: add a seam at each end of the long sides to create tubes (sleeves) for a shrug.)

Yarn: I had one small ball each of the four Stacy Charles Fine fashion yarns I used. (See Zegue’s project page in Ravelry for the yarn facts.) One of them has sequins so I had to use it. Using a mix of yarns for the Ziggy stitch pattern was really fun! I’ve always wanted to do a stripy scrappy ripple, especially in Tunisian stitches.

Crochet Hook: I used the 7.0 mm Addi Tunisian crochet hook from my shop; the Ziggy Vest calls for a 6.0 mm size. A 6.5 mm for Zegue would probably be just as lacy though you might need a few more rows and additional stitch repeat or two.

Finished Dimensions: 14″ x 57″ (35.6 x 144.8 cm), measured flat and blocked. I like wearing it as a wrap. For a shrug option I might add buttons. It weighs 71 g. and I had about a quarter of the Luna mohair and Crystal left over.

I chose the length of each row to match the length from my wrist over the shoulders and across the back to the other wrist while my arms hang at my sides—an easy measurement (57″/144.8 cm). This is because I thought I was going to turn it into a shrug. I just kept adding rows until my forearm would fit through the sleeve tube if I seamed part of the first and last row together; I’d need a minimum of about 9″ (22.9 cm). I figured the yarn amount would get me at least this far.

Foundation and Row Repeats: You’ll need the Delicate Crochet book for the actual Ziggy pattern (starts on page 140). Here are my changes for Zegue:

  • I chained 178 with Color A (Stella).
  • Row 1 forward pass (FP) is also Stella, and then I changed to Color B (Luna) for the return pass (RP) and the Row 2 FP. Fasten off every time you change yarns.
  • Row 2 RP and Row 3 FP: Change to Color C (Céline).
  • Row 3 RP and Row 4 FP: Change to Color B (Luna).
  • Row 4 RP and Row 5 FP: Change to Colors C+D (Céline & Crystal held together).
  • Repeat the color sequence of B, C, B, C+D for a total of 16 rows; for Row 16 RP change to Stella. Complete Row 17 FP and RP with Stella and then fasten off.
  • Edge Row 17 with a strand of Luna and Crystal held together: Single crochet (sc) in first FP stitch, chain 1, slip stitch (ss) in same sc, sc in same stitch, *chain (ch) 1, sc in next FP stitch, ch 1, sc in next stitch group, ch 1, sc in next FP stitch, [sc, ch 1, ss in same sc, sc] in next FP stitch, repeat from * in each remaining FP stitch of row. Fasten off.
  • Attach Stella to first foundation ch. Working along the other side of the foundation, sc in first ch, ch 1 and skip next ch that was not used by a FP stitch, sc in available loop of next used foundation ch, repeat from * in each remaining stitch of row. Fasten off.
  • Attach Luna and Crystal to first sc of Stella. Edge this row the same way you edged Row 17.

Yvelino the Paneled Ring Scarf
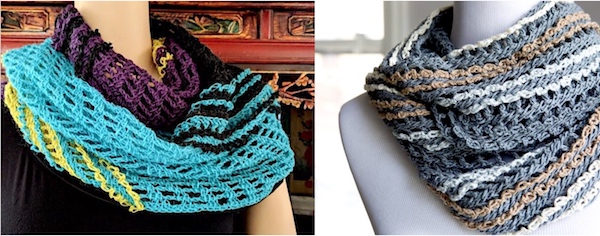
Icelandic wool ring scarf vs DesigningVashti Lotus wrap of Bias-crocheted Tunisian net, surface-crocheted with love knots.
Yvelino Ring (left) with Delicate Crochet‘s Yveline Wrap on the right.


For this version of the Yveline Wrap I used four colors of lace weight Icelandic wool, one ball per color. See its project page for the yarn deets. I loved this yarn; it’s very “sticky” and almost bristly or wiry in a way that works great with this airy bias-worked net.

Crochet Hooks: 5.0 mm (H) Tunisian hook; for the surface-crochet I used a regular 3.5 mm (E) crochet hook.

Finished Dimensions: 13″ wide with a 58″ circumference (33 x 147.3 cm). It weighs 100 g. so I used only half of each ball. (I thought I might want to add a lot of surface crochet, so I reserved yarn for that.) Instead, I like the texture contrast zones.

Foundation and Row Repeats: You’ll need the Delicate Crochet book (starting on page 133) for the actual Yveline pattern. Here are my changes for Yvelino:

  • Chain 58 in Color A. Complete 33 rows. Edge the last row with sc.
  • Slip stitch Color B to the bottom right corner foundation chain of the previous panel. Chain 58. At the end of the Row 1 FP, slip stitch in the first FP stitch of Row 1 of the previous panel and then complete the RP as usual.
  • Repeat this join-as-you-go process at the end of every FP until you’ve completed 33 rows. Edge it with sc like the previous panel.
  • Repeat the above with two more panels. For the last panel, also join-as-you-go the first FP stitch of each row to the last FP stitch of the first panel you completed to create a ring. (Or you could seam the first and last panel sides together to for the ring as a separate step.)

Adding the Frills: The only thing different from the book is that I used a 3.5 mm (E) crochet hook, and surface crocheted a column on each side of the joins.

Oh the Resources Buried in Crochet Patterns

I hold onto lots of crochet pattern books and “mine” them for interesting stitch patterns (love those stitch symbols!), shapes (love those schematics!), and construction methods (love the rare assembly diagram!).

The stitch texture combinationscolor contrasts, or styling ideas in pattern books are also inspiring.

Ravelry takes this into account so I know I’m not the only one who uses books this way. (When creating a new project page, there used to be a box you checked if you improvised from an existing pattern. Now you can choose additional patterns if you’ve incorporated elements from them.)

Delicate Crochet offers hours and hours of riffing on its interesting stitch patterns, shapes, and styles, thanks to the range of designers represented—and thanks to all the stitch diagrams and schematics.

Book Giveaway Details!
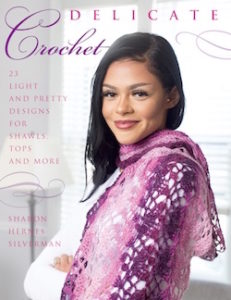
You could win this! Delicate Crochet by Sharon Silverman with 23 patterns by 10 designers.
  • I’ll use a random number generator no earlier than February 18 (Monday, President’s Day) to choose from among the commenters to this post.
  • There may be two winners: one with a shipping address outside of the USA as well as within it. If the first winner has a non-USA shipping address, the prize will be a free downloadable crochet pattern (winner’s choice). I will then draw a new number randomly until the new winner has a USA address to which I can ship the book.
  • To contact the winner(s) I will do these three things: comment on your comment with the news, and announce the winner’s name (as it appears on your comment) in my Ravelry group, and at my Facebook page. I suggest you opt-in to receive alerts of responses to your comment in case you’re a winner.
  • Your comment may respond to my question, “What crochet book would you like me to write?” (as explained in my newsletter #97), or at least be crochet-related. I reserve the right to remove spammy comments as always.
  • Commenting more than once does not improve your chance of winning.
Posted on Leave a comment

Stitch Pattern Spin-Offs from Eilanner

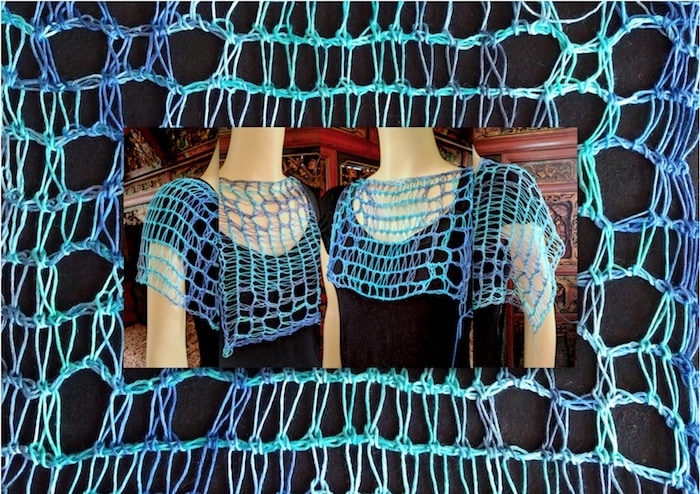
A "spin-off" stitch pattern from Eilanner design, here tested in tencel thread and draped on a mannequin
This is the gauge swatch from the new Eilanner Shawl pattern, but I used tencel thread and a giant hook for kicks. So airy! It inspired me to try draping it on a mannequin different ways. View full size.


I released a new Tunisian crochet pattern the other day. There’s a lot going on in it! I think of the design as containing modules of mini-patterns. Some of them hint at new stitch patterns.

Seeds of New Stitch Patterns

Often if you change one thing about a stitch pattern you can get a whole new effect that’s cool enough to count as a new stitch pattern. (This would be a good newsletter issue, come to think of it…) Here are some I swatched while Eilanner was being edited, and the things I changed to generate them. I posted them to Instagram.

Change the Yarn and/or Gauge

An obvious way to get a new effect with a stitch pattern is to use a dramatically different crochet hook size, or yarn thickness/fiber type, or all of these (as in that first image above). Super summery look! Reminds me of tall grasses.

There’s something else going on with it too: it’s really just a gauge swatch pattern. The skill level for Eilanner is Experienced. Getting the exact gauge is not important for the pattern but I thought it would help some crocheters to focus on just the main stitch pattern without the fancy edging at both row ends and the constant increasing.

Know what else started out as “just a gauge swatch”? Fish Lips Scarf-to-Shrug!

By the way, if you’re interested in Eilanner but worry it’s too challenging, work up to it with its predecessors. Shakti is like “Eilanner 101” and Islander is “Eilanner 102”. (I named Eilanner after Islander.)

Repeat a Special Stitch Group All Over

Another way to do a stitch pattern spin-off is take a stitch group and repeat that. Here’s Eilanner’s “tattoo flower” eyelet group repeated as an all-over motif.

This right here is a fraction of the possible new stitch patterns to generate this way! For example, the eyelets could be grouped differently, or stacked in columns instead of spread out in an alternating way. Moving eyelets around is an art form in itself.

I haven’t even tried sprinkling in stitch texture contrasts. Have a look at what happened when I added a similar stitch texture: love knots!

I woke up this morning with another idea for a stitch pattern that will probably show up in Instagram once I swatch it up. (The way Instagram displays images helps me contemplate designs.)

Isolate One Key Stitch

Not every stitch pattern has a key stitch to isolate. Eilanner does, though: the shallow-extended stitch I blogged about last week. The swatch below is pretty rustic and it’s not easy to see what is different about the stitch, but have a look.

It’s kind of loose so that I can see what the stitch texture is doing. I chose Icelandic wool for this because I love that the shallow-extended stitch is like a reversible and non-curling version of Tunisian Knit stitch.

If you like seeing my experimental swatches, follow me in Instagram where I tend to post them first. And please tell me what you like or don’t about them! It inspires designs and class topics.

Posted on 2 Comments

Crochet Beginners’ Tip: Slip Stitch Fake Facts

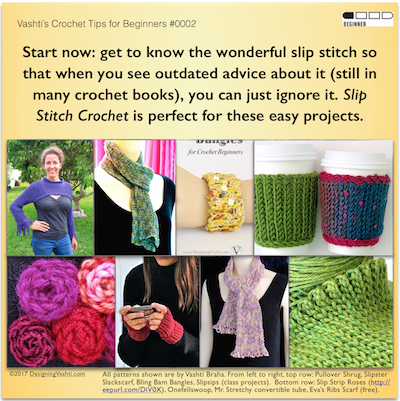
Beginner Crochet tip: tune out the fake facts still being circulated about our most basic and versatile crochet stitch, the slip stitch!

About Today’s Tip for Crochet Beginners

I’m going to unpack that “outdated advice” part in the tip pictured above.

For reasons I still haven’t figured out, misconceptions and outright errors (“alternative facts”?) about slip stitches are still repeated uncritically in English-language crochet books.

This has been going on for decades. Think about how it affects whole generations of crocheters. It’s the only reason it took me 30 years to try crocheting a whole swatch of just slip stitches. I was immediately smitten. My first slip stitch design was the 2004 Pullover Shrug (the cropped purple top I’m wearing in the tip above).

I have distilled every fake fact about slip stitches into the following four sentences, below. I begin my Slip Stitch Crochet 101 classes with them so that we can deal with them head on.

Can you spot all the unhelpful advice?

  1. There is one kind of slip stitch and you crochet it tightly.
  2. It is useful only occasionally, for a few things, such as joining a round, closing a picot, or seaming.
  3. Don’t bother trying to make anything with it, it has no height.
  4. It doesn’t really count as a stitch at all; it’s a nonstitch

(I underlined the fake facts to help you.) This false information discourages crochet beginners and all crocheters from exploring only slip stitches, not other basic stitches. Why? It’s not because slip stitches are tricky for beginners. It’s the most basic crochet stitch of all, along with the chain stitch! In my classes, the experienced crocheters struggle more—but that’s just due to the years of misinformation.

The more I explore slip stitch crocheting, the more insight I get into all crochet. This is why I want every crocheter to know about it. (The things you can make are also awesome.)

New Rules About Slip Stitches

1. Think of slip stitches as a group of stitches.

Lattice textured border of a 100% slip stitch crochet mobius "Bosnian" style (in rounds with no turning).
“Bosnian” crochet: slip stitches crocheted in the round with no turning.

Slip Stitch Crochet is actually a whole technique. When you know this, you can retain what you learn about them easier. It also spurs innovation, and aids pattern writing. I use the abbreviation SSC, as do others in the international SSC community.

Slip stitches look, feel, and behave very differently when crocheted with turning or without (“Bosnian”), and in just the front or back loop or both (or between stitches!). Invert them or twist their loops for more slip stitch types.

2. Go up at least two crochet hook sizes to crochet them loosely. 

Big-hook slip stitch is especially fun! Start with your bounciest wool yarns. 

3. Slip stitches are exceedingly versatile, useful, and pleasing for many of the things crocheters make.

In fact, slip stitches are often preferable to other stitches, such as for ribbing, or for a thin, supple fabric that conserves yarn.

A slip stitch may also be fine for joining a round, closing a picot, or seaming, but not always. For example, slipping a loop through to join is more invisible than a slip stitch. A single crochet sometimes closes a picot better with some yarns or for certain patterns. For seaming, sometimes alternating a slip stitch or single crochet with a chain-1 is better. (I also like to use inverted slip stitches for seams.)

4. Slip stitches clearly have height.

How odd that it needs to be stated. The simple evidence is the heaps of very wearable scarves and sweaters. You should see the overflowing table of them that I bring to classes!

Not only does a slip stitch have height, the height varies depending on the type of slip stitch. As a starting point, expect front-loop types to be taller than back-loop types. (This is the case for single crochet too.) 

Yes, you can even crochet around the post of a slip stitch.

Please Don’t Wait Like I Did.

I learned about crocheting slip stitch projects decades after learning how to crochet everything else. There’s no reason for crochet beginners to wait decades like I did!

Posted on Leave a comment

Happy [inter-]National Crochet Month

This is my Crochetville NatCroMo blogging day.

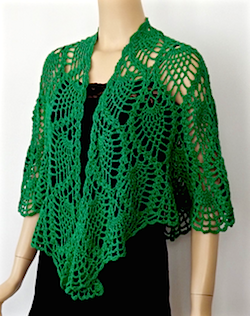
Larger wrap size of DJC Curaçao Wrap in Emerald Deep Lotus yarn
New pineapple crochet lace wrap pattern for Lotus by Doris Chan in Emerald Deep Lotus yarn.

Thanks for stopping by! It’s certainly a big weekend for us crocheters.

Tomorrow is a very green holiday (St. Patrick’s Dayso check out our DesigningVashti Lotus yarn in the new Emerald Deep color. This is a rich, satisfying, inspiring green to take you from winter to spring.

Want to feel warm and cozy quickly? 

I’ve just returned from teaching “Big-Hook Slip Stitch Crochet” in icy Chicago. I urge everyone to gather up their jumbo crochet hooks and super bulky yarns! Some of my slip stitch projects take only an hour or two this way.

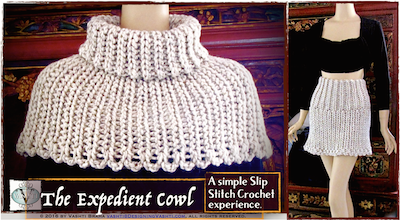
Expedient Cowl Took Only Two Hours to Make.

Beginner slip stitch crochet with a big hook!
Cozy Expedient Cowl: Use beginner slip stitches and a big hook. (Add a third ball and more rows for a trendy skirt!)

Warm up a big hook (size P/11.5 or 12 mm) for this toasty, speedy item. I named it “Expedient” because it took me just two hours tops to make one during LAST year’s surprise cold snap.

No super-bulkies handy? Create your own: just crochet with multiple strands held together of whatever’s in your yarn stash.

Tip: throw in at least one strand of alpaca or angora. These fibers are four times warmer than wool. Add a yarn with a halo like mohair, or a textured novelty yarn, to fill in any gaps between stitches.

Set of 5 Big Crochet Hooks: Perfect for NatCroMo

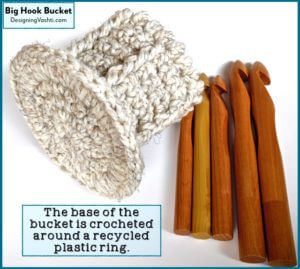
Set of 5 sizes of jumbo wood crochet hooks, and the crocheted "bucket" caddy for them showing the base that's reinforced by crocheting around a recycled plastic ring.
It’s displayed in my studio and I use it all the time now.

Be ready for the next cold snap with this set of five jumbo crochet hooks—sizes Q, R, S, T, and U—bundled with a free Big Hook Bucket pattern. (It’s already at a discount as a kit so I’m unable to discount it further for NatCroMo readers, sorry.) You can buy these crochet hooks individually here.

Armed with these hooks you’ll also be ready for when I release these new Big-Hook Slip Stitch crochet patterns (links currently go to their Ravelry project pages):

Zumie Lace Vest  I used a size S (19 mm) hook for most of it. This one-skein lace item took only 45 minutes to crochet. Yarn: the fun Hikoo Zumie by Skacel.

SS-Luscious Sampler  Size 12 mm (“P”) crochet hook and two skeins of luscious Berroco Noble.

Pink kitty-ears hat with only 95 yds and an M/9 mm hook. It’s simple back loop slip stitch in rows, then seamed on the top and side. It came out smallish on me and perfect on my friend (she kept it!). No yarn left over so I’m mulling a way to get a slightly more out of about 95 yds of yarn for this.

Slip Slab Neckwrap  It was the first prototype for the Expedient Cowl. I needed only 168 yards and a P/12 mm hook.

Also: Happy Spring Break!

Does it start this weekend for your family? My son’s starts this afternoon.

Posted on 5 Comments

Crochet Cable Boot Cuff Pattern in Progress

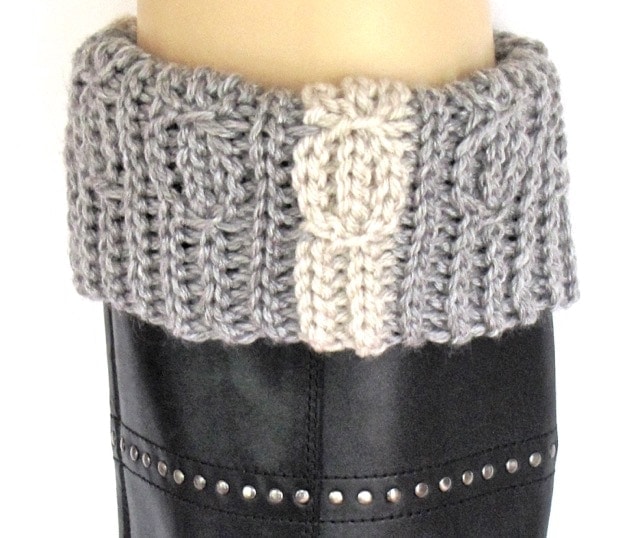
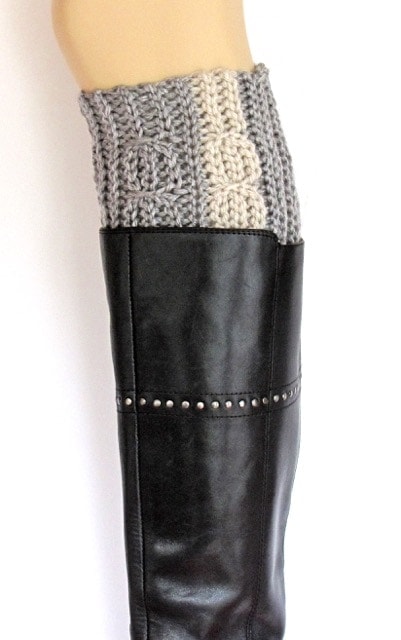
Lucky Twist Bootslip folded over boot top

New Crochet Cable Boot Cuff Pattern!

The Lucky Twist Boot Cuff in action!

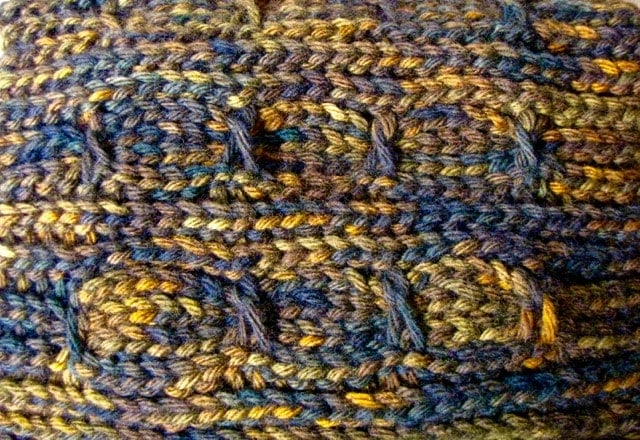
A few days ago I sent out issue #65 of my Crochet Inspirations newsletter: “Mock Cables in Slip Stitch Crochet.” I’m getting questions from readers about the dark brown crochet cable boot cuff photo (shown below). I crocheted that one in November 2012. The gray striped one is fresh off the hook.

The 2012 brown one is actually a prototype of the new crochet slip stitch Lucky Twist Mitts. It’s my newest downloadable pattern. A matching Lucky Twist crochet cable boot cuff pattern is almost finished.

Update: The boot cuff pattern is done!

The early brown Lucky Twist swatch helped me test lots of things. For example, how stretchy the limp five-ply merino yarn would be as a mitt (not enough). How much to taper the ribbed edge with short rows. I wondered about the speckled dyeing and overall dark brown tones.

As I mentioned in the newsletter, I had to dramatically brighten these photos just so that the cabled stitch textures would show up! So in real life I’d need to be standing in full sunshine to see the cabled surface texture in a dark brown yarn. The short amber color flecks are pretty, but they distract a bit from the cables.

First swatch of Lucky Twists Boot Cuffs pattern

This was also the first boot cuff prototype I’d ever crocheted. So I learned about:

  • Finished dimensions for a good crochet cable boot cuff pattern.
  • Stitch surface textures and yarn colors that show up well on that area of the body. (Lighter colors help.)
  • Should one or both edges of a boot cuff taper? (I prefer it tapered at one end only.)
  • How much yarn and time does it take to crochet boot cuffs? (About as long as crocheting just 14 inches of a scarf!)
  • Thickness of yarn and of stitches that fit inside the boot top. (Medium weight yarn seems fine for the boots I own.)
  • Folded, unfolded, scrunched. All ways are fun!

Crochet Boot Cuffs, 2012 and beyond

Back in 2012, crochet boot cuffs were such a new trend that they might have just been a one-season fad. That November I traveled to northern Illinois to teach a crochet retreat. It was a boot-wearing opportunity that I don’t often get here in Florida.

It was in Illinois that I started the brown crochet cable boot cuff pattern prototype. I’d be able to test how much warmth they add, and if I enjoy wearing them.

I discovered that crochet boot cuffs feel great! I wore them over dark tights with skirts. They stayed put. I enjoyed wearing them all ways – scrunched, folded over the boot, and unfolded. Down low into the boot or up near the knee. I did find that I wanted longer ones that covered more of my legs for warmth.