Posted on 1 Comment

Star Stitch Crochet Scarf with Love Knots

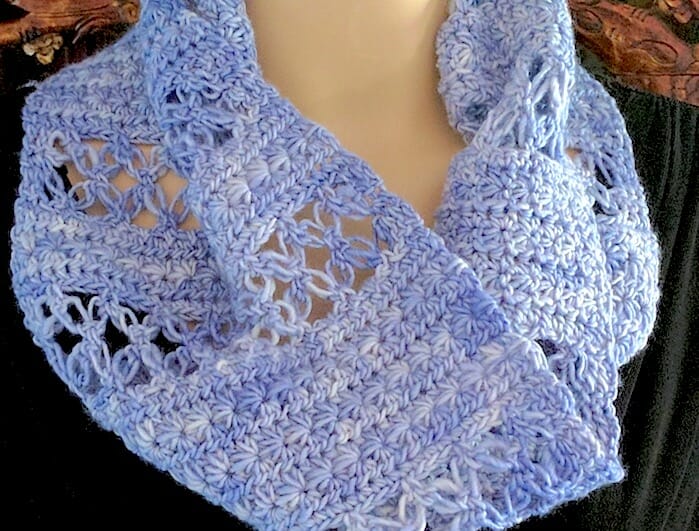
Close up of Lovelace Ring Scarf: bands of love knot mesh alternate with star stitch bands.

Love Knot+Star Stitch Scarf: New Pattern!

A star stitch crochet scarf with love knots? (About as common as a love knot scarf with star stitches.) So beautiful together! I’m calling it Lovelace Ring Scarf.

UPDATE: Lovelace pattern is now in the Designingvashti Shop and Ravelry.

Why Star Stitches With Love Knots? The Story.

I first swatched it in 2014 for CGOA classes I would be teaching: A Star Stitch for Every Purpose (3 hours) and 21st Century Love Knot Adventures (3 hours). Back then I had to set it aside due to stitch compatibility issues. You might be able to see some of this in this first swatch.

Two years later a visitor to the DesigningVashti Facebook page requested the pattern. Again in deep crochet class prep mode, I had to put it off until after teaching and a series of seven crochet tutorials I’d agreed to do for the Cut Out & Keep site.
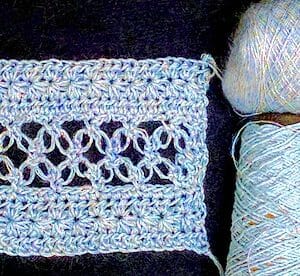
Double-stranded Lovelace swatch: sport weight Lotus and lace weight glittery mohair.
Alternate yarn idea: Love knots and star stitches both benefit when crocheted with two yarn strands held together. This is Satin Grey Lotus yarn with a lace weight metallic mohair.

By then the US election had just taken place. I appreciated the sweet, loving patterns crochet and knit designers were spontaneously posting. I returned to the 2014 attempts to blend stars and love knots in one pattern. It was a pleasure to finally polish it up into a fun, versatile, balanced stitch pattern. I hoped the idea of harmonizing and unifying two popular stitches of very different traditions might lift others’ spirits.

The basic stitch pattern is available here. I used it to make a 6.5″ square block with DK weight yarn and a G7/4.5 mm hook. A border would probably turn it into a 7″ block.

The Lovelace Ring Scarf design happened next because I needed a self-edging version. It came to me during Thanksgiving. As I lay there contemplating the stitch pattern I’d sent off to Cut Out & Keep, I wondered about giving the basic stitch pattern a selvage (no need to edge it later).

The start and end of the love knot section always looked a bit stringy and unstable to me. I also wanted to vary the texture bands and widen it for a lush, romantic ring scarf.

This is how Lovelace came to be.

Is a Love-Knot-to-Star-Stitch Scarf…Challenging?

Both are Intermediate-level crochet stitches but that doesn’t mean they’re difficult. I include tips and visual aids in the pattern that have worked in my classes. Most of Lovelace is rows of easy, familiar stitches like single and half double crochets (sc and hdc, or as they say in the UK: dc and htr).

These easy stitches are a backdrop to the fancy stitches. Like peacekeeping diplomats they harmonize relations between the two iconic, culturally powerful, individualistic “diva” stitches.

My experience of crocheting star stitches (stars) and love knots (LK) in the same pattern is that I get some comfort zone rows of simple stitches, then a spicy row or two, then more comfort zone.

Dramatic Differences Between Stars & Love Knots

I researched both of these two unique stitches deeply. I don’t recall ever seeing them combined in one stitch pattern. If you have, please let me know in the comments.

Love knots are reversible, star stitches are not. It was an issue with my early swatches.

Love knots are more independent than the usual crochet stitch, and star stitches are the other extreme. This shows in lots of ways. Add Love Knots anywhere like a chain stitch because it’s a type of foundation stitch. Each LK is distinct, complete, and recognizable from a distance.

Star stitches require context. The stitch just before it, after it, and often above it determine how recognizable each star is! 

Love knots likely originated as a southern lace, star stitches as a northern thermal fabric. LK were almost always crocheted in very fine cotton and silk threads for delicate and summery edgings, baby bonnets, and petite “opera bags”.

Stars have been used most often for making thick, dense coats and blankets in wool. Even when early stars looked like fine spidery lace, wool was the fiber of choice. (That’s why my unofficial name for the original swatch is “North and South stitch pattern“.)

Interesting Similarities Between Them

  • Both LK and stars are romantic, iconic, classic/old-fashioned, popular, and beloved.
  • Both originated in the early to mid-1800’s.
  • Both have long been favored for baby things. (Stars: baby blankets and coats; LK: sacques, bonnets, layette edgings.)
  • Both can be lacy. When star stitches are lacy, you’re looking at pulled loops, just like with LK.
  • Both start the same odd, non-intuitive way. I did a newsletter issue on it: “Starting a Stitch with a Backtrack“.
  • Crocheting them with two or more strands of yarn held together enhances their distinctive textures.

Hmm. Double or triple the width of Lovelace to make a stunning shrug or wrap!
Posted on Leave a comment

Conference Prep Crazy Zone

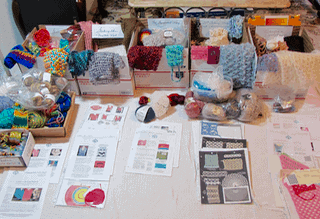
Sorting class materials into a box per class topic (total of 5) on a big white sheet.

Conference Prep Frenzy: A Two-Week Zone

For Future Vashti‘s reference: I shifted into conference prep frenzy at a specific time three days ago: end of the night on Monday, June 27th. It’s like stepping into the cockpit of an airliner, flicking on all switches and activating ‘all systems go’. (Like in the movies, anyway.) It’s obvious when it starts.

The next morning I did my teacher’s conference prep ritual: put on a pot of coffee, spread a big white sheet on the floor (because it helps me focus), lined up a row of empty boxes, and labeled each with a class topic.

Completing the Teacher’s Conference Prep

I rounded up everything to bring: first the completed designs, then the handouts, yarn and other materials for students to use, optional materials like printed patterns, key newsletter issues, visual aids like class swatches etc., topic-related teaching aids like a “blocking demo kit” for the Weightless class, and a “beading demo kit” for the love knots class.

Doesn’t it seem like with a pot of fresh coffee, one could just whip through this? The reality is that it does start this way, but my completed designs are spread all over the house and I forget about some. Not only that, each of the five class topics is distinctly different. It takes focus to keep all five in my mind at once.

It’s as if the white sheet cordons off an area of the house (and my brain) for 24-36 hours. That’s what makes it a ritual, really. I get through the first layer so that I can see the next layer.

After that time I can condense it all into 1 or 2 shipping boxes. That’s the quick and easy part.

More Show Booth Conference Prep

Here’s what else got done since I blogged 2 days ago:

  • Wound new Lotus colors in a few 100 gram balls—so that I could label and take photos of them—so that I can add them to the website. (This automatically means I committed to color names for them, too: Carbonite, Lavender Ice, Orange Luxe, and Emerald Deep.)
  • We build our booth with grid panels. Found out how hundreds of them will get to the show floor! Thanks to Linda Dean whom I can’t wait to finally see again.
  • Placed final order for crochet hooks I’ll need for the booth and classes.
  • Finalized arrangements and logistics for how everything and everybody gets there and gets back!
  • Formatted several crochet patterns for kits, classes, etc (printed):
    • a fun new one-ball pattern for Lotus that Doris designed for the booth (a printed crochet pattern). More on that later.
    • My Mesmer patterns (scarf, stole, sized vest variations on a steeky theme and with double-ended hook option) as one printed pattern set for the class, and extras for booth.
    • Did the same with my Starwirbel pattern.
    • Still have 3 more patterns to do if I can.
  • Back-&-forths with tech editor on edits of class handouts and patterns formatted for printing and kits.
  • Delegated my distress to my husband over both of our home office printers breaking within weeks of each other! He’s got that now.

?I know from last year that there will come a point when I won’t be able to focus on pattern formatting or class handouts, so I’ve done as many as possible these past few weeks.

Woke up the next morning to emails from others who were now also ‘all systems go’ with their conference prep too. And now today is Thursday June 30: twelve days from lift off. I predict these blog updates will get posted more erratically but I’ll keep trying. It forces me to find a peaceful moment to collect my thoughts.

Posted on 1 Comment

Steek Crochet With Pattern Schematics in Any Language

Pattern schematics inspire me to steek crochet.

I wish every crochet garment pattern offered a schematic. It outlines the sections of a garment, like puzzle pieces. Schematics cut through illusions cast by fashion photography and lovely models. A single pattern schematic can distill a fancy design to its simplest essence. I created two Pinterest boards of things that inspire me to steek crochet: Steeks: Ideas and Wearable Simple Shapes.

Schematics also cut through language barriers. I can understand a non-English pattern if it includes a good schematic or two.

I created a few sample schematics for the Tunisian steek crochet class handout and realized how much I get out of them. This would be the next newsletter issue if I had time to do one! (Too much conference prep.)

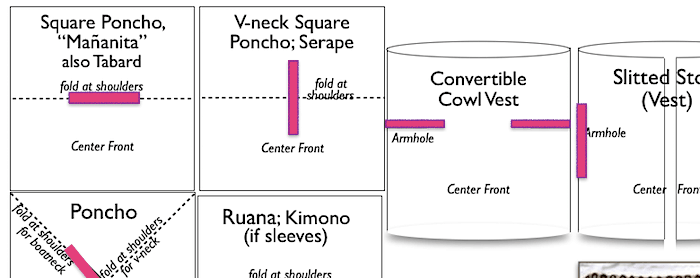
Simple garment squares and rectangles. From my Tunisian class handout. Add a steek where you see a pink bar.
Steek where the pink bar is in these pattern schematics for simple-shapes garments.
Update! I wrote newsletter #80, Pattern Schematics for Insiders & Outsiders, three months after I wrote this blog post. Note that shop links in its right-hand column are outdated as of Sept. 2017.

A schematic is sensational to me when a garment that looks chic on a model, yet its schematic reveals that it’s made of simple shapes like rectangles. It’s exciting because every crocheter or knitter first learns how to make rectangles, right?

Sometimes all you need is a rectangle that drapes, or is clingy/stretchy (or all of these). Sometimes weightlessness brings it home, other times it’s a luxuriously weighty swing. The schematic tells you what’s what when you know what to look for.

Sometimes the key to chic is a well-placed seam on a simple shape. Sometimes it’s a special edging. And sometimes it’s the where and how of the steek. Steek crochet for the easy chic of it.

I love this conference prep blogging because it makes me aware of things that I’ve done for years, like collect pattern schematics.

Posted on 1 Comment

Reinforced Steeked Crochet Hole

Reinforcing a Steeked Crochet Hole

There’s more than one way to reinforce a cut made into crochet stitches because there’s more than one kind of steek, and use for that steek. Here are just two kinds of projects made in the same stitch pattern.

Example #1: Keyhole

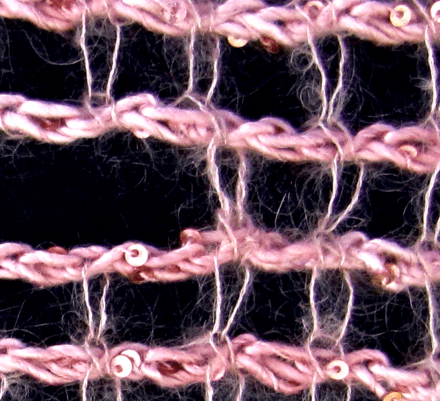
I added a keyhole to a pink Mesmer scarf. The two yarns in this first stitch close up are a lace weight mohair and a worsted weight sequined silk.

A close up that shows how the yarn end is imperceptibly sewn around the edge stitch of the opening.
I used the cut yarn end to reinforce the opening.

Both of the projects are part of the Mesmer Tunisian Veils pattern. If you steek crochet stitches the easy way—within one row—you have at minimum two yarn ends to fasten securely and then weave in. Some Tunisian stitches will cause you to have more (see newsletter #79 about that).

The more stitches you unravel, the larger the hole and the longer the yarn ends will be. I only unraveled 3 of the pink stitches and that left me with yarn ends that were just long enough to work with comfortably.

If the steeked crochet hole won’t be getting a lot of direct wear and tear, use those yarn ends to reinforce just the stitch at each end of the slit. See where I’ve woven the fine mohair yarn in and around the stitch? It will get light wear.

Example #2: Armhole

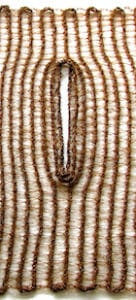
The finished armhole edge, reinforced with crochet.
Crochet-reinforced steek for an armhole. 

You’re looking at an edged armhole of a brown Mesmer Vest that was designed for Interweave Crochet Magazine.

An armhole needs more reinforcement because of the constant pressure it supports in a garment. I switched to a double-ended circular crochet hook to crochet a few rounds of the same Tunisian stitch. It has a nice cap sleeve look when it’s worn. In the future I’d love to try longer sleeves this way.


This post is part of my blogging goal of 50 posts for these 50 days of epic crochet conference prep. I’ve missed a day here and there lately because my dear friend from college is here for the week! We’re about to leave for the day to see the mermaids of Weeki Watchee. It’s a spring fed lake and water park.

Posted on Leave a comment

Tunisian Crochet Love Knots: Thoughts

Tunisian Crochet Love Knots, New Swatches

It’s been on my mind to incorporate love knots into Tunisian crochet since teaching the first Love Knots Adventures class in 2012. I don’t mean a few rows of love knot mesh alternated with a few rows of Tunisian simple stitch (Tss), which could also be interesting and pretty. I mean love knots thoroughly integrated—where the experience of crocheting the love knots feels seamlessly like other Tunisian crochet.

In the Forward Pass or the Return Pass?

For some reason, at first I thought only of making love knots during the Tunisian forward pass (while adding loops onto the hook). A few weeks ago I added love knots to the return pass (while working the loops off of the hook) and the possibilities are inspiring. Also, the experience of doing it feels like true Tunisian crochet love knots.

These are preliminary, so I haven’t tried turning them into actual stitch patterns yet. I think these are promising rough swatches though. I don’t recall ever seeing eyelets or buttonholes created within and by the return pass.

For these two swatches I used Tunisian extended stitches because they’re featured in a new class for July, Steeked Tunisian Lace. It’s just my go-to stitch right now. It has fascinating, sometimes unpredictable properties, so I make a point of using it whenever.

At first I got excited and thought, “Wow, a different kind of steek! OK no, a faux steek!” But actually I think its real promise is as a type of eyelet with the power to change the look of the return pass.

I just sent out a newsletter on steeking Tunisian crochet vs regular crochet stitches. If you haven’t seen it, have a look and compare it with the look of these “faux steeks”.