Posted on 5 Comments

Start Crocheting From Scratch

Classic Slip Knot on left, Crossed Loop on right.
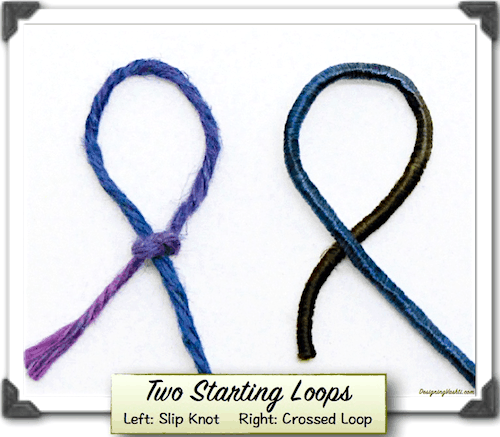
Classic Slip Knot (left), Simple Crossed Loop (right). Either one works. View larger.

How We Tend to Start

Let’s really look at how we start crocheting, and why we do it this way. Most of us learn to make a slip knot that gives you your first loop (called a slip loop) that you can tighten or loosen a bit to fit nicely over your crochet hook.

Later, some of us may alter the beginner’s slip knot, depending on the project. We may start crocheting in the round with a magic ring instead; or we might undo it later because that starting knot is too noticeable in the yarn we’re using. Some crocheters loosen it and crochet the last stitch of the row into it.

Over the next few posts I contrast the advantages of the standard slip knot with some alternatives.

Are you a beginner? Head over to this post first so that you’re clear on the best way to make the standard starting slip knot.

Many Crocheters Don’t Know:

  • The simple slip knot we all learned as beginners is one of two types based on which yarn end tightens the slip loop. Which one we learned matters.
  • The slip knot has a special relationship to the chain stitch. (That’s the first stitch you make after putting the slip loop on your crochet hook.)
  • A slip knot is not required at all, but it’s helpful if you’re a beginner.
  • There are slip knot variations that could be more useful for a particular project. (Explained in future posts.)

Start Crocheting With Just a Loop

The knot part is optional. Compare the two starting loops in the image above. Frankly, you don’t even need a crochet hook or a specific kind of yarn. Isn’t this a remarkable thing about crochet? Musicians need to tune their instrument first, and weavers need to string a loom first. Even knitters need to cast on more than one loop.

The minimum a crocheter needs to start crocheting is a yarn end looped around a hook (or your finger if finger crocheting).

About the “Yarn”

To start crocheting with a loop implies that you need a length of something that bends into a loop, right? If you’ve never, ever crocheted before, you don’t need a ball of yarn. Start crocheting right now with a piece of yarn-like cord that’s at least 36″ long (almost 1 meter). Ideally your cord or string is smooth, limp, and a light enough color to see well. Kind of thick—like craft yarn or cotton clothesline. Not stiff or wiry, neither bristly nor bumpy, and not as skinny as kite string. From here on I’ll refer to this as “yarn.”

The Crossed Loop

When a simple loop has crossed ends, you’ve already got a starting loop for crochet. See it in the photo above? When you think about it, all of crochet is based on loops with crossed ends.

The two crossed ends of a loop matter later. They have different roles in crochet. (For a future post.)

A quick and easy way to think of this Crossed Loop is to imagine that you’re writing a cursive letter “e”. You can do it in the air or “write” with the yarn on a table. See how the Crossed Loop in the photo above could be a cursive “e”?

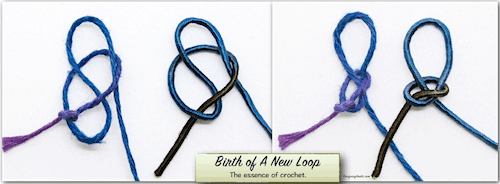
From Crossed Loop to Slip Knot

If You’re Right-Handed

Pinch and hold a Crossed Loop with the fingers of your left hand where the yarn crosses itself. It now appears that two strands are hanging down from your hand. With your right hand, pick up the strand on the right that crosses in front of the other strand. Bring it around behind your loop. Bend it so that you can pull a new loop through the first loop, from behind. Leave it sort of loose, and set it down.

It's this easy to create a loop with a Slip Knot
Two kinds of yarn shown. Slip knot is loose on the left and tighter on the right. View larger.

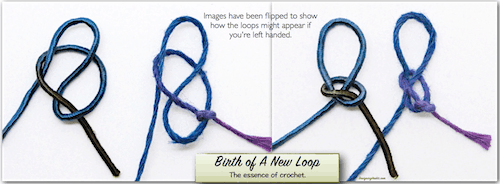
If You’re Left-Handed

Turn it around, pinch and hold it with the fingers of your right hand where the yarn crosses itself. Or, you could write a cursive “e” backwards. It now appears that two strands are hanging down from your hand. With your left hand, pick up the strand on the left that crosses in front of the other strand. (See below.) Bring it around behind your loop. Bend it so that you can pull a new loop through the first loop, from behind. Leave it sort of loose, and set it down.

For Lefties. Two kinds of yarn shown. Slip knot is loose on the left and tighter on the right. View larger.

Slip Knot: It’s a Chain Stitch!

You’re already crocheting. When you pulled the bent or “looped” strand through the initial loop, you finger-crocheted. You can see why some crocheters just leave the knot loose and crochet into it like it’s one of the foundation chains.

Key Takeaways

1. The Crossed Loop is one loop away from being a Slip Knot. Once you pull a new loop through a simple Crossed Loop, just tighten it to reveal that it’s actually a Slip Knot. (To tighten, pinch the loop and tug on the other strand to watch the knot tighten around the loop.) Notice that you can also adjust the loop size of the Slip Knot, and the knot part preserves the size of the loop.

2. The Slip Knot is the standard, official way to start crocheting, especially for beginners. This is probably because beginners also usually start crocheting with a crochet hook in their hand (as opposed to finger crocheting). The Slip Knot is great for this. You can tighten its loop around a crochet hook and wave it around like a magician. It stays put. Very handy!

3. Once you pull a loop through an initial Crossed Loop you’ve crocheted. A Crossed Loop is a fine start for any crocheting, when you’re ready for it. For finger crocheting, you wouldn’t need a Slip Knot to keep a loop on your finger because you can easily hold it. Just keep pulling a new loop through the next loop and you’re crocheting.

4. Chain stitches are self-knotting at the starting end. It’s another reason that a Slip Knot is not essential, it’s optional. Try it: undo the initial Slip Knot after you’ve crocheted some chains. Tug on that starting yarn end and the very next chain stitch automatically becomes the new starting knotThis is why some crocheters can leave the initial knot loose and undo it later.

Updated November 2018. It’s part of an experimental blog post series: Vashti’s How to Crochet Book. Next post: Starting with the Best Slip Knot.
Posted on 3 Comments

How to Increase Tunisian Crochet Stitch Blocks

New Corner-to-corner Warm Tunisian scarf with filet border

Three ways to add stitches at the end of a Forward Pass

It’s good to know how to increase Tunisian crochet stitches more than one way because every project is different. These first two methods are my favorite because they don’t limit how many stitches you can increase at a time. This means I can smoothly add big lacy spaces and whole blocks of solid stitch repeats, when and where I wish, in Tunisian crochet. This is something I’ve always loved about regular crochet.

Have a favorite method of your own? Please let me know in the comments!

Method #1. How to Add Tunisian Stitches with Half Hitches

Each of the two loops added to the crochet hook are loosened to make it easy to see that they're simple loops with a bit of twist before adding to the hook.
A half hitch is simply a loop with a twist in it.

In my original 2009 blog post about this method, I use a pair of half hitches as one increase. This pair is well known to those who do macramé as the double half hitch (dhh). As far as I know, I’m the first to use it as an edge increase.

A single half hitch can also be used for adding a new stitch, and I’ve since found it mentioned for this in a few older books on Tunisian crochet. I add them to a timeline in this half hitch resource post as I find out about them.

The half hitch is also well known in knitting as the simple/single/backwards loop cast on in knitting. This video shows half hitches being added to a knitting. This is how I do it and I’ve really picked up speed.

How to Do the Double Half Hitch Increase (DHH)

3-step diagram of how to increase Tunisian Crochet stitches.
Two crossed loops, or half hitches, have been added to the crochet hook. The pink bar indicates which loops are the half hitches. In Step 3, the two have been crocheted off of the hook together. It’s a mini-limpet!

Method #2. Use Tunisian Foundation Slip Stitches as Increases

Tunisian foundation slip stitch: at the end of a Forward Pass, chain, remove last loop from hook, insert hook in a ch loop, then put live loop back onto hook. An increase of one stitch.
Feel free to choose a loop other than the tinted ones shown.

At the end of your Forward Pass, insert hook in one side loop of the end stitch, yarn over and pull up a loop. Then chain the number of stitches you wish to add. (I chained four in this photo.) Then take the last loop off of your hook; your chain stitches should resemble those in the photo.

Then, insert your hook under one loop of the first chain (tinted pink) and leave on your hook. Repeat with each remaining chain; then put the live loop back on your hook, as described in the caption.

I discovered this Tfslst method after I designed the Five Peaks Shawl with half hitch increases. Tfslsts is the method of choice in the Four Peaks Scarf pattern and in the Warm Aeroette Scarf (pictured at the top).

I love having both of these methods to choose from, depending on the project.

They are probably interchangeable enough that you could use the one you prefer. (More on that in the newsletter.)

The most important thing is to choose a method that doesn’t impose a limit! Especially when you’re crocheting something that has a diagonal edge and needs to drape nicely, like a triangular shawl or an asymmetrical scarf. Compare the triangles below.

Often when someone asks in a forum how to increase Tunisian crochet stitches, the advice is to squeeze them in. Typically this means adding a stitch in another loop just behind or next to another stitch. This method is fine if you’re replacing a stitch that you accidentally decreased in an earlier row. If you think of basic Tunisian crochet fabric as a grid, space was already reserved for the missing stitch, and you’re just filling it back in.

Method #3. The “Squeeze-It-In” (my least favorite shaping method).

Left triangular swatch is starting to curl along one edge. Other triangle is symmetrical with nice drape.
Effect of the “squeeze-it-in” method shows in the left swatch. Not recommended for something like a shawl.

The Squeeze-it-in method has limits. It’s okay for just a rare stitch here and there, and away from the edges. In other words, as an “internal” shaping method. I don’t mean to impose rigid rules. Depending on the project, yarn type, and hook size, squeezing in new stitches when you wish may come out fine.

For me, this shaping method often interferes with my goal of a languid, swaying drape for Tunisian crochet accessories. When I consider how to increase Tunisian crochet edges for a new design, Squeeze-it-in is last on my list.

Posted on Leave a comment

Free Slip Stitch Crochet Scarf Patterns and Answers

It’s fall! That’s when my two free slip stitch crochet scarf patterns are downloaded a lot, and I get questions about them.

I have nine slip stitch crochet scarf patterns published so far. These two are free downloads: Slip Slope Crochet Short Rows Scarf, and Eva’s Ribs Slip Stitch Scarf 101.

Molly asked me, “I am wondering if you allow our finished items to be sold if you are given credit as the designer?” The answer is yes I do, and thanks for including designer credit. I’m honored when my design inspires a crocheter to make several items. As a crocheter I love it when I’m making something and I start thinking, “Ooo… I could see making one of these for everyone on my gift list this winter.” Or, like Molly: I can imagine so many other people wanting the scarf I crocheted.

When I keep using the same pattern, I can try different yarns or color combinations. I find ways to perfect little things or increase my speed, like how I finish the edges or something. Another thing that happens is that I start naturally memorizing most or all of the pattern. That’s when I really pick up speed.

For more questions and answers, see this list of Slip Stitch Crochet FAQs students ask me in my slip stitch crochet classes. Scroll down for a slip stitch short row photo tutorial.

If you’re new to slip stitch crochet, try the free Eva’s Ribs scarf first. It makes for good TV crocheting, or while listening to an audiobook. The free Slip Slope scarf is the next step after Eva. It’s a lot like Eva with one new skill added (the short rows). A different next step after Eva is the Shamlian Weltie.

After the Slip Slope scarf, a bunch of my other slip stitch crochet scarf patterns will make perfect sense! For example, Undaria, Notch, and Slip Tectonics.


Starlooper Mobius

I’ve combed through 200 crochet sources and haven’t yet found pre-1973 occurrences of this simple, reversible, accordion-like star stitch. I’ve modified it to emphasize its natural pleated effect, and its lovely scalloped edges.

This Starlooper pattern includes a choice of finished dimensions and optional accent stripes. Depending on when you stop crocheting and how you seam it, you’ll need 1 to 2 skeins (219 – 438 yards or 200 – 400 meters) of medium weight yarn. Any smooth medium weight yarn would be great. The edge-as-you-go feature would also bring out the best in a self-striping or tonal yarn.

It’s a fast project to memorize and crochet because the pattern is a simple one-row repeat.

Starlooper is the third in a series of quick and easy star stitch projects that I designed as I created Star stitch class booklets. My goal is to design with different kinds of Stars in ways that take advantage of the unique charms of each. 

Skill Level

Easy. I’ve kept pattern abbreviations to a minimum and include International English equivalents for American terms.

?After using this pattern, you will know (if you didn’t already):

  • How to crochet a simple, useful Star stitch pattern.
  • How to heighten the best qualities of this Star stitch, and understand its texture.
  • How to create several cowl, moebius, and loop scarf styles from one simple pattern.
  • How to use simple edge-as-you-go patterns like this one with yarns in your stash.

Finished Dimensions  

Each row measures 9.75″ {24.75 cm} across; inner circumferences are stretchy and approximate. Wearing styles are determined by the total number of rows.

  • Snug Cowl: at least 180 yds {165 m} for at least a 19″ {48.25 cm} circumference.
  • Flat Neck Wrap (unseamed): A full skein of 219 yds {200 m} or slightly more: 28″ {71.12 cm} long.
  • Relaxed Cowl (seamed) & Layered Neck Wrap (unseamed): Approx. 280 yds {256 m)}: 35″ {89 cm} circumference or unseamed length.
  • Shoulder “Moebi:” Approx. 315 yds {288 m}: 43″ {109.22 cm} circumference.
  • Long Loop Scarf and the Multilayer Cowl:  52″ {132 cm} circumference; stretches to approx. 59″ {149.86 cm} when hung. The Multilayer Cowl at the bottom of page 7 is the Long Loop Scarf wrapped twice around the neck.

Materials 

  • Crochet Hook: Size US I/9 {5.5 mm} or size required for gauge.
  • Stitch markers: one or two may be helpful at first.
  • Yarn Used: A 100% fine quality imported Merino Wool; 219 yds {200 m} per 3.5 oz {100 g} skein): one skein or two, depending on desired finished dimensions (see above).  

To substitute a different yarn of the same thickness: Choose a smooth #4 Medium Weight yarn with a bouncy wool texture that lists a crochet hook size range from US H/8 {5 mm} to US J/10 {6 mm} on its label. These yarns may also be referred to as Worsted, Aran, Afghan, and occasionally “Light Chunky” Weight. Bouncy wool type yarns look more corrugated or pleated; a silky plant yarn will flatten. Consider a self-striping, tonal, ombre, or variegated yarn, or add a few contrasting stripes as shown in some of the photos. (View album here.)

To substitute a thinner yarn to crochet with two strands held together throughout: You can also crochet it with two strands of a sport weight yarn held together throughout. I mention this because I’ve been enjoying the effect of crocheting Star stitches with multiple colors or strands held together. Choose a #2 Fine Weight yarn with a recommended crochet hook size range of US E/4 {3.5 mm} to US G/6 {4.0 mm}. These yarns may also be referred to as Sport {Light DK, 5-Ply}.

Posted on Leave a comment

Tunisian Crochet Lace Class Resources

This clickable list of Tunisian crochet lace resources is mainly to aid students of my classes in exploring more about Tunisian lace crochet at their leisure.  The links below represent the extra information that doesn’t fit into a standard three-hour class. Some are the names of designers, books, other types of crochet lace, etc., that I may have mentioned in a class.

Click: My published Tunisian Crochet downloadable patterns

— Vashti Braha

Tunisian Lace Crochet Class Resources

Click on a photo to enlarge it.

Blogged:

Vashti’s Crochet Inspirations Newsletter Topics:

Some of my not-yet published Tunisian Crochet projects

Story of the Tunisian Wicker Stitch (an eyelet mesh) featured in the Weightless Wrap:

Some Valuable Books

  • 1997: Basics of Tunisian Crochet for Beginners, N. Seto, Japan. ISBN 978-4-529-029285
  • 2000 (1991), Rebecca Jones: Tricot Crochet The Complete Book, Lacis Pubs., Berkeley CA. ISBN 978-1-891656-28-6
  • 2004, Angela “ARNie” Grabowski: Encyclopedia of Tunisian Crochet, LoneStar Abilene Pubg LLC, TX. ISBN 978-0-974972-55-8
  • 2004, Carolyn Christmas and Dorris Brooks: 101 Easy Tunisian StitchesTM, Annies Attic, IN. ISBN 978-1-931171-74-8
  • 2008: Tunisian Crochet Patterns 100, Nihon Amimono Bunka Kyo-kai, Japan ISBN 978-4-529-04484-4
  • 2009, Kim Guzman: Learn to Do Tunisian Lace Stitches, Annie’s Attic, IN. ISBN 978-1-59635-264-3
  • 2009, Sharon Hernes Silverman: Tunisian Crochet: The Look of Knitting with the Ease of Crocheting, Stackpole Books, Mechanicsburg PA. ISBN 978-0-811704-84-7
  • 2014, Kim Guzman: Tunisian Crochet Stitch Guide.
  • Duplet magazine issue #61.