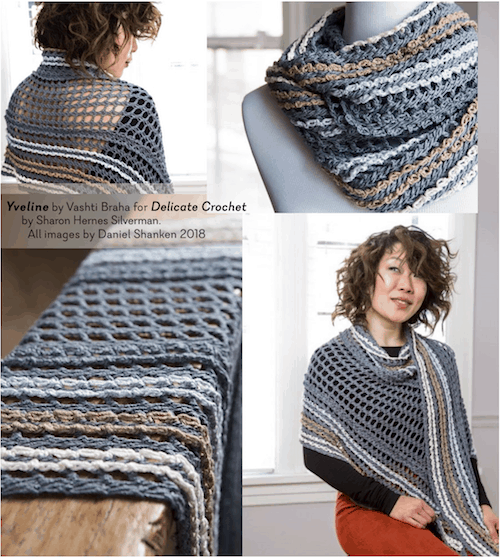
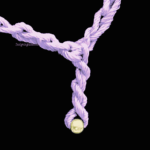
I’ve been looking forward to sharing some sneak peeks! You’re looking at Tunisian crochet eyelets on the diagonal, frilled ? with love knots ?. I used our Lotus yarn in these colors: Carbonite, Pearly Pearl, Satin Grey, and Lustrous Tan.
If you’re going to the conference and you took one of my earlier Tunisian lace classes, Yveline will want to meet you too. I brought swatches to those earlier classes that have since come of age in the form of the lovely Yveline.
Her Story
First, the name. It started out “Lean In” because that’s what I called the early swatches. It fascinated me how much some Tunisian stitches liked to lean with a little encouragement. Not just how much, but the kind of movement; sometimes it’s like Tunisian lace stitches have hinges or ball joints.
When it came time for a grown up name, I was in a dual swoon from binge-watching the Versailles series while adding the love knot frills! I looked for names associated with Versailles and learned that the city is located in a département called Yvelines.
I’m still swooning a bit from using love knots for surface embellishment. I haven’t seen anyone else do this and it’s just the kind of odd new thing I like to try each time I teach 21st Century Love Knot Adventures. (I mean, look at what I called the class.)
It did take several swatches. Remember last year when I did a newsletter on ruffles? It was shortly after I shipped Yveline to Sharon, the book author. I’d been swatching and meditating on the essence of a crocheted ruffle for a few months.
The Tunisian eyelet fabric is so airy and “flexy” (another name I gave to the early swatches) that most of the ruffles I tried were too heavy. I love how airy the love knot frills are! Love!
About the Ruffle Idea
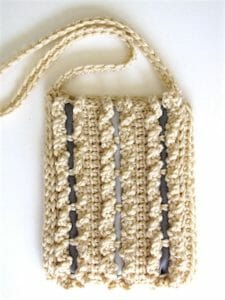
The urge to frill has a story too. Years ago I crocheted the cutest little bag. It’s Tunisian simple stitch with ruffles surface-crocheted on it.
So that’s my Delicate Crochet story of Yveline. I have a very different story coming up about the other design I did for the book!
Watch me open the armholes after I finished crocheting the lace: Snip & Unzip An Armhole. These self-healing stitches don’t mind being cut. It’s the low-stress way to create armholes. Really! Much easier than breaking the crochet flow to place them correctly.
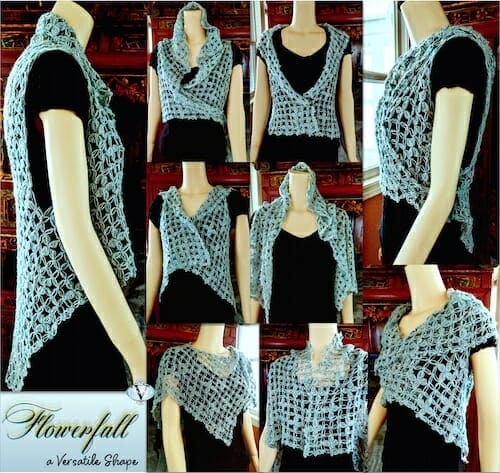
Special Shape
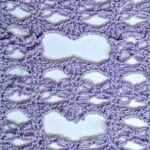
Flowerfall is a modified diamond shape: imagine a diamond with its top and bottom corners lopped off. You start crocheting the shape at the left front corner and end at the right front corner.
When you wear it upside down, the hem ends at a different place and the amount of fabric in the collar changes. (It’s also reversible.)
The armholes are generous and not centered, which increases its wearable ways. You can even treat the armholes like head openings. That results in a poncho look, see the bottom images.
An older design, the Leftfield Diamond, is the first time I crocheted this shape. That’s when I found out how versatile it is.
Side-Tied Waist Option
See the top right-hand image above? There’s a hint of a tie belt at the waist. It inspired me to add ties to the front corners for a wrap belt option. These are removable and repositionable, with a petal-like accent that echoes the chained petals in the stitch pattern. I don’t have photos of them yet.
I put off writing about the Tunisian on the Diagonal class because I kept feeling like I had nothing to say, but also too much! Here’s another paradox: I feel like I’ve been teaching this class since 2010 and yet I never have, exactly. How can all of this be true?
I figured it out after writing the section about its 2009 roots below. Crocheting Tunisian diagonally is a huge topic based upon simple and powerful principles. Vary one thing a little, factor in some momentum, and everything ends up dramatically different.
I’ve taught big sections of this. The 2018 class will be the master class. (It’s great for all skill levels, thanks to the “simple principles” part I just mentioned.)
For contrast, travel back to 2009 with me for a bit.
There was almost nothing on diagonal Tunisian crochet from corner to corner, or “C2C”. With C2C you increase steadily along both row ends to widen, then decrease steadily until you end at the opposite corner.
The default increase method back then didn’t have a symmetrical, polished drape. I blogged about it (and the photo at right) in June 2009 because that’s when I was working out the increase method for the Five Peaks Shawl.
2009 Tunisian Hook Choices
Tunisian crochet hooks larger than size 6.0 mm (J) were scarce in any style and length, whether straight, flexible, double-ended, short, or long. When you found one, you put up with whatever its material, surface finish, and hook shape was. Remember that?
My options were either a long straight 6.5 mm (K) or a discontinued 9 mm (“M/N”) flexible hook from eBay. I needed a size between these two. Too bad!
Back then, publishers needed designers to use crochet hooks that were commonly available in stores. I worried that I wouldn’t be able to sell the Five Peaks pattern to a magazine. Fortunately, Tunisian hook choices were improving. Only three months later I blogged “Heaven is a Crochet Hook for Every Need”. Nowadays I keep a range of Tunisian hook sizes and lengths.
The Evolving Tunisian Crocheter
We Tunisian crocheters have been enjoying a renaissance for our craft! It had barely started in 2009. Back then, most crocheters still assumed the nature of Tunisian crochet was to be thick, kind of stiff, and with a stubborn curl. Not something that couldcascade and swing from the shoulders like a waterfall, or look like a lacy weightless veil.
Each time I’ve taught a Tunisian crochet class since 2010, the students bring more skills and experience to the room. Newer Tunisian crocheters understand things faster. This became really noticeable around 2013.
Five Peaks classes were the first I taught on diagonal Tunisian crochet. It was ahead of its time in 2009. Since then I’ve learned to start every Tunisian topic with a quick review of the relevant basics. People of all skill levels seem to welcome this. It seems to pull together and standardize the new things everyone is learning from different designers.
For 2018 I’m excited to be starting out with a review of a different set of basics because when we crochet Tunisian on the diagonal, there are clues we can be looking for but may not recognize for awhile. Things may look wrong for awhile and yet be so, so right.
Sure, a crocheted item can be quick and easy, but I mean producing patterns, teaching, and other business-oriented projects. For example, I completed two interesting Tunisian crochet patterns in 2017 that will appear in a 2018 book.
I should do this review every year! It’s easy to lose sight of the wins when so many projects are complex or long-term.
Favorite discoveries in 2017
Discoveries about crochet are what motivate me to design and teach!
Beaded Twisted Loop
Rosy Rosepuff swatch
Tripuff Tunic in progress
Crocheting a twisted loop fringe edging at the start of a row is so promising! Make it any length. Add beads to it without stringing them on first. I discovered this with Aquarienne. It was also the perfect thing for the border of Graven.
Discovering which crochet stitches are “self-healing” when you cut them (and why) is a game changer! See Zumie. Scroll down to see Lovatar.
My experimental yoke worked! The yoke of the Tripuff Tunic is just a draped scarf.
Rosepuff inspired new clustered puff swatches that make me swoon, like the one above.
I made too many discoveries that are too technical to go into while covering bangles with crochet in December and January! It was completely inspiring and rejuvenating.
When I matched my yarn stash to a favorite silk skirt I discovered two things. First, using the skirt’s colors is a tribute to a favorite thing that can inspire me indefinitely (past the life of the skirt). Second, I also matched my yarn colors to a favorite painting and realized chances are good that the yarns you add to your stash also correspond to the colors of favorite items because you are the common denominator.
DesigningVashti 2017 by the Numbers
Our Lotus yarn in magazines: Morning Dew Wrap by Kristin Lynn and I Do Shawl by Cindy Adams, both in Crochet!Magazine. I published two of my new Lotus patterns, Rosepuff Shawlette and Aquarienne. Two new Tunisian designs coming out in a 2018 book will also feature Lotus yarn.
12 blog posts in 2017 (monthly is ok but my overall average is 17.5 posts per year and I’d like it higher than that).
6 newsletters, so they came out bimonthly in 2017. Originally (2010) they came out every other Thursday. Overall, the average frequency is monthly. The six topics in 2017 were Hidden Pictures in Cut Stitches, Crocheted Ruffles, New/Favorite Stitch Patterns, Edgings That Multitask, Announcing a Ruana DAL-CAL, and Yarn Overs & Yarn Unders.
Posted 18 different crochet tips for new crocheters in Facebook and Twitter. One of them became a full blog post.
Favorite Designs in Development
These favorites link to their project pages in Ravelry if I haven’t blogged about them yet.
Lovatar, almost ready for steeking!
Love knot pattern I’m using for Lovatar.
Laluna Lotus at an early stage.
Mamruana, Lovatar, Laluna (and the Tripuff Tunic and Graven mentioned above) are all crocheted in our Lotus yarn.
Renovated a seven years old website. I’m still cleaning up broken links and stuff. This 2017 project is spilling over into 2018.
Found someone who makes wonderfully intuitive stitch diagrams for my patterns. An easy win!
Acquired what we affectionately call a ‘warehouse’ for my shop yarns and hooks (it’s a small Rubbermaid shed). Did important maintenance on my Lotus yarn equipment myself. Got some helpful IKEA office items.
Taught a weekend crochet workshop at Mosaic Yarn Studio and got up to speed using Airplay instead of an overhead projector. I loved using that set up.
Videos -deep breath- learned how to edit footage, and what filming equipment I wish I had, so I’m further along than in 2016; a hurricane put a dent in that momentum. For 2018 I figure I’ll try again keeping it simple, short, casual. Otherwise I’ll never get anywhere! Ellen Gormley and Mary Beth Temple inspire me.
Digitized crochet archives: In 2017 I started a process that works for me. (It also helped me during Hurricane Irma!) Here are my stats: I have 4 or 5 shelves of stuff to digitize; each shelf is 20″ wide. If I’m getting 15 to 18 images per shelf inch, I’ll need 4.5 to 8 gigabytes of storage.
A Year’s Worth of Crochet
I can see why bloggers do a year-end review now that I’ve done it. It feels good to see a year’s worth of highlights–you’ve always done more than you remember. I appreciate everything more. It’s easier to be objective about what is significant. I can see what obstacles I overcame, and what it took to do so, instead of expectations I had at the time that I didn’t meet.
I love to see the glimmerings of 2018 crochet in 2017.
Some of us only use one or two of these five, but you may discover that you use more blocking methods than you thought. (I hope we all use at least one!)
One of the methods below could be the perfect finishing touch for your next crochet project, depending on your yarn and project type. They’re listed from the gentlest to the most aggressive. It also depends on your own preferences. I’ve found that each crocheter has a favorite method.
Special considerations for a specific stitch, technique, or project follow.
1. Dry Block (the gentlest method)
On the left, love knots crocheted in wire are “unblocked”. On the right I’ve manually “dry blocked” them using a fine crochet hook to open them up.
I also think of dry blocking as “hand ironing”. Crocheters do this without even knowing that it has a name. Stretch, spread out, and flatten your crochet piece on something flat. One’s knee always seems to be nearby! Using one’s knee or upper leg is not too bad for a small item, especially if you’re wearing jeans or other fabric that provides a bit of friction. (Don’t use it for measuring a gauge swatch though.) If your surface is hard and flat, such as a table, you can also press it with your hands, i.e. “hand-iron” it.
I’ve read that some crocheters prefer the softer and more handmade look of their thread lace when they dry block it only. (Wet blocking thread crochet is more common, and it can include a stiffener; see below.)
Isn’t wire crochet a great way to illustrate dry blocking?
2. Damp Block
Also known as spray blocking and blocking with mist. Spritz liberally with water, especially the edges, then spread out on a toweled surface to dry. Use a bath towel on a flat surface; the towel offers some friction that I find in most cases replaces the need for pins.
This method is my personal favorite. I blogged about it back in 2010. I also combine it with methods 3 or 4 below: usually I damp block every 6″ to 12″ of rows while I’m crocheting, and then do a final wet block when you’ve completed the project. I like damp blocking partly because it’s the most portable, and partly because it’s fast. It works great for the types of yarn I tend to work with: bamboo, rayon, and plant fibers in general; also merino and alpaca. For most of the year here in humid Florida, wet things simply take too long to dry.
3. Wet Block
Wet blocking is when you fully immerse the crochet item in water. It’s a simple method that has several options for adding a whole range of effects to your projects. Practice wet blocking and it will develop into an art form. Try adding a fragrance, conditioner, fabric softener, or a stiffener to the water.
Depending on the yarn fibers and colorfastness, soaking can be a benefit or a liability. You can soak plant fibers like cotton, linen, hemp, rayon in warm or cool water a bit. This is Doris Chan’s favorite method.
For wools, immerse briefly in cool water to avoid fulling (felting), then remove excess water gently before spreading out on a toweled surface to dry. I like to add a little hair conditioner to the water if the yarn is wool or silk.
ShamWow super absorbent microfiber cloths are really helpful for speeding up the drying. I use them instead of, or on top of a bath towel on a table.
4. Steam Block
Steam blocking specifically uses the power of moist heat. This method can really pay off if you carefully test first. With practice you’ll develop the visual and tactile cues for how close to hold the steamer to your stitches and for how long, depending on the yarn. You’ll also develop a sense for which effects to aim for with a given yarn and stitch pattern.
Why risk using this rather aggressive blocking method? It can give acrylic yarns the sheen and drape of silk. Steam blocking is an art that can bring out extra softness and luster in some silk, camel, and llama fibers too.
5. Pin Block
Pin blocking includes stretching an item on blocking wires while wet or steamed. The most important thing about pinning is to use rust proof pins. I don’t own blocking wires, but I sure admire the knitted lace wraps that have been blocked with them. (Personally and non-professionally, I have only ever pinned crocheted snowflakes.)
Tug and pinch each picot to round it out and make it visible, adding more water to them than the rest of the stitches, if necessary. Sometimes I roll each picot between my fingers to compress them and even out their roundness.
Love Knots
Most love knots are intended to be air-filled like a semi-inflated balloon. If yours are, spritz lightly with mist and damp block selectively: stretch and flatten stitches around the love knots. Gently smooth the love knots themselves so that you don’t flatten, deflate, stretch them out, nor weigh them down with too much water. You might feel like it’s not worth blocking them at all, but I tested this in my love knot classes and people could tell the difference.
Conversely, if you want yours to have the limp and collapsed look that is typical of the love knots in the tropics, feel free to wet block and perhaps even steam block them.
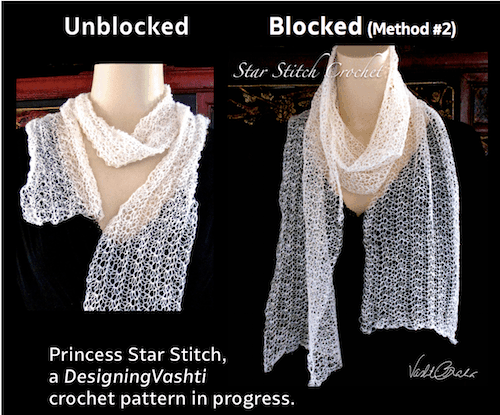
The lacy Tunisian crochet that I’ve done responds beautifully to wet blocking. Aim for squared filet eyelets. I tug strongly on the return pass lines to straighten, flatten, and lengthen them evenly. Tug vertically on extended Tunisian stitches to fully extend them, if you used them.
Garments
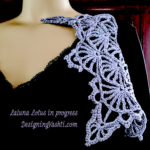
Wet blocking is the method here for the stylish fit, silhouette, and elegantly flowing, breezy movement many garments and accessories are intended to have. It’s no wonder that it’s Doris Chan‘s favorite method. Be sure to block the accessories that need to drape stylishly, such as wraps, scarves, collars, and even necklaces.
If you used acrylic yarn, steam blocking can bring out all the fashion drape and gleam, as if you used silk!
Note that steaming some animal fibers will soften them enough to wear against the neck.
Home Decor
Home decor projects, especially doilies, snowflakes, and afghan squares (also flowers and other appliques) usually need to be as perfectly flat and square, or round, as possible. Wet blocking with pins, wires, or dowels is common with these items. Sometimes starch is added (especially for snowflakes).
And finally…for all blocked items by all methods:
Let air dry completely, then admire your work and bask in the compliments!