Posted on 9 Comments

Yarn Overs, Yarn Unders (Newsletter Overflow)

If an image is missing, view it herehttp://www.flickr.com/photos/vashtirama/

Close-ups of Yarn Overs, Yarn Unders, and Yarn-to-Front.
If image is not displaying, go to https://flic.kr/p/DyV1A3.

Yesterday’s issue 88 of Vashti’s Crochet Inspirations Newsletter had only enough room for yarn over highlights. Who knew I’d discover too much material for a newsletter?

Here’s the rest of the story.

More on Yarn Over Basics

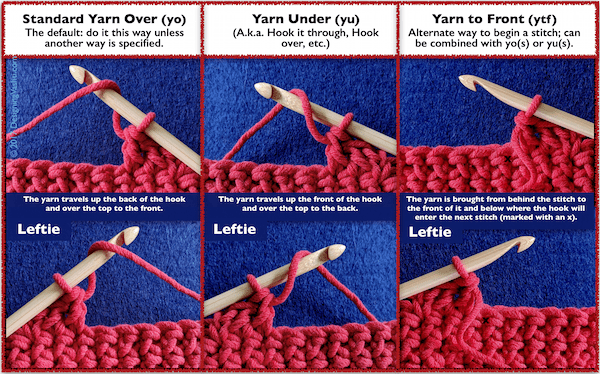
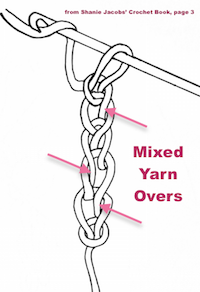
I described the basics of yarn overs and yarn unders in the issue already, but that only goes so far. Yarn overs are actually kind of tricky—at least when you think about them and watch yourself in slow motion. I see this in classes. Yarning over is one our most ingrained habits. Prefer a video to the close-ups above? I like PlanetJune’s.

“Clockwise” Depends on Your Point of View

Mixed yarn overs in a foundation chain.
This can also happen if the loop falls off the hook while crocheting the chains and twists before you place it back on the hook. If image isn’t displaying, see it at https://flic.kr/p/DyXB97

Another thing about yarn overs is the rotational movement. It would be easier to describe them if they were linear (just move your hook along a line from point A to B). Instead, we describe what the hook’s motion is, or focus on the yarn’s motion: a “yarn under” is also a “hook over”.

Some describe the motion as clockwise vs. counter (anti-)clockwise, which adds its own ambiguity. The motion your hook and yarn make for a yarn over is counterclockwise…IF you’re looking at it from the shaft end of the hook and IF you’re crocheting right-handed. The same motion suddenly appears clockwise if you watch it head on (from the head end of the hook).

Yarn Unders For Simple Stitches

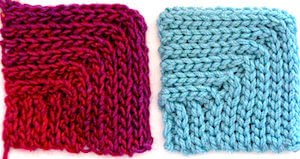
I’ve swatched several kinds of familiar stitches with yarn unders instead of yarn overs. The stitch didn’t always look different, but in every case, it’s denser and tighter. I struggled at times to maintain an even gauge and to loosen up, depending on the stitch and yarn.

When I’ve preferred the feeling of using yarn unders, they seem lean and efficient, like taking a shortcut. It’s tempting to use yarn unders when finger crocheting and when completing reverse single crochets and loop/fur stitches.  I’m sure a large project with them uses up less yarn! Usually I prefer yarn overs though. I’m used to rhythm of it and the control they give me over my gauge. Sometimes they feel sort of “luxe” or fancy, compared to yarn unders.

Slip Stitches and Single Crochets

Swatch shows single crochet stitches crocheted with yarn-unders only, in rounds with no turning, and with variations: some rounds are moss stitch (chain 1, sc), some are extended sc.
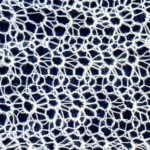
If you want to do the old style slip stitch crochet that is so dense it’s waterproof, use yarn unders!

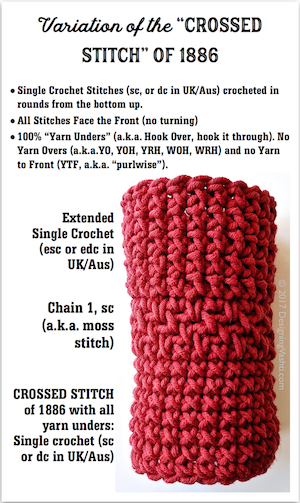
The single crochet stitch (sc, or UK: dc) requires just two yarn overs and is visibly affected by changing just one of them to a yarn under. I expected to find yarn unders in Mark Dittrick’s Hard Crochet book on sculpturally stiff sc.

Change the first yarn over and you get sc with crossed or twisted fronts that look very much like my variation pictured here.The 1886 crossed stitch is significant to me because it was in the influential Complete Encyclopedia of Needlework by Thérèse de Dillmont. I’ve seen the same stitch repeated in other crochet books since. (I don’t know if it occurs before 1886.)

Change just the second yarn over and you get what Rebecca Medina‘s modified sc for tapestry crochet.

Here’s another interesting reason to use some yarn unders for your sc. In her Freeform Knitting and Crochet book, Jenny Dowde recommends alternating a yarn over with a yarn under when starting a surface sc. Doing this prevents the raised row of sc from slanting to the left or right.

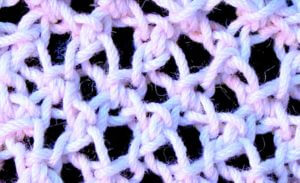
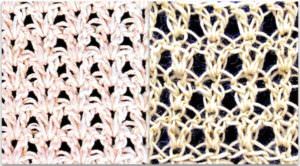
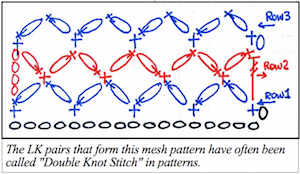
Two other stitches that show off yarn unders nicely are half doubles (hdc or UK: htr) and love knots. See the issue for more on those. View the hdc swatch diagram from the issue in high resolution.

A newsletter subscriber mentioned to me that the designer Aoibhe Ni uses yarn unders for special texture effects in her lovely Tunisian crochet designs.

How Many Types of Yarn Overs?

Two crossed loops (half hitches) have been "cast on" at the end of a Tunisian forward pass row.
A method I used for the Five Peaks Shawl.

I think of yarn over types in terms of how to get more yarn on the hook for making stitches. So we have the two obvious types: wrap it one way (Yarn Over), or the other way (Yarn Under).

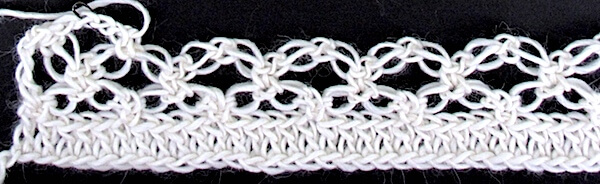
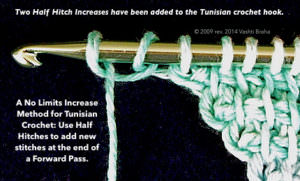
A third way to add loops to the hook is the crossed loop, which is a simple cast-on in knitting. It’s also a half hitch in macramé. This loop has a twist in one direction or the other, so there are actually two types of them. I used them for Tunisian crochet to increase stitches along one edge of the Five Peaks Shawl.

This kind of loop was the subject of one of my earliest newsletter issues: “A Very Different Kind of Crochet Stitch“. I love Sue Perez’ “Forward Loop Chain” blog post about them.

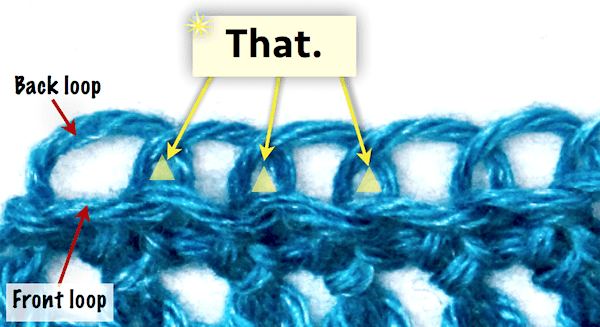
The yarn-to-front (ytf) shows at the top of this page with the two yarn over types even though strictly speaking it isn’t one. It’s easily confused with the yarn under.

The Yarn Over in other Languages

I found this handy information in the 1989 Vogue Dictionary of Crochet Stitches by Anne Matthews. Here are the non-English pattern equivalents listed for Yarn Over (US) and Yarn Over Hook (UK):

  • Jeté (French)
  • Umschlag (German)
  • Gettato, abbreviated gett (Italian)
  • Arrollado (Spanish)

One More Thing!

I mentioned Jane Rimmer in the issue because I want to make sure you know about her two-part article for CGOA’s Chain Link newsletter: “Yarn Over History and Technique” (Autumn 2014) and “Yarn Overs Part 2: Techniques” (Summer 2015).

When to Crochet BETWEEN Top Loops

Diagram and stitch close up that illustrates the space BETWEEN 2 top loops of 2 stitches. That is, between 2 back loops (as shown), or 2 front loops.
Still getting the hang of basic crocheting? Feel free to give this a try. You’ll need to be able to find the top two loops of stitches, which is a beginner skill. Increasing or decreasing internally is for Intermediate-level projects, however. (Internal shaping happens within a row, while external shaping is at the edge of a row.) Also, its invisible effect makes it challenging even for more experienced crocheters!

This is an uncommon stitch insertion point. I found it in use as far back as about 1840 but have not found a name for it, nor a consistent modern use of it. Scroll down to see all the special reasons that I think we should all be making more use of it.

How to Crochet Between Top Loops

Here’s how to get your crochet hook into the yellow triangle spaces between loops as illustrated above.

If you’re crocheting in rounds and you don’t turn to begin a new round,

  1. Insert your crochet hook under the front loop of the next stitch AND under the front loop of the stitch after it
  2. Yarn over and pull a loop through the two stitches: 2 loops on hook; yarn over and pull through the 2 loops to complete a single crochet (sc, or dc outside of the US).

If you’re crocheting in rows and you turn to begin each new row,

  1. Insert your crochet hook under the back loop of the next stitch AND under the back loop of the stitch after it
  2. Yarn over and pull a loop through the two stitches: 2 loops on hook; yarn over and pull through the 2 loops to complete a single crochet (sc, or dc outside of the US).

You don’t have to use only front loops in the round, or back loops in rows; these are just easier to start with because of the way they overlap. Try it with front loops, and then with back loops. You’ll see what I mean.

You also don’t have to do a single crochet. I just used that stitch for convenience.

I developed this system of dots to diagram slip stitch shaping.
I developed this system of dots to diagram slip stitch shaping. It’s based on standard crochet symbols for indicating the front loop (half circle, like a smile) or back loop (same symbol upside down).

When and Why Though?

A lacy 19th century Norwegian star stitch forms a unique web look because some of the stitches are crocheted between the top loops.
1800’s star stitch lace.

In short, it’s amazing. It’s invisibly effective when you want, and lovely when it’s visible. It brings out a fine-grained lacy charm to stitch textures whether you use it for shaping or not.

Lacy star stitches are already lovely; crochet them between top loops and you get the beauty at right. I still swoon when I see it.

Invisible Shaping Method

It’s not just one of many ways to increase or decrease stitches; it is often the best way.

A smoothly curving slip stitch rib rainbow thanks to invisible increases!
Slip stitch rib with invisible shaping.

You can easily add even the stitches you’d normally have to yarn over to add first, such as a slip stitch or a Tunisian simple stitch.

Amigurumi crocheters are already in on the secret. They love this method for decreasing invisibly.

Slip Stitch Crochet aficionados love it especially when increasing because it is so easy and invisible to do with slip stitches. To me it feels like the most natural method to use with slip stitches. It’s my favorite way to shape slip stitch ribbing.

Unique Textural and Decorative Effects

Any shaping method can also be used to create all-over stitch patterns. This “between the top loops” stitch insertion point changes the way holes look, in a really cool woven filigree way sometimes. Scroll down to see what it does to V-stitches.

Mitered Slip Stitch Rib: the invisible increases are stacked in one corner.
Mitered Slip Stitch Rib: the invisible increases stack up in one corner.

You can make the invisible visible when you stack your increases or decreases, such as to make a mitered corner. The result is a neatly polished look. No weird holes. No lumps or weird puckering. It doesn’t interfere with stretch or drape.

There are several ways to increase and decrease but few methods can pass so many tests.

Why It’s a Game Changer

An experimental swatch of slip stitches worked between two top loops. It's stretchy!
An experimental swatch of slip stitches worked between two top loops. It’s stretchy!

It transforms the most common crochet texture of all, its chain-topped look, into a filigree-like woven or lattice look. It’s like weaving air or a bit of cotton candy floss into links of chain mail. At right is some “air” added to slip stitches.

I think it works so well as a shaping method because it takes advantage of how the base of a crochet stitch is willing to compress into the tiny “magic triangle” between top loops. This helps it seem invisible; so does finding secret hiding places between the stitch line up that the eye usually spots.

Most of all I think this is an important stitch insertion point option because it points to deeper relationships between the stitches.

Basic V-Stitch on left; same V-stitch pattern, but worked between two top loops on right.
V-Stitches worked between two top loops on the right.

Two crochet stitches across a flat horizontal plane share a “magic triangle” of space where their top loops overlap. Instead of always starting a new stitch by inserting the hook from front to back (perpendicular to the row), we can move the hook alongside the row, parallel to it. This is something I love about Tunisian Simple Stitch: we crochet the next forward row into front vertical bars in a motion that runs parallel to the row and fabric surface. Great things result, including different kinds of drape, stretch, and texture.

I published an earlier version of this material January 23, 2016 in issue #75 of Vashti’s Crochet Inspirations Newsletter.

Crocheting the Love Knot Mesh

A row of love knots has been worked into a row of double crochets (an easy base). A second row of love knots is crocheted into the first row of them to create the classic lacy diamond mesh. This is a 19th cen. stitch pattern.
Start here first to learn how to crochet one Love Knot stitch, and a single string of them. (Depending on your project, it might be called “the foundation row” or “Row One” or, “Hey look, I just made a necklace/eyeglass cord/wrap bracelettie belt!”)

That Iconic Love Knot Mesh

Classic Love Knot mesh crocheted as a triangle, such as a shawl. One swatch was started in the bottom corner, the other swatch started at the top long edge and ended in the bottom corner.
Crocheting a triangular shawl of classic Love Knot mesh was a 1970’s craze.

You can see two completed rows of love knots in the above image. The first row is all just double crochet stitches (dc, or tr outside of the US). This 19th century stitch pattern is my first choice for teaching how to crochet the classic love knot mesh. I also used it for Sister Act, a pattern in Interweave Crochet Magazine that I haven’t yet added to my shop.

At right is the same mesh crocheted in a triangular shape. One started in the bottom corner then steadily increased to the top long edge. The other is the opposite: Steadily decreased from the top long edge to end at the bottom corner.

You need to know what to expect with all the love knot mesh pattern variations out there. Following that is the row by row pattern instructions for a starter love knot mesh.

Tricky Pattern Versions

I’m amazed by the variations of this mesh pattern! Many of them may look the same, but here’s how they can vary:

  • The foundation row might be all love knots, or all chains, or a mix. If love knots, it might be a straight edge of shorter ones, or echo the diamond-shaped spaces with full-sized ones. Starting with a row of double crochets is similar to all chains but it gives you a nice strip to grip.
  • How you start and end each row might be all love knots, like you see in the triangle swatches above. Or, start with turning chains and end with tall stitches, like the one in the topmost photo—see its tall stitch at the end of the row? Like the foundation row, using all love knots could result in straight row sides (half-diamond spaces) or be full diamond-shaped spaces (each row has a corner). This could entail mixing love knot sizes.
  • How you crochet into a love knot could be with a standard single crochet (sc, or dc outside of the US) in a love knot’s sc; or a sc just before and after its sc—also standard. Less common variations include something other than a sc, crocheting into more than 2 loops of the sc, and adding a tight ch to “lock” the sc.

Today Let’s Do the Easy One

Vashti’s recommended starter mesh for your “first love”: Classic Love Knot Mesh with foundation chains (ch), turning chs, and tall end stitches. Dc = double crochet (tr outside of US). Sc = single crochet (dc outside of US).  LK = Love Knot. Tr = treble crochet (dtr outside of US).

Ch 20 (or a multiple of 4).

Row 1: Dc in the fourth ch from your crochet hook, dc in each remaining ch: 17 dc, ch 1, turn.

Row 2: Sc in first dc, *2 half-inch-long LK, skip 3 dc, sc in next dc, repeat from * in remaining dc, ch 4, turn: 4 LK pairs.

Row 3: 1 LK, sc in the center sc of first LK pair, *2 LK, sc in the center sc of next LK pair, repeat from * twice, end with 1 LK, 1 tr in last sc of row, ch 1, turn.

Row 4: Sc in first stitch, *2 LK, sc in center sc of next LK pair, repeat from * twice, 2 LK, sc in top of ch-4, ch 4, turn.

Stitch symbol diagram for a simple love knot mesh that has a foundation ch, and the rows begin with turning chains and end with tall stitches. I use this diagram in my classes.Repeat Rows 3 and 4 for pattern.

Would you like a diagram for this? I have this one handy. It might help you visualize how the LK rows go together. Keep in mind that it omits the Row 1 dc.


About Crochet Skill Levels

The Craft Yarn Council of America provides guidance for classifying crochet projects according to the skill level required. The goal is to help crocheters choose projects they will enjoy. Each skill level has its own easily recognized symbol. The guidelines and symbols have been widely adopted in the industry and are summarized in the chart further down this page.

Screenshot of the skill level details for Vashti's Lovelace pattern.
An example of skill level details: page 2 of the Lovelace Scarf pattern.

Vashti’s Advice

Recommended for newer crocheters: the skill level designation for projects is a great place for you to start if you’re still learning the basics.

Experienced crocheter? Use the guidelines to choose a Beginner or Easy level project for travel or “TV crocheting”.

Remember that these levels are very general. As a designer and teacher, I find that some projects fit more neatly in this system than others. Each crochet project is creative and unique—that’s what we love about them!

Look for crochet patterns that get specific about which skills are needed within a skill level. Consider the Intermediate skill level: that’s a particularly broad one. Skill specifics let the crocheter know exactly how the pattern is—and is also not—Intermediate. When I write patterns I go another step beyond even that. I include a list of specific new skills the crocheter will acquire while using the pattern. See image above of the skill level details on page 2 of the Lovelace Scarf pattern.

Are you an advanced crocheter but new to using written crochet patterns? Practice with projects rated Beginner or Easy. The way a pattern is worded, edited, and charted requires its own skill set. After all, crochet instructions can usually be explained or depicted more than one way. A pattern for five sizes that’s tersely edited to fit on one page requires experience to use!

Look for crochet patterns that are designed & written explicitly for more than one skill level, such as when there’s an option for more experienced crocheters to use a specialized stitch variation, while the less experienced can simply skip it. I love writing this type of pattern.

Be wary of using these skill levels to describe the crocheter rather than the project. The generalizations are often not helpful enough and can even be misleading; see my Beyond Basic Crochet page.

The Four Standard Crochet Skill Levels

The Craft Yarn Council's Standard Skill Levels for Crochet chart of symbols and descriptions as of Oct 2017.
Clicking this chart will take you directly to its location at CraftYarnCouncil.com.
  1. Beginner Projects for first-time crocheters using basic stitches. Minimal shaping.
  2. Easy Projects using yarn with basic stitches, repetitive stitch patterns, simple color changes, and simple shaping and finishing.
  3. Intermediate Projects using a variety of techniques, such as basic lace patterns or color patterns, mid-level shaping and finishing.
  4. Experienced Projects with intricate stitch patterns, techniques and dimension, such as non-repeating patterns, multi-color techniques, fine threads, small hooks, detailed shaping and refined finishing.
Posted on 7 Comments

Wearing Crochet to a Memorial Service

Four views of Graven worn with its buttons in front or back.

I traveled over the weekend to attend a memorial service for the sudden death of a beloved uncle.

The chapel accommodates 280 people, and 360 attended. Fortunately the weather was ideal (around 80º and sunny) so that the building could be open on two (maybe three? sides. The overflow of people could sit comfortably outside and feel included.

I designed something specifically to wear to this event and had two weeks to make it. That includes all swatching, blocking, and any do-overs.

The Challenge: Accepted.

Wearing crochet to this event meant meeting three strict requirements.

The short, fixed deadline.

I had to rule out my very first idea: to crochet a Chanel-style jacket. Instead I started imagining something that would take two balls of yarn or less.

Result: The finished Graven weighs 108g (slightly over one 256-yd ball).

The second limit was its style and color.

The 3-button front Graven capelet and black dress and pearls.
A stop at Starbucks after the memorial.

Graven would have to be far more subdued than my default personal style, so I ruled out several initial ideas. It also had to be solid black; a challenge because that’s not what I tend to crochet. Sure, I often wear black clothing as a plain first layer that forms a background to a (sometimes crocheted) lighter-colored layer. I struggled at first to picture wearing crochet in solid black on a sunny Florida morning, not for evening, or in a northern office.

Result: I wore Graven all day. It was mostly easy and comfortable to wear, and felt elegant and proper style wise. I did have to adjust it periodically so that the buttons stayed centered. (I think this is because I accidentally increased some rows unevenly.)

It had to work with my dress and high heels.

The dress was a simple sleeveless deep V-front shift made of an inky black pima-modal fabric. Its surface had a woven linen look but it was actually a fine knit. Very comfortable to wear in Florida! It needed a dressy covering for the upper arms and chest though.

Result: Armed with these three requirements, I narrowed down my project to a fairly traditional shoulder covering, crocheted in a fairly tame lace stitch texture, with a polished-looking yarn that’s not too thin or thick: a capelet in Tunisian crochet with Lotus. (Our “Black Gleam” color matched the dress! whew.)

Other Requirements I Hoped to Meet

Half of the capelet shown flat along its hem while it blocks.

Learn something new about crochet: this was the first time I tried doing a Tunisian “wicker” mesh in short rows with a built-in shaped collar, and a distinctive twisted-loop edging at the hem.

Use yarn already in my stash, ideally my Lotus yarn. I try to feature a different Lotus color each time I design with it. This was the first time I designed with the black.

Try out a trendy style: The trend of using mesh textures in a modern, sort of sporty way inspired the stitch pattern. (The edging later added more of a medieval-ish wrought iron look.)

Give my handmade item the kind of polish that could even make someone wonder if it was a store-bought designer label. (I don’t know if this actually happened).

Wearing Crochet to Memorials

I’d do it again. It was a tangible comfort to me.

Although I don’t think I caught sight of all 360 people individually, I feel confident in saying that I was the only one wearing crochet, or even a hand knit item.

To me, fabric has a language, and crochet adds a necessary voice to the conversation, at memorials too. Time spent crocheting Graven was also time spent contemplating the uncle I will miss so much. Crochet caught and is holding my feelings for him.