Slip Stitch Crochet FAQ

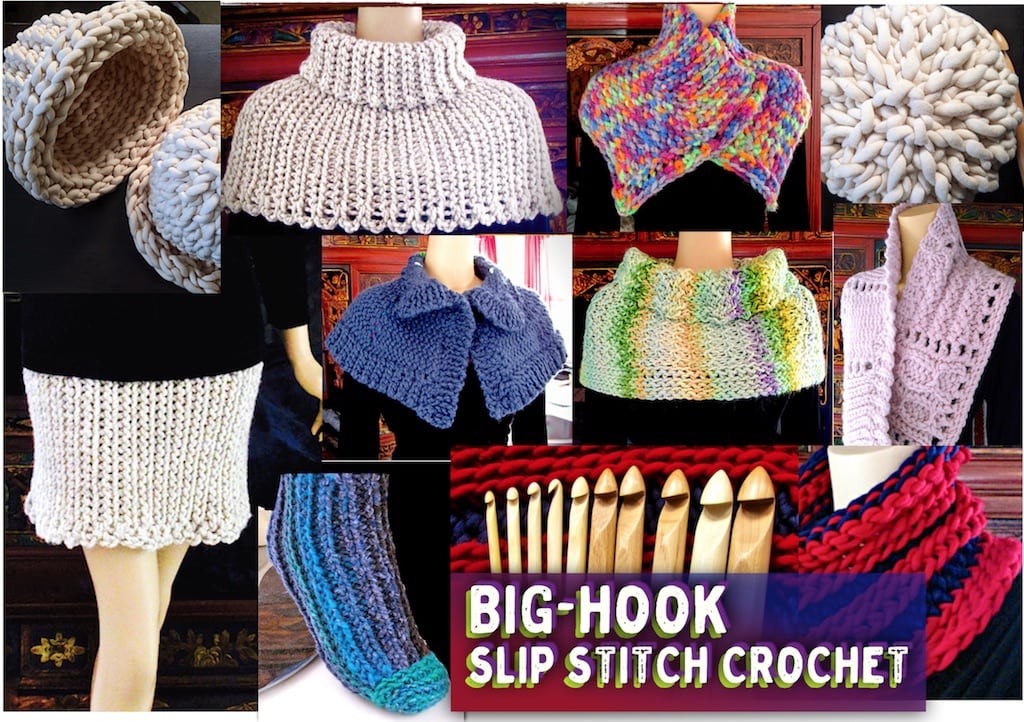
These are the questions I most often answer in slip stitch crochet classes and by email in response to my slip stitch patterns.

Q: How much more yarn does slip stitching use?

Simple Fss makes a hand dyed yarn even more beautiful. Jempool Scarf: Color-stacked planned pooling technique with a fingering weight merino wool hand painted yarn.
Jempool‘s simple Fss makes a hand dyed yarn even more beautiful!

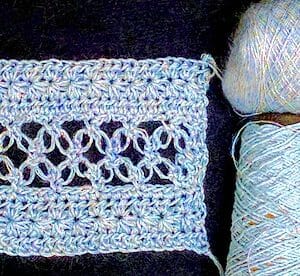
A: It seems to use LESS than single crochet! I tested this by using the same yarn and crochet hook size to make same-sized swatches of:

  • Slip stitch in the back loop [Bss]
  • Single crochet in the back loop [blsc]
  • Slip stitch in the front loop [Fss]

The blsc swatch used the most yarn of all. Fss used the least yarn of all.

Q: Why doesn’t my slip stitch ribbing look ribbed?

Eva Scarf in progress. The row ends are spread out a bit to make the ribs more obvious.
Eva Scarf. The ribs show clearly where the row ends spread out.

A: Some crocheters don’t see the ribs forming until they look along the row edges while stretching them apart. You need at least 10 rows, which will create 5 ribs. Until then, it might seem like nothing’s happening.

The ss rib is so corrugated, or accordion-like, that sometimes students don’t see the ribs and valleys even though they’re there! (This is what makes it such a great ribbing when you wear it, especially with wool and wool blend yarns.) At rest, the ribbing is even more compressed and springy than sc in the back loop, because sc “bodies” stand independently of each other and make wider ribs than the ss bodies do. Ss bodies mesh together more both in height and in width.

Q: Why do my edges look uneven?

A: Usually this is caused by accidentally increasing stitches, or decreasing them, or both. The best fix is to place a stitch marker in the first stitch of each new row. By the time you get to the end of each row, the end slip stitch (ss) is usually partly covered by strands from the turning ch. This makes it very easy to overlook for beginners, or even if you’re slip stitching with a new yarn. The result of missing the last ss of the row is a decrease.

It can also be tempting to think the turning chain is another ss, but that would result in an increase.

The turning chain (ch) might be the cause. Occasionally a student’s turning chs look loose and kind of messy along the sides of rows. The easy fix is to simply crochet a tighter turning ch. Some slip stitchers omit the turning ch altogether. If you do this, be sure to use stitch markers to keep the end ss from melting away even more. Personally I never omit the turning ch because I like the extra stretchiness along the row ends.

Q: My foundation chain looks loose, and each row is getting tighter. I have the right number of stitches so why does it look like I’m missing some?

A: Does your swatch feel stiff, and do you struggle to get your hook into the back loop of the next stitch? If so, then the stitches really are too tight. A common problem is when the stitches feel a bit too tight to crochet into, some crocheters reach for a smaller crochet hook to make it easier. This is the worst thing you can do. Instead, focus on making each stitch looser. The two top loops of the stitch should have a large enough space between them to fit the size of the hook you’re using. (This is what I call “hook-led gauge“. It’s an important skill for many kinds of crochet projects.)

Q: I’ve tried everything so why are my slip stitches still too tight?

A: Sometimes a crocheter is careful to make a loose ss, but then after s/he makes the NEXT ss, the previous loose one is tight! This is usually because the yarn is being pulled from the completed stitch while forming the next ss. This habit doesn’t affect other crochet stitches as much, but ss are closely interlooped, so it’s easy to affect nearby stitches in a big way.

Making each slip stitch in two steps helps some folks: 1) insert hook in stitch, yarn over and pull loop through stitch; pause, then 2) pull that loop through the other loop on your hook to complete the slip stitch. (It’s like the 2-step process of making a single crochet except that you don’t yarn over again to complete the ss.) This tip tends to help long-term crocheters who are deeply habituated to making their slip stitches (ss) quickly and tightly.

Occasionally a crocheter is not crocheting into the correct row. See the next two answers.

Q: Why am I having so much trouble finding the back loop?

A: Slip stitches tilt away from you as you crochet them in rows. This causes their front loops to stick up in the air, tempting you to crochet into them. The back loops fall lower to the back of the row. Some crocheters overcompensate and look too far back for the back loop, and choose a loop from the row below instead.

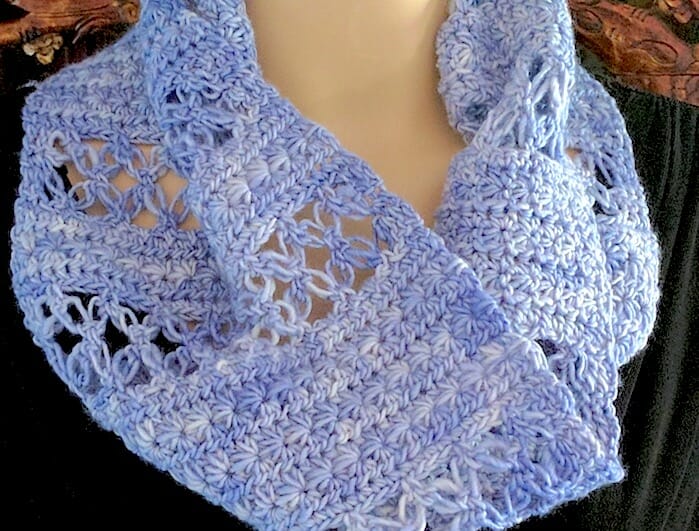
Q: It isn’t stretchy. It doesn’t really seem like ribbing. Am I doing it wrong?

A: The most common cause is choosing the wrong loop as the back loop. If you’re choosing a loop from the row below instead, you’ll make a tighter, thicker, less stretchy, less ribbed fabric. Understandably, some new slip stitchers accidentally crochet into that tempting front loop sometimes, instead of in the back loop. Rows of Fss are less stretchy and are not ribbed.

Occasionally a crocheter mixes some single crochets (sc) with their Bss or Fss. This tends to happen when crocheting ss with the two-step method described above.

Q: Should I change to a smaller hook? Then I’d be able to crochet into the back loops easier and faster.

Slip Stitches Love Big Hooks! Hook sizes K through U on a background of super-bulky striped slip stitch ribbing.
BIG hooks & BIGGER: in the shop.

A: No. Resist the temptation! A smaller hook never solves the problem of crocheting ss tightly. If the back loop of a ss is too tight for the hook you’re using, it means you’re not using the hook size as a guide to how big (loose) your stitches should be.

Q: What happens if you do a row of Bss and then a row of Fss (slip stitch in the front loop)?

A: Try it! And try other repeat sequences like 2 rows Bss, 2 rows Fss, or 2 Bss rows and 4 Fss. Try changing colors, incorporating a single crochet row here and there, and so on.

Q: Does it matter if I chain 1 when beginning a new row? Does it matter which way I turn?

A: Sometimes it matters a lot, or a little, or not much at all. It depends on the crocheter and the project. I teach all slip stitch newbies to chain 1, and to be consistent about turning the same direction each time. Both of these habits help to make the last ss of each row easier to recognize.  I prefer to turn so that the yarn is at the back of my hook instead of front.

In designs, I almost always use turning chs because I like the extra drape. See this newsletter issue: “Crochet That Pours“. Undaria and Slip Swoop slip stitch designs have 2 or 3 turning chains!

Q: How would I change the width of the Slip Slope Scarf?

A: The short answer is that this would require a redesign. Many crocheters could figure out how to do this, using the Slip Slope Scarf free pattern as a guide. The best thing to do is to crochet two complete short row “wedges” of Slip Slope. After that, not only will you have a swatch of how wide your scarf would come out if you change nothing as a starting point, you’ll also understand the simple system of short rows, and can then try your own variations. You could simply add or subtract a stitch repeat; or you could also shorten each short row more gradually, or less, to create wedges of different sloping angles.

Q: Does slip stitch ribbing get any easier/faster?

A: Yes! Slip stitch crochet is a little faster than knitting, it’s as fast, or a bit slower than sc ribbing, depending on the crocheter. Fss is faster than Bss. All looser ss is faster than all tighter ss.

Some ways to improve speed:

  • Focus on the unique rhythm of slip stitch crocheting until it becomes an ingrained tactile/muscle memory.
  • Make the ss in ONE step instead of two for a swift, fluid motion. (Make sure your ss are consistently loose first.)
  • Use a pointy-headed crochet hook. You can customize your crochet hook by filing the head of it.

Some ways to increase fun:

  • Use bulky yarn and jumbo crochet hooks for quick projects.
  • Listen to audiobooks & podcasts.
  • Add a pinch of stitch ‘spice’: change colors; short rows; use a fun or luxe yarn; mix different stitches; add beads!
See also issue #45, “Slip Stitch Q & A” of my Crochet Inspirations Newsletter.

Upcoming Classes & Events

NEW online crochet class May 18 & 19, 2022:

See my new gallery at the Herringbone Chains class resources page!

Crochet Herringbone Chains for All the Things

This is a two-hour class taught over two days: 1:00 pm –2:00pm Central Time on Wednesday May 18 & Thursday May 19. Register with CGOA. Registration closes May 15 or when the class is filled.

Class description & supplies needed: 

Here’s a stitch that is almost as useful as our basic chain stitch because it can be used in place of chain stitches. That’s a lot of uses! This means in chain-lace stitch patterns, as turning chains, as simple utility cords such as drawstrings, and for effect, such as in jewelry.

I’ve even used herringbone chains as Tunisian return passes instead of the usual chains.

Believe it or not, you can even use them to form the post of a tall stitch, while you’re crocheting the initial yarn overs off of the hook. All of these uses will be covered in class.

As far as I know, I developed this method of crocheting the “bugle cord/braid/chain/sinnet”, which is well-known in knot-tying world. In fact, the finger-chaining the knotters do is also sometimes called “single bugle”. To me, being able use a crochet hook to make this “bugle” chain is much faster, easier, and more versatile.

The herringbone chains pictured are like doubled chains; I’ll also show you how to do tripled ones. Why would you want to? Sometimes chain stitches are just not pretty, substantial, or polished-looking enough. For drawstrings, spaghetti straps, etc., I often want a denser, smoother, or reinforced cord than just chains. The herringbone texture also has classic good looks, so it’s great to be able to add it to a project. Other times you want a chain stitch to be nearly invisible; at those times I wouldn’t use herringbone chains.

Materials

See all details at the registration page.

Scroll down to see some of the crochet topics I’ve taught in the past. 

New online crochet class meets April 27 & 28, 2022:

Zegue-Along: Tunisian Scrap Zapper Project

This is a two-hour class taught over two days: 11:00am – 12:00pm Central Time on Wednesday, April 27 & Thursday April 28, 2022. Register with CGOA. Registration closes on 4/24/2022 or when the class is filled.

Class description:

See the complete class listing at https://www.crochet.org/page/OnlineEducationProgram. See its new Resources Page: https://www.designingvashti.com/zegue-along-tunisian-crochet-class-resources/.

The Zegue wrap I made for myself has brought me much happiness through a difficult year. I also fondly remember the process of making it: the stitch pattern has just a little challenge (typical of ripples) to make it interesting, and it’s easy to memorize because it has a one-row repeat. The yarns I used were high-end Italian imports. Each row felt like I was treating myself.

Use any yarn and any hook size to make a range of items; we’ll stick with simple shapes. We can do a lot with clever folds, seams, or…cuts. The stitches are self-healing: cut open armholes or a head opening where and when you wish. The edges are already sealed and polished-looking!

This design is great for a class project because it’s stress-free in many ways. It’s an easy way to combine odd balls of special novelty yarn stash. I’ve found that Tunisian crochet tends to make a wider range of novelty yarns look and feel good to crochet with. 
The extended stitch used here marries different yarn weights effortlessly.

Choosing a good crochet hook size to use with yarn scraps of different weights is just not an issue. Neither is the hook length! The one I used for the wrap only needed to be 11″ long! This lacy stitch pattern cuts in half the number of stitches needed for a 57″-wide wrap.

Materials

See all details at the registration page.


Vashti’s Crochet Classes in 2020

In 2020 I taught two classes for the Crochet Guild of America. It was the first ONLINE edition of their popular Chain Link conference.

It was my first time teaching online. I’m still excited about it! They were also the first 3-hour online classes for CGOA, and we’re discussing all the valuable feedback we received about them from the participants.

Thank you!  I enjoyed the class and learned a lot!

Thanks for the wonderful and inspiring class(es).  It is great having a teacher with passion for their topic! 

Thank you so much.  I took both of your classes and learned so much! You have truly inspired me and I thank you so much!

Thank you for an excellent class.  I learned a LOT and also discovered how much I still have to learn.

some Feedback from participants

CGOA’s plan is to have one or two class topics taught by one or two teachers per week, going forward.

Subscribe to my newsletters so that you find out what I find out when I find it out. Or, subscribe to the blog: scroll down to the bottom right corner of this page and click “subscribe”.

Quick Facts

These first two crochet classes were a total of three hours long each; an hour per day, three days in a row. As usual, I provided comprehensive full-color handouts.

It seems to be the consensus that each meeting time could have been a bit longer than an hour. For example, a three-hour class could meet twice for 1.5 hours each time. Perhaps even on the same day, however I did also like a 24 hour gap before the next meet up. Participants had a chance to practice and swatch what they learned. When we met again, everyone was ready with great questions, and swatches to show.

Even More Show & Tell!

I always bring lots of crocheted examples of topics I teach. In yarn industry lingo I guess it’s called having an in-class trunk show per topic. Normally this means deciding which crochet items to ship to the conference.

This time I had all the crochet at my fingertips here at home base.

Why so many items? I test fibers, dyeing styles, crochet hook sizes, stitch variations, shaping methods, and all the what-ifs. These items often inspire students to try variations with their own projects. A class project may end up being the starting point of a new design.

I discovered that for the first time, I could bring my mannequin to class! I could also show some of the crochet books from my home library, not just talk about them.

I hope to teach many more virtual crochet classes! It’s a great way to learn crochet. Whenever I did a stitch demonstration, for example, each person had the same full screen close up view. Like a good YouTube video, I guess, but anyone could ask me more about any step, such as to explain it a different way. Or to explain when to do something this way and when that way.

-:——————–:-

Watch this spot for updates to Vashti’s teaching and events schedule.

Changes to this page are announced in our Crochet Inspirations Newsletter.

Read what students say about Vashti’s crochet classes.

Vashti’s Crochet Classes

Quite the array of herringbone chain examples! From new Tunisian stitch patterns to new jewelry cords, picots, and tambour (surface) slip stitches.

Upcoming Online Class: May 18 & 19, 2022

An exciting new online crochet class is scheduled for mid-May 2022. I love creating new crochet classes! Register with CGOA.

Registration for this class closes soon: May 15!

How to Crochet Herringbone Chains – May 18 & 19, 2022

This is a two-hour class that meets twice for 1 hour each time: Wednesday May 18 & Thursday May 19, 1:00 pm –2:00pm Central Time. Registration closes May 15 or when the class is filled.

Not only is this is a new class, I don’t think anyone else has taught it either. Its Resources Page: https://www.designingvashti.com/crochet-herringbone-chains-class-resources/.


I Love Teaching Crochet.

This page is an overview of Vashti’s crochet classes and student feedback on them. Go straight to the student feedback. Be sure to check Upcoming Classes & Events. You might enjoy my class resource pages.

These topics have been presented as three-hour classes at national crochet conferences, yarn shops, and as three-day workshop formats around the USA.

Contact Vashti about teaching crochet classes and workshops for your group.

Vashti’s Crochet Classes Consistently Sell Out.

Contact Vashti about developing crochet classes and workshops tailored to your group.

Recent Class Topics

Zegue-Along: Tunisian Scrap Zapper (Project & Design) – April 27 & 28, 2022

A two-hour class that meets twice for 1 hour each time: Wednesday, April 27 & Thursday, April 28, 11:00am – 12:00pm Central Time. Registration closes on 4/24/2022 or when the class is filled.

This is a new class. Its Resources Page: https://www.designingvashti.com/zegue-along-tunisian-crochet-class-resources/.

Self-Healing Stitches and How to Cut Them – March 8 & 9, 2022

A two-hour class that met twice for 1 hour each time. This class has been held several times at in-person events since 2017. This online version is a first for this often-requested topic.

See its updated Class Resources page for plenty more.

Extending Forward and Return Tunisian Stitches – Feb. 1 & 2, 2022

A new three-hour class that met twice for 1.5 hours each time. This recent blog post and free afghan block pattern is a great example of what can happen when you extend both forward and return Tunisian stitches in a pattern.

Fancy examples of extending only some return pass stitches would be Rivuline, and Kiri. For a simple and satisfying experience of extending only the forward pass stitches, see Shakti Scarfythings.

Have a look at its Class Resources Page.

(2019–2020)

I’ve recently completed two online classes for CGOA’s first virtual Chain Link conference: Tall Stitch Virtuosity and Big Hook Slip Stitch Crochet.

(2016–2018)

Draping cowl and star stitch pattern shapes for The Starwirbel Way Crochet Class by Vashti Braha
A popular class.

Student Feedback by Class Topic

Here’s what students say about Vashti’s crochet classes (culled from anonymous class evaluations).

Slip Stitch Crochet Classes

  • I have learned more than I ever imagined possible in 3 hours. Vashti is an amazing teacher, so generous and very, very talented in the teaching department. Thank you, thank you, thank you!
  • This class was challenging – really stretched my mind to new limits. Ms. Braha is so calming and patient.
  • Excellent! So much new information! Yay!
  • More Vashti, more slip stitch!

Love Knot (Lover’s Knot, Solomon’s Knot) Classes

  • Best class ever! Thank you!
  • Vashti is a natural teacher – very organized and clear!
  • A joy of a class!
  • Excellent class! I’m a new crocheter and it was accessible and challenging.
Views of vest and its unique Love Knot stitch pattern for Flowerfall Crochet Class by Vashti Braha
Vashti’s newest crochet class topic combines a new love knot stitch pattern with easy steeking and convertible construction.
  • Loved this! Will definitely use it.
  • Well researched, plenty of resources, swatches, projects.
  • Always enjoy Vashti’s informed teaching style!
  • Love it!
  • This was a wonderful class!! I really learned many new techniques that I can’t wait to try in designing. Thanks, Vashti!

Tunisian Crochet Lace Classes

Class: Tunisian Eyelet Meshes (Crochet Meshes: The Weightless Wrap & Variations)
Award winning Weightless Wrap: The eyelet lace design that inspired the earliest Tunisian lace classes.
  • Great class! I want more!! Lots of info.
  • Vashti has brought Tunisian to the next level! I am addicted to the new technique that we learned! Great class.
  • Can’t wait to get started!
  • I loved this course! I’m excited about new Tunisian stitches and techniques – thanks!
  • Innovative, taking Tunisian to new heights! Great visuals – large swatches, projects. Awesome!
  • Great instructor and fun techniques.
  • Very detailed, learned a lot.
  • Great handouts & instructions.
  • Great website & blog. Love the designs. Thank you!
  • Terrific class – really appreciate Vashti’s historic perspective on the art!

The Beauty of Antique Love Knots Class

  • Great class! Enjoyed and learned some great new ideas.
  • Well-paced class – she was excellent!
  • History, resources, technique – can’t wait to do more.
  • I especially like introducing the historical perspective & designers of old!
  • Awesome!
  • Great class!

Creating Crochet Jewelry Class (2012)

  • Not only is Vashti very knowledgeable but her very fun and friendly character adds so much to the class and inspiration.
  • Very good class – instructor knowledgable – great teacher!

The Rave Reviews Continue…

Even MORE About the Love Knot Classes

  • Fabulous handout. Good information. Clearly Vashti knows her knot stitch.
  • Great workshop – neat samples.
  • Learned new techniques, great class.
  • Fun class, well organized.
  • This was my first crochet class. It pushed me and inspired me. I can’t wait to get to work (play).

Even MORE About the Tunisian Crochet Lace Classes

  • Really a great class! I’m already dreaming up design ideas.
  • Love the class, great teacher, great tips.
  • Learned more than I expected–very interesting class.
  • Wonderful stitches, great ideas.
  • Great techniques, inspirational.
  • Excellent class.
  • Great class – lots of info.

Even MORE About the Slip Stitch Crochet Classes

  • I have learned more than I ever imagined possible in 3 hours. Vashti is an amazing teacher, so generous and very, very talented in the teaching department. Thank you, thank you, thank you!
  • Great class! Vashti is definitely a pioneer for the “new slip stitch technique.”
  • I never knew the slip stitch could make such a beautiful fabric & that it’s so versatile.
  • Fabulous! Instructor made me feel as an equal – which was delightful. Super friendly and passionate. 
  • I left with a great appreciation for a stitch that I once didn’t value. I look forward to dreaming about all the possibilities. Thank you!
  • More slip stitch classes from Vashti–fabulous
  • Makes me want more–great class!
  • So, so great! Learned lots and had fun.
  • A joy! Learned so much. 
  • This could be very useful in garment design. Thanks Vashti!
  • Wow!
  • Very interesting! Learned some new techniques that will be fun to use in future projects.
  • Excellent class – learned a lot!
  • Instructor was very patient–she took the time the students needed. Was unfamiliar with this type of crochet so did not always understand. She was very good!
  • Enjoyed looking through all the samples that Vashti brought in. They were very inspiring.
  • Vashti was very enthusiastic when teaching the class and I think that spread throughout the class.
  • Vashti is a gentle teacher who is very patient!
  • Fabulous fabrics, great techniques, new way of looking at and thinking about a stitch that normally is rather neglected. A++
  • As a beginner, I was unsure but instructor was very good, easy to understand.
  • Very interesting. Learned a lot and will use this in my work.
  • Thanks so much for offering this wonderful class!
  • Vashti is very calm and that makes her very easy to listen to. She does an awesome job!
  • This workshop was filled with so many exciting possibilities for future projects! I enjoyed learning the history too.
  • Great history of techniques. Fascinating.
  • Vashti is really great at communicating and seeing where we go wrong (or think we do) and pointing out and explaining how to fix and when we are right.
  • This class was challenging – really stretched my mind to new limits. Ms. Braha is so calming and patient.
  • Awesome class!! Thank you.
  • Excellent! So much new information! Yay!
  • Yeah!
Posted on 2 Comments

Crochet Beginners’ Tip: Slip Stitch Fake Facts

Beginner Crochet tip: tune out the fake facts still being circulated about our most basic and versatile crochet stitch, the slip stitch!

About Today’s Tip for Crochet Beginners

I’m going to unpack that “outdated advice” part in the tip pictured above.

For reasons I still haven’t figured out, misconceptions and outright errors (“alternative facts”?) about slip stitches are still repeated uncritically in English-language crochet books.

This has been going on for decades. Think about how it affects whole generations of crocheters. It’s the only reason it took me 30 years to try crocheting a whole swatch of just slip stitches. I was immediately smitten. My first slip stitch design was the 2004 Pullover Shrug (the cropped purple top I’m wearing in the tip above).

I have distilled every fake fact about slip stitches into the following four sentences, below. I begin my Slip Stitch Crochet 101 classes with them so that we can deal with them head on.

Can you spot all the unhelpful advice?

  1. There is one kind of slip stitch and you crochet it tightly.
  2. It is useful only occasionally, for a few things, such as joining a round, closing a picot, or seaming.
  3. Don’t bother trying to make anything with it, it has no height.
  4. It doesn’t really count as a stitch at all; it’s a nonstitch

(I underlined the fake facts to help you.) This false information discourages crochet beginners and all crocheters from exploring only slip stitches, not other basic stitches. Why? It’s not because slip stitches are tricky for beginners. It’s the most basic crochet stitch of all, along with the chain stitch! In my classes, the experienced crocheters struggle more—but that’s just due to the years of misinformation.

The more I explore slip stitch crocheting, the more insight I get into all crochet. This is why I want every crocheter to know about it. (The things you can make are also awesome.)

New Rules About Slip Stitches

1. Think of slip stitches as a group of stitches.

Lattice textured border of a 100% slip stitch crochet mobius "Bosnian" style (in rounds with no turning).
“Bosnian” crochet: slip stitches crocheted in the round with no turning.

Slip Stitch Crochet is actually a whole technique. When you know this, you can retain what you learn about them easier. It also spurs innovation, and aids pattern writing. I use the abbreviation SSC, as do others in the international SSC community.

Slip stitches look, feel, and behave very differently when crocheted with turning or without (“Bosnian”), and in just the front or back loop or both (or between stitches!). Invert them or twist their loops for more slip stitch types.

2. Go up at least two crochet hook sizes to crochet them loosely. 

Big-hook slip stitch is especially fun! Start with your bounciest wool yarns. 

3. Slip stitches are exceedingly versatile, useful, and pleasing for many of the things crocheters make.

In fact, slip stitches are often preferable to other stitches, such as for ribbing, or for a thin, supple fabric that conserves yarn.

A slip stitch may also be fine for joining a round, closing a picot, or seaming, but not always. For example, slipping a loop through to join is more invisible than a slip stitch. A single crochet sometimes closes a picot better with some yarns or for certain patterns. For seaming, sometimes alternating a slip stitch or single crochet with a chain-1 is better. (I also like to use inverted slip stitches for seams.)

4. Slip stitches clearly have height.

How odd that it needs to be stated. The simple evidence is the heaps of very wearable scarves and sweaters. You should see the overflowing table of them that I bring to classes!

Not only does a slip stitch have height, the height varies depending on the type of slip stitch. As a starting point, expect front-loop types to be taller than back-loop types. (This is the case for single crochet too.) 

Yes, you can even crochet around the post of a slip stitch.

Please Don’t Wait Like I Did.

I learned about crocheting slip stitch projects decades after learning how to crochet everything else. There’s no reason for crochet beginners to wait decades like I did!

Posted on 1 Comment

Star Stitch Crochet Scarf with Love Knots

Close up of Lovelace Ring Scarf: bands of love knot mesh alternate with star stitch bands.

Love Knot+Star Stitch Scarf: New Pattern!

A star stitch crochet scarf with love knots? (About as common as a love knot scarf with star stitches.) So beautiful together! I’m calling it Lovelace Ring Scarf.

UPDATE: Lovelace pattern is now in the Designingvashti Shop and Ravelry.

Why Star Stitches With Love Knots? The Story.

I first swatched it in 2014 for CGOA classes I would be teaching: A Star Stitch for Every Purpose (3 hours) and 21st Century Love Knot Adventures (3 hours). Back then I had to set it aside due to stitch compatibility issues. You might be able to see some of this in this first swatch.

Two years later a visitor to the DesigningVashti Facebook page requested the pattern. Again in deep crochet class prep mode, I had to put it off until after teaching and a series of seven crochet tutorials I’d agreed to do for the Cut Out & Keep site.

Double-stranded Lovelace swatch: sport weight Lotus and lace weight glittery mohair.
Alternate yarn idea: Love knots and star stitches both benefit when crocheted with two yarn strands held together. This is Satin Grey Lotus yarn with a lace weight metallic mohair.

By then the US election had just taken place. I appreciated the sweet, loving patterns crochet and knit designers were spontaneously posting. I returned to the 2014 attempts to blend stars and love knots in one pattern. It was a pleasure to finally polish it up into a fun, versatile, balanced stitch pattern. I hoped the idea of harmonizing and unifying two popular stitches of very different traditions might lift others’ spirits.

The basic stitch pattern is available here. I used it to make a 6.5″ square block with DK weight yarn and a G7/4.5 mm hook. A border would probably turn it into a 7″ block.

The Lovelace Ring Scarf design happened next because I needed a self-edging version. It came to me during Thanksgiving. As I lay there contemplating the stitch pattern I’d sent off to Cut Out & Keep, I wondered about giving the basic stitch pattern a selvage (no need to edge it later).

The start and end of the love knot section always looked a bit stringy and unstable to me. I also wanted to vary the texture bands and widen it for a lush, romantic ring scarf.

This is how Lovelace came to be.

Is a Love-Knot-to-Star-Stitch Scarf…Challenging?

Both are Intermediate-level crochet stitches but that doesn’t mean they’re difficult. I include tips and visual aids in the pattern that have worked in my classes. Most of Lovelace is rows of easy, familiar stitches like single and half double crochets (sc and hdc, or as they say in the UK: dc and htr).

These easy stitches are a backdrop to the fancy stitches. Like peacekeeping diplomats they harmonize relations between the two iconic, culturally powerful, individualistic “diva” stitches.

My experience of crocheting star stitches (stars) and love knots (LK) in the same pattern is that I get some comfort zone rows of simple stitches, then a spicy row or two, then more comfort zone.

Dramatic Differences Between Stars & Love Knots

I researched both of these two unique stitches deeply. I don’t recall ever seeing them combined in one stitch pattern. If you have, please let me know in the comments.

Love knots are reversible, star stitches are not. It was an issue with my early swatches.

Love knots are more independent than the usual crochet stitch, and star stitches are the other extreme. This shows in lots of ways. Add Love Knots anywhere like a chain stitch because it’s a type of foundation stitch. Each LK is distinct, complete, and recognizable from a distance.

Star stitches require context. The stitch just before it, after it, and often above it determine how recognizable each star is! 

Love knots likely originated as a southern lace, star stitches as a northern thermal fabric. LK were almost always crocheted in very fine cotton and silk threads for delicate and summery edgings, baby bonnets, and petite “opera bags”.

Stars have been used most often for making thick, dense coats and blankets in wool. Even when early stars looked like fine spidery lace, wool was the fiber of choice. (That’s why my unofficial name for the original swatch is “North and South stitch pattern“.)

Interesting Similarities Between Them

  • Both LK and stars are romantic, iconic, classic/old-fashioned, popular, and beloved.
  • Both originated in the early to mid-1800’s.
  • Both have long been favored for baby things. (Stars: baby blankets and coats; LK: sacques, bonnets, layette edgings.)
  • Both can be lacy. When star stitches are lacy, you’re looking at pulled loops, just like with LK.
  • Both start the same odd, non-intuitive way. I did a newsletter issue on it: “Starting a Stitch with a Backtrack“.
  • Crocheting them with two or more strands of yarn held together enhances their distinctive textures.

Hmm. Double or triple the width of Lovelace to make a stunning shrug or wrap!