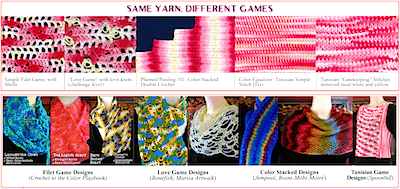
Pictured is a type of photo gallery that I’ve started including in my crochet class handouts. This one is for the Stitch Games class. View it full size. It shows a few different stitch games across the top. In the row below are finished designs that are based on one of those game types.
(I’m still tweaking the handout. This gallery may change by July 13.)
Pattern Galleries are Like 2-D Trunk Shows
Crochet class pattern galleries have turned out to be very useful over the years. I bring an overabundance of crocheted examples for what we cover in class. It’s like a whole trunk show per topic! Anyone is welcome to examine them and try things on. As you can imagine, I’m often asked what the name of a design is, or whether the pattern for an item is downloadable. It’s just easier if I label thumbnail photos of them in the handout.
I first did this in 2012 with the 21st Century Love Knots handout. It helped immensely. When I pass around items, someone will ask, “Is the information for this one in the handout?” and it’s wonderful to be able to say “Yes, in the gallery on p. 3.”
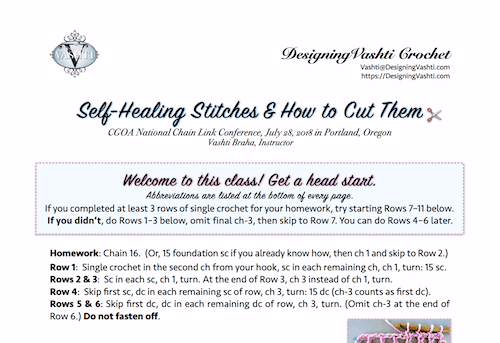
Updated in 2018. Above is a 2018 example of something I mentioned trying in 2016, below. Now most of my crochet class handouts begin with “Welcome to this class! Get a head start.” (Is image missing? View it here.)
It Happened This Morning.
When a crochet class handout “clicks” it’s like getting a crystal-clear vision of how the class will begin and then smoothly unfold for its 3 hours. It becomes a map for the teacher too, and then I can relax.
The feeling is so distinct that I tell my husband each time, “The _ class handout clicked into place!”
I’d forgotten about the phenomenon until it happened today with The Starwirbel Wayclass, so I’ll blog it here for my future self. I wonder if other teachers experience something similar.
[Hi 2016-Vashti. It’s 2018-Vashti, and yes, it happened with the Tunisian on the Diagonal handout.]
Crochet Class Handouts: Many Requirements!
This year (2016) I’m adding a few initial sentences that describe how to get a head start while waiting for the class to begin. [See a 2018 example above.] People come to crochet classes with a dramatic range of skill levels; some like to explore the topic independently, and some like to arrive early.
Many people also bring a range of different yarns, and need to try a few before they can settle in with one. Most people need to warm up with a row or two of a familiar stitch.
[2018-Vashti is really glad you started doing this. It’s been working out great.]
Some illustrations need to be shown reversed for those who are crocheting left-handed. Starting in 2018 I print a separate sheet, usually a half-sheet, of the reversed images. I’ve added a fresh example of one on my Classes page.
Ideally the handout makes a great first impression in that first five minutes of the class! Generous margins and small blocks of text help, and the font shouldn’t be too small.
It’s an Assistant Teacher.
A crochet class handout is an extension of the teacher. It stays with every student while I’m helping someone else on the other side of the room. If someone were to ask a question that requires a demo, and two or three other people say they wonder the same thing, I love when I can answer, “Look at the photo on page 2 of your handout, and try it out while I come around to each of you individually.” So a big priority is for a handout to help me while I’m helping other students.
Like some images, certain kinds of text are best in a handout. Row-by-row instructions for a practice swatch, for example. Also good is a list that summarizes and distills many details. This morning I created a sidebar of all the ways to make star stitches starrier, and bolded the ones used for Starwirbel.
Sometimes a class topic is a series of specific skills that build on each other in a specific order. Checkpoints after each skill are great. They sum up what makes the step important. I love when I can also include a panel of “You Know How to Make This Now” designs! The little thumbnails are a visual reference for all the examples I show in class.
Any hands-on activity needs some side-by-side demonstrating. This is especially the case with crochet because of how 3D-spatial it is: we’re constantly rotating hooks, turning rows, and going in rounds, while adding big lacy holes at times which add more fields of vision! Each bit of key information in a crochet class usually needs to be shown different ways.
This is why people travel to take crochet classes in person. Nothing beats it, not even videos, sometimes. It’s great when a close up photo or diagram in a handout can save time or prevent confusion about a key step. Sometimes demonstrating a key stitching motion in front of the room with a gigantic hook and yarn works great; often it’s best shown up close to just a few people at a time.
Over the years teachers develop a sense for which things can be nailed with a demo, diagram, swatch, or a close up of stitches done in contrasting colors.
Back in January I read a stack of crochet books (and many knitting books) as research for my Stitch Gamesclass topic. I welcome doing this, especially in January after the hectic holidays. It’s so cozy.
I take notes as I read them. Then I set it all aside for a few months until I’m ready to look it all over and start writing the class handout.
It wasn’t necessary that I do this kind of research for the other class topics this year (one never knows how time-consuming it’s going to be!). I went through stacks of crochet books about love knots, star stitches, and Tunisian lace methods in earlier years.
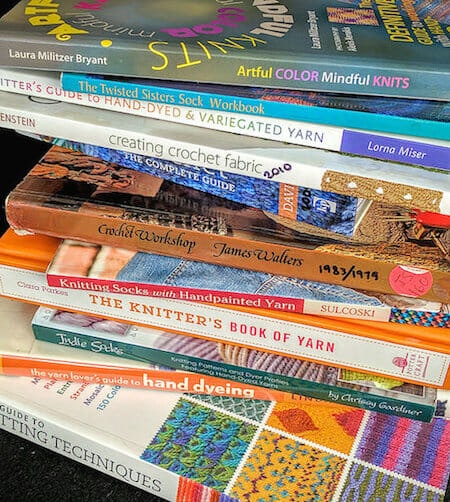
Below is the list of seventeen knit and crochet books that helped me in some way. They’re in alphabetical order by title. I starred the ones that I recommend the most (about stitch games/pooling techniques). The list doesn’t include a few articles and websites I also used.
17 Knit and Crochet Books Read
***Artful Color, Mindful Knits: The Definitive Guide to Working with Hand-dyed Yarn by Laura Militzer Bryant XRX Books 2013 ISBN-13: 978-1933064260
*The Essential Guide to Color Knitting TechniquesMargaret Radcliffe Storey Publishing, LLC 2015 ISBN-13: 978-1612126623
Exploring Color in Knitting: Techniques, Swatches, and Projects to Expand Your Knit HorizonsSarah Hazell, Emma King Barron’s Educational Series 2011 ISBN-13: 978-0764147395
**Hand Dyeing Yarn and Fleece: Custom-Color Your Favorite Fibers with Dip-Dyeing, Hand-Painting, Tie-Dyeing, and Other Creative TechniquesGail Callahan Storey Publishing, LLC 2010 ISBN-13: 978-1603424684
*The Knitter’s Book of Socks: The Yarn Lover’s Ultimate Guide to Creating Socks That Fit Well, Feel Great, and Last a LifetimeClara Parkes Potter Craft 2011 ISBN-13: 978-0307586803
The Knitter’s Book of Yarn: The Ultimate Guide to Choosing, Using, and Enjoying YarnClara Parkes Potter Craft 2007 ISBN-13: 978-0307352163
The Knitter’s Guide to Hand-Dyed and Variegated Yarn: Techniques and Projects for Handpainted and Multicolored YarnLorna Miser Potter Craft 2010 ISBN-13: 978-0823085521
The Knitter’s Life List: To Do, To Know, To Explore, To MakeGwen W. Steege Storey Publishing, LLC 2011 ISBN-13: 978-1603429962
**Knitting Socks with Handpainted YarnCarol Sulcoski Interweave 2009 ISBN-13: 978-1596680982
The Twisted Sisters Sock WorkbookLynne Vogel Interweave 2002 ISBN-13: 978-1931499163
Wrapped in Color: 30 Shawls to Knit in Koigu Handpainted Yarns by Koigu Wool Designs Sixth&Spring Books 2015 ISBN-13: 978-1936096848
The Yarn Lover’s Guide to Hand Dyeing: Beautiful Color and Simple KnitsLinda LaBelle Potter Craft 2007 ISBN-13: 978-0307352538
I abbreviate it Fstar in keeping with how other crochet foundation stitches tend to be abbreviated in patterns.
Starwirbel could be started with the foundation star, but it’s not part of pattern or the class description, so it’s an extra feature. (I’ll be happy to demonstrate how to do it in class if anyone asks.)
2018 Update! The Starwirbel pattern now includes the Foundation Star and a stitch diagram.
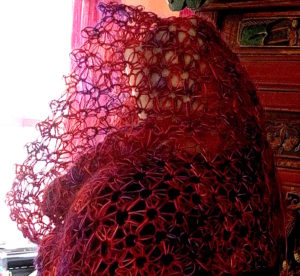
My other wish was to try a new yarn or two for the design. Schulana Kid-Paillettes is the stunning yarn I used a few years ago for Starwirbel. I found no close substitutes for it back then. I’m excited about the one shown here: Alchemy Yarns’ Tweedy. The way it’s hand dyed gives this foundation star stitch a fiery look! One of the strands that shows up well in the photo is silk raffia. The play of light is unique.
2017 Update! The Alchemy Yarn grew up to become Firewirbel.
I also found another special yarn that I’m waiting to swatch: Mohair Luxe Paillettes by Lang.
These are just wishes–not critical requirements to be ready to teach this topic, but crossing these off the wish list makes me happy. And now I’m off to tell my friend Marty Miller, goddess of foundation stitches!
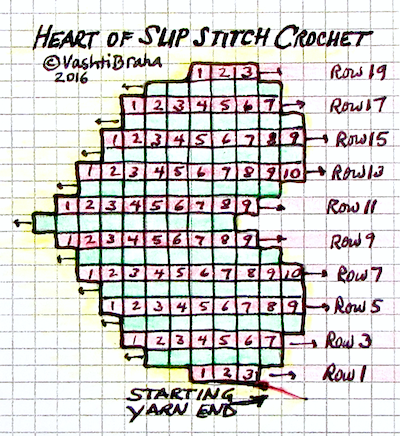
This blog post is an overflow page for issue #76 of my crochet newsletter. Scroll down to see the heart shape chart, and then the full text of the Slip Stitch Crochet Hearts Free Pattern. To print, click on the little printer icon at the end of this post.
We Need to Talk: Slip Stitch Skill Levels
I rate this pattern Intermediate for slip stitch crocheters, and Advanced if you’re new to Slip Stitch Crochet. A good free crochet pattern for slip stitch beginners would be Eva’s Ribs Scarf. After that, Slip Tectonics or Undaria would bring novices solidly up to speed for these hearts.
Seriously.
These crochet hearts were originally used for a three-hour intermediate-level class on slip stitch shaping methods. “Slip Stitch Crochet 101” class was a prerequisite. After crocheting this heart, students would be equipped to crochet fitted sleeve caps and gracefully shaped armholes!
You’ll be adding or subtracting only a stitch or two to make this heart. Not a big deal if you’ve ever increased and decreased with single crochets. It takes practice, though, to shape every row of slip stitches.
Consider that even if you’ve already completed some slip stitch projects, most existing slip stitch crochet patterns involve only occasional shaping, if any. (If you’ve crocheted a slip stitch pattern with a significant amount of shaping, please tell me about it in the comments.)
For a slip stitch beginner, the biggest challenge is recognizing what the stitches are doing to avoid increasing or decreasing by accident. It’s like learning to crochet all over again—and that’s humbling if you don’t expect it, but what a beautiful thing! How many of us long-time crocheters remember what it was like to learn how to crochet for the first time? If you’ve crocheted for at least ten years already, you can revisit this life changing moment.
Challenge Accepted? Great!
Welcome to the “heart” of slip stitch country. Start with a thick smooth yarn and a big hook.
Cross off each row when you complete it to easily keep track of where you are. (I have to. For these crochet hearts it’s easier to count stitches, not rows.) For pattern help, visit my fabulous forum.
This heart shape is crocheted from side to side. Use any yarn. Image missing? See this album.
Chain 4.
Row 1: Skip ch nearest your hook, ss in any loop of each remaining ch, turn: 3 ss. Easy, right?
Notice that every odd-numbered row ends at the top of the heart and every even-numbered row ends at the bottom of it. The yarn end (called “tail” from now on) is at the top of the heart, so when you crochet toward the tail end, you must be on an odd-numbered row.
Row 2: Ch 2, ss in 2nd ch from your hook (an increase of one st), Fss in first ss, 2 Fss in each of next 2 ss, turn: 6 ss.
No row will ever have more than 10 sts in it. If you have trouble seeing which loops to crochet into:
It will get easier after 3 rows or so. You won’t see the heart shape develop until you’re halfway there (Row 9).
The st count matters more than choosing the correct loop. Count as you crochet and add a st in a good enough loop if need be. The most common problem for slip stitchers is identifying which st is the last one of the row. Counting as you go helps and you won’t need to use a stitch marker.
I don’t count my rows. As I complete each row I put a check mark next to it on the pattern. I also rely heavily on the yarn tail to know whether I’m crocheting a row toward the tail or away from it.
Row 3: Ch 2, ss in 2nd ch from your hook, Fss in each ss, turn: 7 ss.
Rows 4 & 5: Repeat Row 3. At the end of Row 5 you’ll have 9 ss.
Row 6: Ch 1, Fss in each ss, turn: 9 ss.
Row 7: Repeat Row 3: 10 ss.
Row 8: Ch 1, skip first ss (a decrease of one st), Fss in each remaining ss, turn: 9 ss.
Row 9: Ch 2, ss in 2nd ch from your hook, Fss in each ss to last st, turn leaving last st unworked: 9 ss.
Row 10: Ch 1, skip first ss, Fss in each ss to last st, 2 ss in last st, turn: 9 ss.
Row 11: Repeat Row 10: 9 ss.
Row 12: Repeat Row 9: 9 ss.
Row 13:Ch 1, Fss in each ss to last st, 2 ss in last st, turn: 10 ss.
Row 14:Ch 1, Fss in each ss to last st, turn leaving last st unworked: 9 ss.
Row 15:Repeat Row 6: 9 ss.
Row 16-18: Repeat Row 14. At the end of Row 18 you’ll have 6 ss.
Row 19: Ch 1, skip first ss, Fss in next ss, [skip next ss, Fss in next ss] twice, turn: 3 ss.
This is how it looks after a quick blocking, and before edging it with a round of slip stitches. (If image is missing, see this album.)
Round 1 (add a border of ss): Fss in each ss of Row 19, ss in one loop at the end of each row to bottom point of heart, [ss, ch 1, ss] in it, continue edging row ends to first row, ss in each of the 3 foundation chs, ss in remaining row ends, join to start of round with a ss.
Note: Edging these crochet hearts is not as laborious as it might seem. Even though it’s not easy to identify the same loop of each each row end, this needn’t slow you down. I mostly just estimate where to put my next stitch, and it comes out fine.
Finishing: Fasten off, or add another round of ss, or reverse sc. Be sure to damp block: stretch all edges in every direction then let it settle into a smooth, symmetrical-enough heart shape and let dry. Make another like the first so that you can seam them together with a ss seam, add a bit of stuffing and hide the ends.
Experiment Freely with this Free Heart Chart
The grid rows of the chart match Fss stitch height, but why impose limits on your heart? Try using single crochets instead; the heart shape may widen or narrow a bit. Or, try back-loop slip stitches (Bss) after you’ve made a few crochet hearts in all front-loop slip stitches (Fss). (The back loops of slip stitches are trickier to find than front loops for some folks at first.)
I hope you’ll show us your crochet hearts in my forum.
Site-wide Search
Vashti’s Crochet Shop
Get the Newsletter
Sign up to receive Vashti’s Crochet Inspirations Newsletter in your inbox monthly.