Posted on 2 Comments

Crochet Star Stitch How-To

This post is being revised and updated. Please check back.

A Guide to Star Stitches in Patterns

All right. Here’s the thing: star stitches are beautiful, and also tricky sometimes. This is a solidly intermediate level stitch that requires from 5 to 12 steps to complete, depending on the stitch variation.

Most of us use patterns when crocheting this stitch, so most crocheters will encounter star stitch types that vary a little, or a lot. Toward the end of this post I use colored dots to give you a heads-up on some variations you might encounter.

This is still a “basic” start stitch how-to, though! The stitch variations complicate it, but you need to know about them because we’re all equally likely to encounter a variation any time we use a new star stitch crochet pattern.

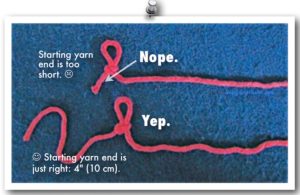
Want to follow along with hook and yarn? With blue (or a dark color) yarn, chain 15, double crochet (dc) in the 4th chain (ch) from your hook and in each remaining ch: 11 dc; 12 dc if you count the 3 chs you skipped. Change to white (or a light color) yarn. Chain 3 and turn.

A star stitch is intricately linked with the stitch before it.
It may look like image #1 skipped some steps, but read the directions above and below.

Basic Star Stitch How-to:

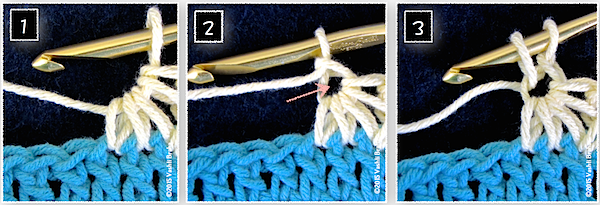
  1. Pull up a loop in the second white ch from your hook, in the top of the first blue dc, and in each of the next two blue dc. Yarn over (yo) and pull through all 5 loops on hook. Your stitches should look like image #1 above.
  2. Ch 1 to form the eyeThis completes one star stitch. The arrow is pointing to the eye of the star.
  3. To begin another star stitch, insert your crochet hook in that eye, yarn over, and pull up a loop.

Really Look At the Loops

In image #4, we see the two loops on the hook from image #3, plus three more loops. One of the loops was pulled up in the same blue dc as the completed star. I marked that with a yellow dot. Notice the two pink dots. Those are the two next blue dc of the row. I’ll come back to these dots later.

Two red dots (image #4) indicate the two next stitches of the row to crochet the new star stitch into. Image #5 identify what the stitch loops become in a completed star vs while a star in progress.
These two images illustrate how to avoid accidentally increasing or decreasing along the row.

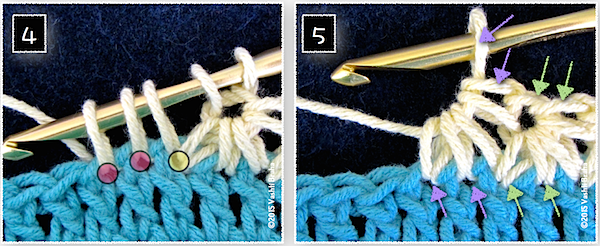
When you yarn over and pull the yarn through all 5 loops on your hook, you get image #5. Here’s what those arrows are all about: The two pairs of green arrows point out that the base of that completed star take up two blue dc; the top of that star counts as two stitches (the eye and what is called its top in most patterns). Each star counts as a two-stitch group.

The two lower purple arrows point out the same thing about this new star-in-progress: the base of it takes up only two new blue dc of the row.

The purple arrow pointing to the loop on the hook will become the star’s eye the minute we chain 1 to complete the star.

Common “Side of Star” Option

The side loops of the star are shown with an orange dot in image #6. Image #7 shows what it looks like when you pull up a loop in the side. Colored dots also indicated other places to pull up loops.
Pay attention to just the ORANGE dot for now.

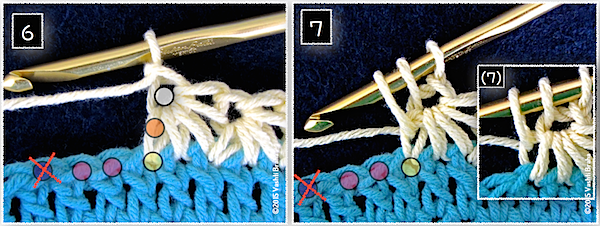
Image #6: More colored dots! The orange dot indicates the side of the star. The side of the star has a front loop and a back loop. In many star stitch patterns, you pull up a loop in the side of the star. Sometimes it doesn’t matter which loop, other times the front or the back loop is specified.

In image #7 you can see that a loop has been pulled up in the side of the star. In the smaller inset (7), the loop was pulled up in only the back loop of the side.

Loop Priorities

The two most important places to pull up loops while making star stitches are:

  • the eye (the white dot in image #6), and
  • one of the two new stitches of the row (the pink dot that’s furthest from the star).

All of the other loops you pull up between these two places are flexible and variable, meaning you can omit pulling up a loop in one, or opt to add a loop in one. You needn’t have five loops on your hook before completing a star stitch; for example, you can ignore the place indicated with the yellow dot, or the orange dot in image #6. Or include both.

You’ll likely develop a favorite way to make your star stitches. Most likely you can substitute the star you want in a pattern you’re using, but of course swatch to make sure. (Occasionally the stitch or row gauge will change slightly.)

It’s like picots: most experienced crocheters have their own favorite way to make a picot and freely use their own where they wish.

The blue dot with the red X signals an error (image #6 & 7). If you pull up a loop past the two pink dots, you’ll start decreasing. Your star will take up 3 stitches of the row, but still only give back only 2 stitches in its top loops. Does that make sense? And that is what my newsletter issue #73 is about.

(Note: There’s a star stitch out there that does take up 3 stitches of a row instead of 2. The stitch count is adjusted in the next row.)

Want more Star Stitches?

I’ve written four newsletters about star stitches over the years: Star Stitch Lace Pretties, Star Stitch the Tunisian ConnectionShaping Star Stitches, Foundation Star Stitch. Although I’ve created star stitch step outs for patterns and for classes, I thought I’d already blogged one for star stitches—like I have for Love Knots, basics of Foundation Stitches, and “camel crochet” (third loop of single crochet).

I hope this star stitch how-to comes in handy.

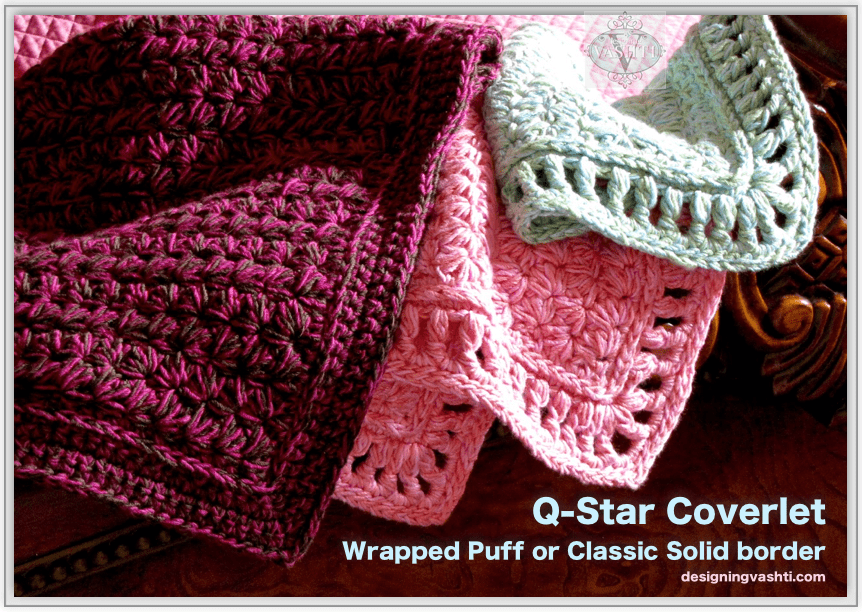
Star Stitch Patterns by Vashti Braha: Starlooper Mobius, Starpath Scarf, Q-Star Coverlet, and Starwirbel.

Q-Star Coverlet

Note: The old URL for this design was www.shop.designingvashti.com/q-star-coverlet-reversible-star-stitches-24l-h5415.htm. The permanent URL for it is now https://www.designingvashti.com/product/q-star-coverlet-star-stitch/.

Q-Star Coverlet is a lavish, reversible star stitch pattern that results in a beautifully durable and warm blanket—just like a real quilt. (The “Q” is for “quilted.”) Pattern includes photo tutorials and 2 reversible borders: wrapped puff eyelets, or simple solid single crochet.

I developed the Q-star stitch to combine special features of other star stitches, and to eliminate biasing. I built in a nice selvage stitch for a stable edge. A surprise Q-uality of Q-stars is that they’re fully reversible!

Skill Level: Intermediate

This pattern is written with a minimal amount of abbreviations. UK and Australian equivalents for American measurements, yarn weights, and stitch terms are in brackets { }.

After using this pattern you will know (if you didn’t already):

  • How to crochet an eleven-loop star stitch (22 loops if double-stranded).
  • How to understand and use reversible star stitches.
  • How crocheting with two different colors held together affects star stitches.
  • How to end each row with a selvage stitch for perfectly straight, neat, stabilized edges.
  • How to do a fully reversible surface slip stitch trim.

Finished Dimensions

Include a 1.5”-wide {3.8 cm} border. It’s easy to change the finished size by increasing or decreasing stitches and rows (guidelines provided in the pattern).

  • Baby Stroller & Crib Blanket: 30” x 35” {76.2 cm by 88.9 cm}
  • Lapghan: 38” x 45” {96.5 cm x 114.3 cm}
  • Throw: 45″ x 56″ {114.3 cm x 142.2 cm}
  • Twin Bed & Day Bed: 50″ x 72″ {127.0 cm x 182.9 cm}

Supplies Needed

Crochet Hook: I/9/5.5mm or size required for gauge.

Yarn used for the two-colored blankets: Two strands of different colors were held together throughout of DesigningVashti.com Lotus (52% Cotton, 48% Rayon; 256yd/234m per 3.5oz/100g skein). Color pairings shown: Pink Sugar and Peachy Sheen; Crystal Blue and Bamboo Green; Grenadine and Dark Roast. Two Lotus cones of each color would be enough to make the Lapghan size; add a third cone of each color to make the Throw size. For a baby blanket, use just one strand.

Notes about this yarn and substituting: Star stitches are so beautiful in this yarn that I originally planned to make a fancy jacket! As a coverlet it has a sleek, supple, heavy luster. Using two strands of similar colors, such as pink and peach, gives the stars a rich dimensional look. Choose a #2 Fine Weight yarn in one or two colors (a.k.a. Sport, Heavy Sock, Light DK, 5-Ply). You’ll be crocheting with two strands of it held together. Or use one strand of a yarn in the “#4 Medium Weight yarn” category (worsted, afghan, aran weight).

Yarn used for light grey blanket: One strand of Red Heart Fiesta (73% acrylic, 27% nylon, 316yds/289m per 6oz/170g skein. Color #6341 “Millenium”: 6 skeins for a Lapghan, 9 skeins for the Throw, and 12 skeins for the Twin/Day Bed size.

5 stitch markers, optional (4 to mark each corner stitch and a contrasting 5th one to mark the join while completing the border).

Posted on 1 Comment

Pros & Cons of the Starting Slip Knot

In the previous post I listed five decisions we’ve already made by the time we’ve made a starting slip knot in the yarn, and six options we have for doing more with the starting yarn end. Below I compare the advantages and disadvantages of different slip knots.

If you’re new to crochet, stick with the basic slip knot for now, and read on for future reference.

Starting slip knots: reinforced with a twist; three-loop; fancy "jury mast knot".
Reinforced with a twist (two leftmost photos). Three-loop slip knot (upper right). Fancy “jury mast knot” (lower right).

A Creative Start

Crochet happens when a loop can be pulled through another loop. So much creative freedom in this!—including the very first step we take when starting a new crochet project. With options come new advantages.

Basic Slip Knot: Advantages

The role of the traditional beginner’s slip knot is to be:

  1. Invisible (ideally completely).
  2. Strong.
  3. Permanent (when made the right way).
  4. Simple and quick to make, remember, adjust, and use to start crocheting the first stitch.
  5. The slip loop blends in as a stitch: it forms the top two loops of the first chain stitch.

✅The beginner’s slip knot is a great choice for #1 through #5, with a few minor exceptions.

(Slight) Disadvantages

The basic slip knot is not truly invisible.

It’s usually invisible enough, but occasionally not in certain yarns and project types. The thicker the yarn, the bigger the knot when you start crocheting. A knot in the center of a motif, flower shape, or nose of a stuffed animal can make it more noticeable.

It’s not particularly pretty.

The basic slip knot adds no beauty or polish when it’s noticeable. For me it’s because it lacks symmetry. The yarn end doesn’t hang straight and centered from it. The knot itself is a bit lumpy (sort of like a tiny fist). It looks like what it is: a simple, common, serviceable knot.

It can loosen and unravel (due to user error).

©2013 Reyna Lorele: Granny square blanket with just the center unraveled.
©2013 Reyna Lorele. Only the center of this granny square unraveled.

If the starting yarn end is clipped too short and/or the yarn is slippery, watch out. The knot could loosen and even unravel in certain projects (see example at right).

⚠️Beginners: this is why I go into detail about the starting yarn end and how to make the basic slip knot the best way.

Ever seen an old lace or granny square afghan with only the centers unraveled? It’s sad how common this is and how easily it could have been prevented.

Alternatives: Advantages

Given that…crochet is great for everything from delicate lace dresses to sturdy beach totes and slipper soles; from super strong pet leashes to artistic jewelry; from weightless shawls to heavy coats and afghans, and still more! —

And…that many crochet projects are actually “started” over and over, like granny square afghans (each granny square starts in its center), Irish crochet lace (separate shapes are assembled later), and intarsia (patterns of colors with varying lengths of yarn), —

Doesn’t it make sense that some crochet projects could benefit from specialized ways of starting them? 

6. Pretty.

A clearly visible starting slip knot could be intentionally decorative. Imagine one that looks symmetrical and has a charming, fancy, or fascinating texture. It could also be functional. A dense and bulky one would serve as a stopper for a large-holed bead. (I’ve often needed a good knot for this purpose!) It could also add weight to the ends of fringe for a nicer drape. See my Buff Slip Knot.

7. Temporary.

Some crocheters and knitters have a blanket “no knots” policy. Temporary knots are easy. Just make your basic slip knot really loose so that you can undo it later. Or, crochet right into it as if it’s a foundation chain. This way, the knot makes it easy to start crocheting, but you’re not stuck with it permanently.

8. More than one starting loop.

I keep discovering more uses for starting with more than one loop. Make a simple slip knot variation that produces two (or more) starting loops, then start crocheting with one of them. The remaining starting loop(s) can be used as a button loop or hanging loop for your finished project.

9. Reinforced strength.

Add a twist or an extra wrap while making the basic slip knot reinforces its strength and security. I need this reinforcement when using extra slippery or wiry yarns and threads. See some in the first picture above.

10. Change the angle of the yarn ends.

Simple crochet jewelry with chain stitches, starting slip knots, and simple fastening off knots. Lotus yarn, four colors.
Yarn ends hang bent from basic starting slip knots.

“Change the angle of the yarn ends” may sound odd, but for me it’s a new way of looking at starting knots. When my yarn end is visible as fringe, sometimes it’s noticeable to me that it doesn’t hang straight. This is because our basic slip knot causes the yarn end to hang at an angle. I’m currently looking for starting knots that cause the starting yarn end to hang differently. I like the Buff Slip Knot so far.

11. Attach to something with a starting loop.

I’ve needed a way to start crocheting while also neatly, elegantly attaching it to something when I’ve made: watchbands, a belt with a buckle, and certain pendants for necklaces. I’m currently looking for new favorite starting knots in this category.

A Note about Knots

Remember I mentioned that some crocheters and knitters have a NO KNOTS policy? Perhaps some of them mean tight knots. A tight knot can weaken the yarn over time. It’s also unsightly, intruding on a buttery, spongey look and hand.

I almost always use knots when I start crocheting, but I don’t pull them into tight hard lumps. I rely on reinforcement from a long woven-in yarn end more than on a knot if I can. It depends on each project. I’m especially careful in areas that will have to sustain strain and weight. That would be the shoulders of a sweater, the motif centers and seams of a blanket, the toes and heels of socks, a bag bottom and its handle attachments, and so on.

Updated November 2018. It’s part of an experimental blog post series: Vashti’s How to Crochet Book. Next post: .
Posted on 1 Comment

Starting End of Yarn: No Small Thing!

Which starting yarn end is the ball end or feed line? labeled diagram.
Some folks call the short end the “yarn tail” and the other end the “supply end” or “the yarn coming from the ball”. View full size.

More to It Than it Seems

Crochet beginners need to know how to leave a long enough one (see #2 below) when they making their basic slip knot. Of course the other thing to know is which end to start crocheting with, and if beginner chooses the shorter end they figure it out soon enough!

Very little is usually written or said about the starting yarn end. What else is there to know? The starting yarn end comes with built in decisions—decisions we non-beginners may not realize we’re making. I’ve listed five below. If you’re a new crocheter, just read through them for now.

In addition, we could be putting the starting yarn end to work for us. I’ve listed six ways at the end of this post. That humble starting yarn end may be the most underestimated part of a crochet project!

New to Using Yarn?

If you’re new to using yarn as well as new to crocheting, keep the yarn simple for now: use a 36″ or so {91 cm} piece (I mentioned it previously). A shorter yarn length like this avoids unnecessary yarn-based issues, like whether the yarn is in a hank or other difficult-to-use form, or how to even find the yarn end when it’s tucked away well.

This will also make it easy for you to keep both ends of the yarn in sight at all times. The first end we use is the starting end (or occasionally a yarn tail), and the other end is called the longer endball end (because it leads to the rest of the yarn), feed line (feeding from the ball), working endsupply end.

Five Hidden Decisions

We make five decisions (maybe more) with the starting yarn end every time. They’re hidden because most of them are made automatically, or are not seen as having options.

1. Which End?

Every ball of yarn has two ends. Depending on how it’s wound, you may have easy access to both: one wound around the outside of the ball, the other coming from its center. (See example in the upper photo). The end in the center can be surprisingly hard to find! When you do it will be wrinkled. The outer end is smoother and easier to find.

The first decision we make is which end we choose as our starting yarn end. Sometimes it matters (that’s for a future post); often it doesn’t. The center end is my first choice because the ball won’t roll around as I pull more yarn from it.

2. How Close to the End?

The next decision is how close to this end we make the starting slip knot. In other words, how long should the starting end of yarn be for a crochet project?

A starting yarn end that is too short vs. just right.
Making the slip knot too close to the yarn end results in a yarn tail (starting end) shorter than at least 4 in (10 cm). Full size.

The standard guideline is 4″/10 cm long. Why? It’s just long enough to be threaded onto a yarn needle later and woven in (sewn securely into nearby stitches so that it stays invisible). It’s not too long to waste yarn or get in your way.

A common exception to the default 4″-long starting end of yarn is 6“/15 cm long, for example when the yarn is especially slippery. Some yarns need more weaving in to stay put.

⚠️Never snip the yarn end close to the knot unless you’re specifically, rarely, directed to in a pattern for a certain effect, such as for stubby fringe. It otherwise looks poorly finished. Worse, it could loosen and cause seams or other stitches to unravel.

3. Which Kind of Slip Knot?

Most crocheters always use one of two types they learned as a beginner, so this counts as a hidden decision. Knot tyers know several more, and some offer extra features. More experienced crocheters avoid the knot part and just wrap a loop around the hook for their starting loop. (A chain stitch is self-knotting at its base, so a starting knot is optional.)

4. Adding Beads?

If you wish to have beads strung on your yarn so that you can slide them up and into stitches as you crochet them, string them onto the yarn before you make that slip knot. You could cut the yarn later to string beads on, but the knot you’d add would be pretty inconvenient with beads. (There are alternate ways to add beads, which is for another post.)

5. Assign a Special Task?

Give the starting yarn end some odd jobs to do. A few of these tasks below count as beginner-level, especially the first two. Some may take a bit of planning ahead, so once you make that slip knot, you’ve essentially made a decision against certain special tasks.

Special Tasks

The starting end is already securely attached, so you can use it to hold extra yarn in reserve for later. If you had to attach a new piece of yarn later for the same tasks, you’d have three yarn ends to weave in instead of just one. Keep this list in mind and you won’t underestimate the starting end of yarn as your skills grow.

⚠️When a starting end of yarn is very long, beginners are especially at risk of confusing the ends. Make sure you don’t crochet with the starting end instead of the ball end.

1. Sew/String on Buttons and Beads

A moderately long starting yarn end (12″ to 24″/30–61 cm) is helpful in case I might wish to:

  • Sew on a button.
  • String on a big accent bead.
  • Create beaded chain fringe. (I’d still be attaching more yarn if I decide to add a fringe edging, but at least I wouldn’t have to weave in the starting end of yarn that’s too short.)

I’ve often used the starting end of yarn for the first two tasks for crochet jewelry. By now I reflexively leave a longer end when I swatch a new jewelry idea just in case I need it; also see #3 below.

2. Seaming

For some projects, a much longer starting end of yarn can be reserved for seaming later. It’s the best yarn for this because it’s already attached, and I often prefer a crocheted seam. I don’t always know how much yarn I’ll need for the seam; my general guideline is to multiply the length of the seam by 3 or 4 for a slip stitch seam and longer for a single crochet seam.

For this option, and for the next one, it helps to wind the starting end of yarn onto a bobbin or scrap piece of cardboard.

3. New Jewelry Clasp

Sometimes when designing new crochet jewelry I’ll use a long starting end of yarn to crochet a clasp  later. At least 36″/91 cm long gives me options for adding a range of jewelry clasps without having to attach a separate length of yarn.

4. Both Ends Together

You might start off crocheting a long starting yarn end together with the ball end. I’ve done this when starting at the center of a rectangular or oval shape so that the foundation chains are more substantial, since I’ll be crocheting Round 1 into both sides of the chains. In other words, I’m crocheting the foundation double-stranded—with two strands held together—but I didn’t need to add a separate length of yarn (with two more ends to weave in later!) to do so.

5. Add a Simple Finished Edge

For small projects and simple edgings, you don’t need a crazy-long starting yarn end. An edge of slip stitches and chains or of single crochets would require roughly the same amount of yarn as a crocheted seam (see #2).

I’ve done this most often with coffee cozies. With the starting end of yarn I slip stitch around the bottom rim to firm it up. It also looks nice.

6. Improve a Join or Add a Few Stitches Later

Rosepuff crochet videos by Vashti.
Rose and lavender shawl points were completed later with fancy beaded picots, thanks to the reserve yarn of their long starting ends.

Sometimes a beginning is prettier when you save it for the end! For newer crocheters, this means you don’t have to sweat what your first round of stitches looks like, especially if it’s a spiraling round. Maybe it looks stringy, uneven, or lumpy. You can use your starting end and a yarn needle to smooth the area with a few darning stitches where you joined your round. Or, slip stitch a new edge with a crochet hook (see #5). It may help to unravel the starting knot first.

A more advanced example is when I start a shawl in one corner and it has a fancy built-in edging. I can get its edge to look like the other corners if I come back to it and crochet its first few stitches last. It’s a low-stress option that also makes the pattern easier to write and to follow.

There are probably many more handy uses for a long starting yarn end. Have I left out any special tasks?

One Last Thing

The starting end of yarn determines whether your starting slip knot is fixed and secure, or can be pulled loose enough to allow a seam to unravel! See my earlier post about these two different slip knots. Look closely at the starting yarn ends.

Updated November 2018. It’s part of an experimental blog post series: Vashti’s How to Crochet Book. Next post: More Ways to Start Crocheting.
Posted on Leave a comment

Starting With the Best Slip Knot

How to make the best (most secure) slip knot (leftie view too).
View above image full size.

I knew of only one kind of slip knot when I learned how to crochet at the age of nine. It’s a common, fast, useful, and easy knot. As I recall it was occasionally called a slip loop

The simple slip knot we’re all taught when we first learn how to crochet can be made to be either adjustable (blue one in photo) or secure/locking (the red one). The only difference is which yarn end you use to make it.

Many years passed before I learned about these two versions of the same slip knot. (I discovered other kinds of slip knots a few years after that. More on those at the end of this post.)

It used to be that all of my slip knots were adjustable by accident. Now they are all secure on purpose!

Which Slip Knot Do You Make?

Tug on the short end of the yarn (a.k.a. the cut end or “tail”).

  • If doing this tightens the loop, you made an adjustable slip knot
  • If you have to tug on the long or “ball end” (i.e. where the yarn that is attached to the skein) to tighten the loop, it is a locking slip knot.

The locking type is important because there’s no chance of it loosening and perhaps even unknotting over time under stress. A source of stress could be when the slip knot is part of a purse bottom, at the clasp end of heavy beaded jewelry, or—very commonly—at the center of afghan motifs.

The adjustable version could come in handy when you want to close up a center hole in one of the many methods of crocheting in the round. (Make sure a lot of stress won’t be put on it.)

Here’s how: If you work all stitches of the first round into one chain, you can then pull on the yarn tail to close up the center hole tightly. This is how I was taught to start granny squares in the 1970’s.

Be sure to leave a long enough end (more than four inches/10 cm) for weaving in securely so that it won’t loosen later.

If your adjustable slip knots have never loosened, great! Perhaps you have woven in a nice long yarn end to secure it; or used a non-slippery yarn, or a tight stitch gauge. Maybe your projects have not subjected the slip knots to a lot of stress.

Slip Knot How-To Video

This video demonstration (not mine) shows three ways to make a slip knot. The first two are just different ways to make an adjustable slip knot. Notice how she uses the short yarn end when completing the slip knot, and then tightens the loop around the hook by pulling the short end.

The third slip knot in the same video is the locking slip knot. Notice she uses the ball end (long yarn end) when completing the slip knot.

More Slip Knots?

Knot tyers make several types of slip knots!

Among non-crocheters, our simple slip knot may go by other names, such as Simple Noose KnotOverhand Knot with Draw Loop, and Slipped Overhand (or Thumb) Knot.

Knot tyers have more slip knots that crocheters could use. After all, we really just need a simple loop to start crocheting. When we know more slip knots, we can choose one that offers advantages for the project we’re starting.

You can see some of the ones I tried at right. In another post I explained how to do a few of them and why you might want to.

Updated November 2018. It’s part of an experimental blog post series: Vashti’s How to Crochet Book. Next post: Starting End of Yarn: No Small Thing!