Posted on 5 Comments

All Crochet Hook Sizes in Charts

Crochet Hook Sizing with easy to see size gaps: my size charts (for steel, for medium-range, and for jumbo hooks) include the MISSING sizes.
Download the three charts shown above—with extra columns!—as a free PDF. See below. There was no room for this material in my newsletter issue about crochet hooks. It pairs well with this one: Deluxe Crochet Hook Diagram.


Hey there, New Crocheter?: On the face of it, crochet hook sizes are beginner-level stuff. Question one quirky thing and you can end up in a maze. I did. Over the years I’ve had five key realizations. They build on each other in a logical order, below. I wish I could have read this post when I started questioning! Bookmark this if you’re not quite ready for it yet. Better yet, add a comment about where you’re at.

Crochet Hook Sizes Explained

Charts of all crochet hook Sizes! Easy to see size gaps. My size charts (for steel, for medium-range, and for jumbo hooks) include the MISSING sizes.
Vashti’s Charts of Crochet Hook Sizes

First, download my Crochet Hook Size Charts, and then the Deluxe Crochet Hook Diagram. You might want to refer to them as you read further.

I originally created these charts for my own use.The PDF has more information than the three charts pictured at the top of this blog. For example, two more columns, and how to use the charts and understand the size increments. Each chart is a full-page size:

  1. All Steel Crochet Hook Sizes in 0.10 mm increments: 0.40 mm – 3.50 mm
  2. NON-Steel Crochet Hooks, medium-range in 0.25 mm increments: 1.75 mm – 7.75 mm
  3. NON-Steel Crochet Hooks, jumbo sizes in 1.00 mm increments: 8.00 mm – 36.00 mm

Crochet Hook Sizes, the Five Keys

1. I watch exactly where on the hook I make each stitch.

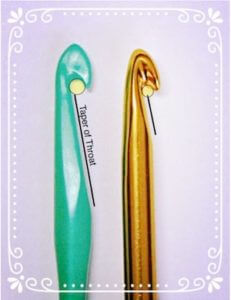
I especially watch the starting loop on the hook because it will become the top two loops of the new stitch. My goal is to avoid forming stitches on the tapered part (“throat”) of the crochet hook.

Some hooks have such a long throat that I can’t avoid making my stitches there. This is a big deal with some stitches. The taper will give my tall stitches loose top loops.

Pictured at right is my first crochet hook (green) and one of my current favorites (gold). My green crochet hook made my stitches look more stringy and uneven than they had to, even for a newer crocheter.

A big revelation for me (thank you Nancy Nehring) was that the crochet hook’s true size is where my stitches are made on it. So the other reason I watch where I make stitches on the hook is to know where to measure the hook size.

2. I treasure my slide gauge tool.

Needle gauges, the kind with holes, are everywhere. They’re even given out for free at yarn shops and conferences. I tossed them all out and only use a slide gauge. If I could find a reliable source for my favorite slide gauge I’d have it in my shop already. Lacis has had this one for a long time. It’s now also at JoAnn Fabrics, Amazon, Walmart, etc. Here’s another one. You can also search for millimeter calipers.

Once I know where on the hook I make my stitches (see #1 above), I measure that with a slide gauge or caliper. I get my true size of each hook in a jiffy. No forcing a hook in or out of the holes of a needle sizer with the risk of scratching the hook in the process!

When I did this with all of my crochet hooks, I found out that about a third of them were not the sizes I thought they were (based on how I use them).

3. I base my stitch gauge on my hook size.

Beginner slip stitch crochet with a big hook!
So stretchy! Easy slip stitch Expedient Cowl.

At some point in my crochet life I realized why we have so many crochet hook sizes. When the stitch gauge is based on the hook size and not on the yarn thickness, or personal habit, some amazing crochet fabrics are possible! Starwirbel, Weightless, stretchy slip stitches, and many more.

There are two more reasons: it’s the way to get the most polished stitching gauge for each project. It also standardizes our results as an international crochet community.

Before this realization I thought the different hook sizes were there to make crocheting with different yarns more pleasant. “I think this yarn is too thick for this hook. Must mean I need a bigger hook size”. That’s a fine reason, but if it were the real reason for the sizes, we’d only need about eight sizes—one per yarn thickness category. See the How Many Crochet Hooks? section of my other crochet hook post.

4. I think in millimeter (mm) sizes.

Instead of the “H hook” of my childhood I now think “5 mm hook”. It has improved every day of my crocheting life. I no longer have to deal with traditional hook size systems that are riddled with overlaps and exceptions.

Not only that, the mm sizing makes it plain where there are gaps in the standard hook sizes, and how large each gap is. This in turn opened up to me a wonderland of in-between or nonstandard crochet hook sizes. Hello handmade crochet hooks, imported hooks, and other collectibles, including odd manufacturing runs of established brands.

5. The actual number of crochet hook sizes? Infinite.

The American Craft Yarn Council (CYC) maintains a chart of 29 steel and 28 non-steel crochet hook sizes according to American and British standards. It’s a good start and includes equivalent mm sizes. I build on it in my crochet hook sizing charts by adding Japanese hook sizes and placeholders for missing sizes.

The millimeter measure accounts for all possible hook sizes, including the sizing standards of other countries. I love seeing how US, UK, and Japanese hook sizes all fit together.

Does an infinite number of crochet hook sizes seem overwhelming? Every crocheter needs a different number of sizes. Check for yourself with my list of five factors.

How Did We Get Here?

I think of the non-metric crochet hook sizing systems as being two great crochet traditions (cotton/silk threads vs. wool yarns) that got mushed together, then sprinkled with sizing standards of different countries. It’s quite the heady brew.

Steel crochet hooks were designed for lace crochet with thread. Steel is very strong for even the finest hook sizes. They’re numbered from 00 to 14 (sometimes 16). The larger the number, the smaller the hook.

Non-steel crochet hooks, whether made of aluminum, wood, bamboo, plastic, or glass, get numbered and lettered sizes (from B to U so far) according to an American system. Sizing systems in other countries use different numbering systems. Unlike the steel sizes, the large the number, the larger the hook.

Let’s talk about the size “G” hook. The CYC lists three non-steel G hooks: 4.0 mm, 4.25 mm, and 4.5 mm. Each one is a useful size. Labeling all of them size “G” is unnecessarily confusing.

The Way of Peace

Just focus on the millimeter size. A crochet hook that measures 4.0 mm (on the part of the hook where you make the stitches) will always be that size for you. It won’t matter what it’s made of, where you live, or which country manufactured the hook. Feels peaceful, doesn’t it?

I’ve added this to an experimental blog post series: Vashti’s How to Crochet Book
Posted on Leave a comment

Stitch Pattern Spin-Offs from Eilanner

A "spin-off" stitch pattern from Eilanner design, here tested in tencel thread and draped on a mannequin
This is the gauge swatch from the new Eilanner Shawl pattern, but I used tencel thread and a giant hook for kicks. So airy! It inspired me to try draping it on a mannequin different ways. View full size.


I released a new Tunisian crochet pattern the other day. There’s a lot going on in it! I think of the design as containing modules of mini-patterns. Some of them hint at new stitch patterns.

Seeds of New Stitch Patterns

Often if you change one thing about a stitch pattern you can get a whole new effect that’s cool enough to count as a new stitch pattern. (This would be a good newsletter issue, come to think of it…) Here are some I swatched while Eilanner was being edited, and the things I changed to generate them. I posted them to Instagram.

Change the Yarn and/or Gauge

An obvious way to get a new effect with a stitch pattern is to use a dramatically different crochet hook size, or yarn thickness/fiber type, or all of these (as in that first image above). Super summery look! Reminds me of tall grasses.

There’s something else going on with it too: it’s really just a gauge swatch pattern. The skill level for Eilanner is Experienced. Getting the exact gauge is not important for the pattern but I thought it would help some crocheters to focus on just the main stitch pattern without the fancy edging at both row ends and the constant increasing.

Know what else started out as “just a gauge swatch”? Fish Lips Scarf-to-Shrug!

By the way, if you’re interested in Eilanner but worry it’s too challenging, work up to it with its predecessors. Shakti is like “Eilanner 101” and Islander is “Eilanner 102”. (I named Eilanner after Islander.)

Repeat a Special Stitch Group All Over

Another way to do a stitch pattern spin-off is take a stitch group and repeat that. Here’s Eilanner’s “tattoo flower” eyelet group repeated as an all-over motif.

This right here is a fraction of the possible new stitch patterns to generate this way! For example, the eyelets could be grouped differently, or stacked in columns instead of spread out in an alternating way. Moving eyelets around is an art form in itself.

I haven’t even tried sprinkling in stitch texture contrasts. Have a look at what happened when I added a similar stitch texture: love knots!

I woke up this morning with another idea for a stitch pattern that will probably show up in Instagram once I swatch it up. (The way Instagram displays images helps me contemplate designs.)

Isolate One Key Stitch

Not every stitch pattern has a key stitch to isolate. Eilanner does, though: the shallow-extended stitch I blogged about last week. The swatch below is pretty rustic and it’s not easy to see what is different about the stitch, but have a look.

It’s kind of loose so that I can see what the stitch texture is doing. I chose Icelandic wool for this because I love that the shallow-extended stitch is like a reversible and non-curling version of Tunisian Knit stitch.

If you like seeing my experimental swatches, follow me in Instagram where I tend to post them first. And please tell me what you like or don’t about them! It inspires designs and class topics.

Eilanner Shawl

Eilanner Shawl by Vashti Braha: Lattice-Edged Tunisian Eyelets

Eilanner has been a new experience for me of many things. The flower “tattoo” accent and a row-shaping stitch at the back neck were fun to develop. So was getting fancy with the Return Passes, and experimenting with extended-stitch eyelets.

Eilanner means “islander” in Frisian. The lattice edging of Tunisian Islander, which is crocheted point-to-point along only one edge, inspired me to try it at both ends of each row. The self-edging contrast border widens gradually as the shawl widens.

Skill Level: Experienced

The return passes add an uncommon amount of special features. I also introduce a new stitch! For Eilanner it changes the row height at the back neck during the forward passes. It also makes the “tattoo-flower” eyelets pop.

Another reason for the Experienced rating is its lush built-in border: it starts in seed form at the bottom point and gradually widens. I see this unique Tunisian pattern as containing semi-independent mini-pattern modules within it.

Don’t be deterred! It’s a gradual roll out of pattern changes that happen at a measured pace designed to keep things interesting. I’ve provided a gauge swatch so that you can try the basic stitch pattern without the edging or starting in a corner. (Matching the stated gauge is not necessary.)

Visual aids: two stitch diagrams, and a schematic with signposts like a road map. Stitch close ups for both right- and left-handed crocheters are on the last two print-optional pages. As an advanced-skill Tunisian pattern this has more pattern abbreviations. For your convenience, every other pattern page has a Stitch Guide sidebar.

Either one of Eilanner’s older sister-designs—Tunisian Islander, Neck Latticewould be an ideal stepping stone to this pattern. If the lattice edging seems tricky, start with Shakti Scarfythings, which uses the same stitch but doesn’t include the border.

?After using this pattern, you will know (if you didn’t already):

  • How to start a lacy self-edged Tunisian triangle shawl at the bottom point and end at the top edge.
  • How to add a striking lattice border of tall, interlaced Tunisian crochet sts along both edges.
  • How to crochet netlike eyelets with simple extended stitches.
  • How to crochet a promising new Tunisian stitch!
  • How to use the Return Pass for lacy effects.
  • How to create a fancy “tattoo flower” detail.
  • How to add Back Neck shaping by changing row heights.

Finished Dimensions

Finished Size of Triangular Shawl (pictured): About 65″ {165.1 cm} wide from point to point and 25″ {63.5 cm} long at deepest point of triangle.

Materials

Hooks Straight or Flexible Tunisian crochet hook at least 19″ {48.3 cm} long: Size I/9 {5.5 mm} or size needed to match gauge. I used a set of interchangeable hooks to increase the cable length as needed. Regular crochet hook of the same size (used for border).

Yarn Used Newton Yarn Tencel Linen (75% tencel, 25% linen; 1450 yd [1326 m]/16 oz [454 g]; CYC #2): 625 yds. It’s listed as #3 DK weight but it’s closer to #1 Fingering. The final ropy Z-twist gives it a lovely surface but my tests suggest that it adds a strong bias to this pattern. If you’re crocheting right-handed, I recommend a yarn with a final S-twist for a weak bias that blocks out, especially a blend with drape, such as merino or alpaca with rayon. (Fine wool-blend yarns tend to have a final S-twist.) The blue Bijou Spun Llasa Wilderness swatch pictured below is great! It’s a #2 sport weight blend of 75% yak, 25% rayon.

Any yarn thickness will work; simply use a larger crochet hook size for a thicker yarn and test with the Gauge Swatch.

Notions 3 stitch markers that will fit easily around the Tunisian hook. Yarn needle for weaving ends.

Posted on 1 Comment

V-O-T-E Early and Often with Crochet

Crocheted letters V-O-T-E against sunrise-colored crochet background
View the image above full size.

Last week I used a new Tunisian crochet stitch to swatch up a few letters of the alphabet. You can see four of the letters above. (The background is something I crocheted for the kitchen years ago.) Just look at what I can spell! I also made an ‘L’ to spell LOVE. I’ll explain how to do the cool Tunisian stitch below.

Eight-Color Poster

Tunisian crochet letters spell V-O-T-E against a rainbow aran crochet background.
It came out to approx. 12″ x 14″. View full size in Ravelry.

I’m working on a newsletter issue (#95!) about COLOR. It gave me the idea to crochet a “poster” background for the letters using as many of my Lotus yarn colors as possible.

Does the stitch pattern of the background look familiar? Maybe not—it’s rarely done with color changes. (Not sure I’ve ever seen it in more than one color. I think it’s traditionally thought of as an Aran crochet texture in off-white wool.)

I used this stitch pattern for the Chainmaille scarf, in just one color. The shiny alpaca-tencel yarn gives it a very different look!

Chainmaille: Free for October

Add the Chainmaille pattern to your cart then use the code free-poster-stitch.

For the poster, just use four pattern repeats of the Chainmaille scarf. For the flatter middle section where the letters go, I did the [ch 1, skip next ch-space, sc] part of the stitch pattern across each row for about 18 rows, then resumed the Chainmaille pattern again. Use a shallow single crochet instead of a regular single crochet if you know how. (Keeps the background a bit denser.)

 The Tunisian Stitch I’m Excited About!

I don’t know what else to call it but a shallow extended knit stitch.

First you must do a row of Tunisian Extended Stitch (ExtTSS or as I much prefer to call it, TES). It’s how you crochet the next row into them that turns them into shallow extended knit stitches.

For the alphabet letters I did just one row of TES into the foundation chains: skip the chain nearest your hook, insert your hook under the bump loop of the next chain, yarn over and pull up loop; at this point you’d leave it on your hook for a TSS. Chain 1 and it becomes a TES. To continue, [insert hook under the bump loop of the next chain, yarn over and pull up loop, chain 1] in each remaining chain of the row.

Standard return pass: chain 1, then [yarn over and pull through next two loops on hook] until one loop remains on the hook.

Have a look at your TES row. Compare them to TSS. The chain-1 you added to each TSS doubles its height and adds a horizontal loop on the back of the stitch. See it? See how it resembles the horizontal loop on the back of a single crochet stitch? (See this blog post about that “third loop”.)

Close up of how to crochet a shallow Tunisian extended knit stitch.
This is the front of an extended Tunisian stitch. (This one is an extended knit stitch: a TEKS.) If your hook went where the red arrow points—between the front and back vertical bars—you’d make a TEKS. Insert the hook where the yellow arrow points and it becomes a SHALLOW TEKS.

To do a row of shallow extended knit stitch: chain 1 to begin the row (count as first stitch), *insert hook knitwise (between the front and back vertical bars) and under the lower horizontal “bump” loop (as seen on the back) of the next stitch, yarn over and pull up a loop, chain 1. Repeat from * in each remaining stitch of the row.

Return pass is the same.

As with all occasions when you’re crocheting shallow stitches, the looser your gauge is, the easier it is to pick up speed crocheting them.

Diamond Ennis

This two-color convertible rhombus shape makes the most of one of my favorite things: Tunisian filet structure and drape. Looking for the triangle shawl? See the Ennis Revelation set.

Add two beaded ties for a shoulder layer that stays where you drape it. Add two more ties and it converts to a stunning halter top.

The ties are designed to be repositionable. Add, remove, and relocate the ties anywhere, easily. They’re crocheted with Tunisian stitches and the beaded fringe ends are done with a crochet hook.

The size Small shown here required only 170 yards (two Lotus Snack mini-balls) and could be completed in a day. Tunisian lace doesn’t use up a lot of yarn, and looks pretty on both sides.

The pattern includes changes for Medium, Large/1X, and Plus sizes. It has a stitch diagram, schematic, and plenty of leftie-friendly extra information.

This Diamond Ennis pattern is also in a set called Ennis Revelation. The other pattern in the set is a triangular shawl that was my first and most dramatic Tunisian filet design, published as Ennis in Interweave Crochet Magazine, Summer 2013 issue.

The original Ennis inspired the Aero series: Aero, Warm Aeroette, Aery Faery, and Aquarienne, as well as more designs in progress, classes, newsletters, and blog posts over the years. I’ve added links to some of these in this pattern.

Skill Level

Tunisian Intermediate. With this pattern you’ll learn how to crochet a diamond shape from the center out. You’ll decrease along only the “easy” edge (the starting edge of the forward passes).

Is this your first Tunisian filet project? Try a few different crochet hooks; a different surface finish may offer more control when making stitches with many yarn overs. If the numerous yarn overs remain challenging, start with the Aery Faery or Warm Aeroette pattern instead. They were written with Tunisian filet beginners in mind.

I’ve kept abbreviations to a minimum.

?After using this pattern, you will know (if you didn’t already):

  • How to apply principles of filet crochet to Tunisian stitches for a strikingly lacy net.
  • How to manage different kinds of loops held on the Tunisian crochet hook: temporary vs. Tunisian yarn overs, and completed stitches.
  • How to make and drape a “diamond” (rhombus) as a capelet-style wrap, and halter top.
  • How to edge Tunisian crochet with filet spaces as you go.
  • How to crochet beaded-fringe removable ties.

Finished Dimensions

Measured flat, blocked. Dimensions are given for sizes X-Small/Small, with Medium and Large in parentheses. Pattern has more details on customizing the dimensions and yarn amounts.

  • Halter Vest: Torso circumference is 38 (41.5, 45)” {96.5 (105.4, 114.3) cm}. Each solid-stitch bra cup section spans approx. 7.5 (8.5, 9.5)” {19.1 (21.6, 24.1) cm} in height and width. Neckline drop is 12 (13, 14.5)”.
    The ties add range to these final dimensions.
  • Shoulder Drape: 38 (41.5, 45)” long x 12 (13, 14.5)” wide {105.4 (114.3) cm x 33.0 (36.8) cm}.

Materials

Straight or Flexible Tunisian crochet hook at least 13″ {33.0 cm} long: Size G/6 {4 mm} or size needed to match gauge.

Yarn DesigningVashti.com Lotus (52% Cotton, 48% Rayon; 256 yds/235 m per 3.5 oz/100 g skein): This yarn comes in two amounts. This one is the original 256-yd ball. See below for the 85-yd “Snack” mini-ball. Use one 256-yd ball if you want to make a one-color version in any size. For the 2-color version, use one ball of each color for the Plus sizes.

  • Yarn Used for Diamond Ennis Shown: DesigningVashti.com Lotus Snack mini-balls (52% Cotton, 48% Rayon; 85 yds/77.7 m per 1.16 oz/33 g skein): 1 (2, 2) balls each of Satin Grey and Lavender Ice. Add 40 yds more per Plus size (see p. 9) and use the 256-yd ball size listed above.
  • Substituting Yarns: Pattern works the same if you use one color throughout. The dramatic filet border is created as you complete each row, so a long-striping yarn would work well. Choose a yarn with a recommended crochet hook size range of E/4–G/7 {3.5 mm–4.5 mm}. Or use any yarn weight and a hook size that is appropriate for it.

Large Seed Beads and a steel hook (optional for ties): 18 seed beads per tie. Capelet style needs two ties (36 beads) and the halter style needs four (72 beads). The bead holes need to be large enough for a loop of your yarn to be pulled through with a steel crochet hook. For the Lotus yarn I used size 6° “e-beads” and a size 10 {1.3 mm} steel hook.

Notions: Two stitch markers. Scissors. Yarn needle.